Key Steps in WordPress Site Building

As one of the world’s most popular open-source CMS platforms, WordPress maintains its dominant position in the website development field thanks to its highly mature ecosystem of themes and plugins, as well as an architecture that is highly inclusive to all types of users—from beginners to experienced developers. With its rich visual editors and modular tools, even users without programming backgrounds can easily build fully functional websites, greatly lowering the technical barrier of site building.
However, it must be made clear that truly high-quality website development is not as simple as "zero threshold, online in a few hours." Some exaggerated claims commonly seen online often overlook deeper aspects such as website customization, user experience, interactive features, and performance optimization. While WordPress is flexible enough, as an open-source system based on PHP and MySQL, its true value lies in how developers leverage its underlying logic combined with frontend design, plugin extensions, and backend interaction to create digital products that fit their target audience and business goals.
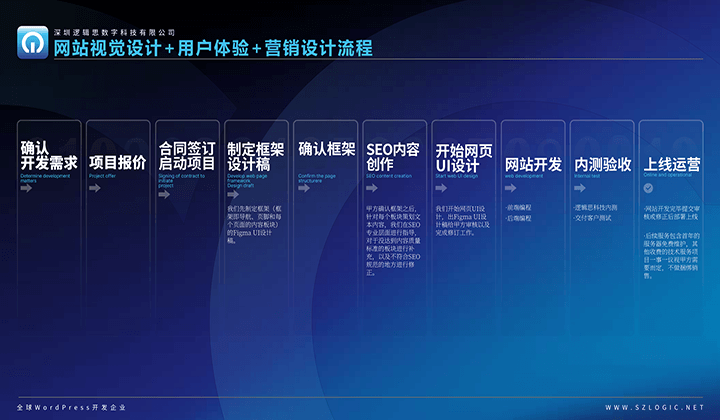
This article outlines key WordPress development steps—from planning and theme choice to function setup and page building—helping readers master site launch and ongoing optimization.
To facilitate readers in quickly obtaining the information they need based on their own requirements, this article organizes the main content into a clear structure, listed in the table of contents below. Although the ideal reading order is top-to-bottom sequential reading, considering that some readers may only focus on specific sections, you can directly click the chapter titles you are interested in to quickly jump to the corresponding content, saving time and improving reading efficiency. The detailed table of contents is as follows:
- Install WordPress on a host or VPS
- Choosing a WordPress website theme
- Essential system settings in the WordPress backend
- Installing Elementor Pro as the page editor for WordPress websites
- Using Elementor Pro to start building webpage elements
One、Installing WordPress on a Host or VPS
Before starting to design and build a WordPress website, you first need to have your own hosting server or VPS. This is the foundational requirement for all website development based on the WordPress.org architecture. If you are not clear about the difference between “hosting” and “VPS,” or if you are still confused about the positioning of WordPress.org and WordPress.com, it is recommended that you first visit the “WordPress Tutorials” section on my website to review related beginner content and fill in this basic knowledge gap.
The website building process explained in this article is based on the open-source content management system (CMS) provided by WordPress.org. Unlike the SaaS hosting model of WordPress.com, WordPress.org allows users full control over the source code and freedom to deploy the website, customize themes, and develop functionalities. Therefore, you need to deploy the main WordPress program on your own server and complete a relatively complete installation and configuration process.
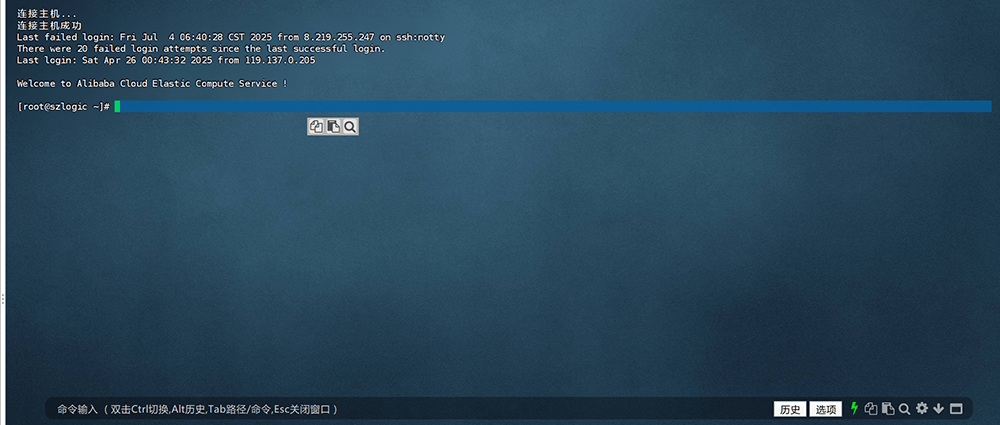
In this section, I will use the BT (BaoTa) Panel as an example environment to break down in detail how to complete the deployment and installation of WordPress on this panel. Even if you use other server management panels, the overall process has some reference value.
One-click deployment of WordPress on BT Panel

Referring to the screenshot above, find the WordPress one-click deployment program in the “Software Store” interface on the left toolbar of the BT Panel, then click the “One-Click Deploy” button on the right. The operation interface will then jump to the WordPress installation process.
Necessary settings for WordPress installation
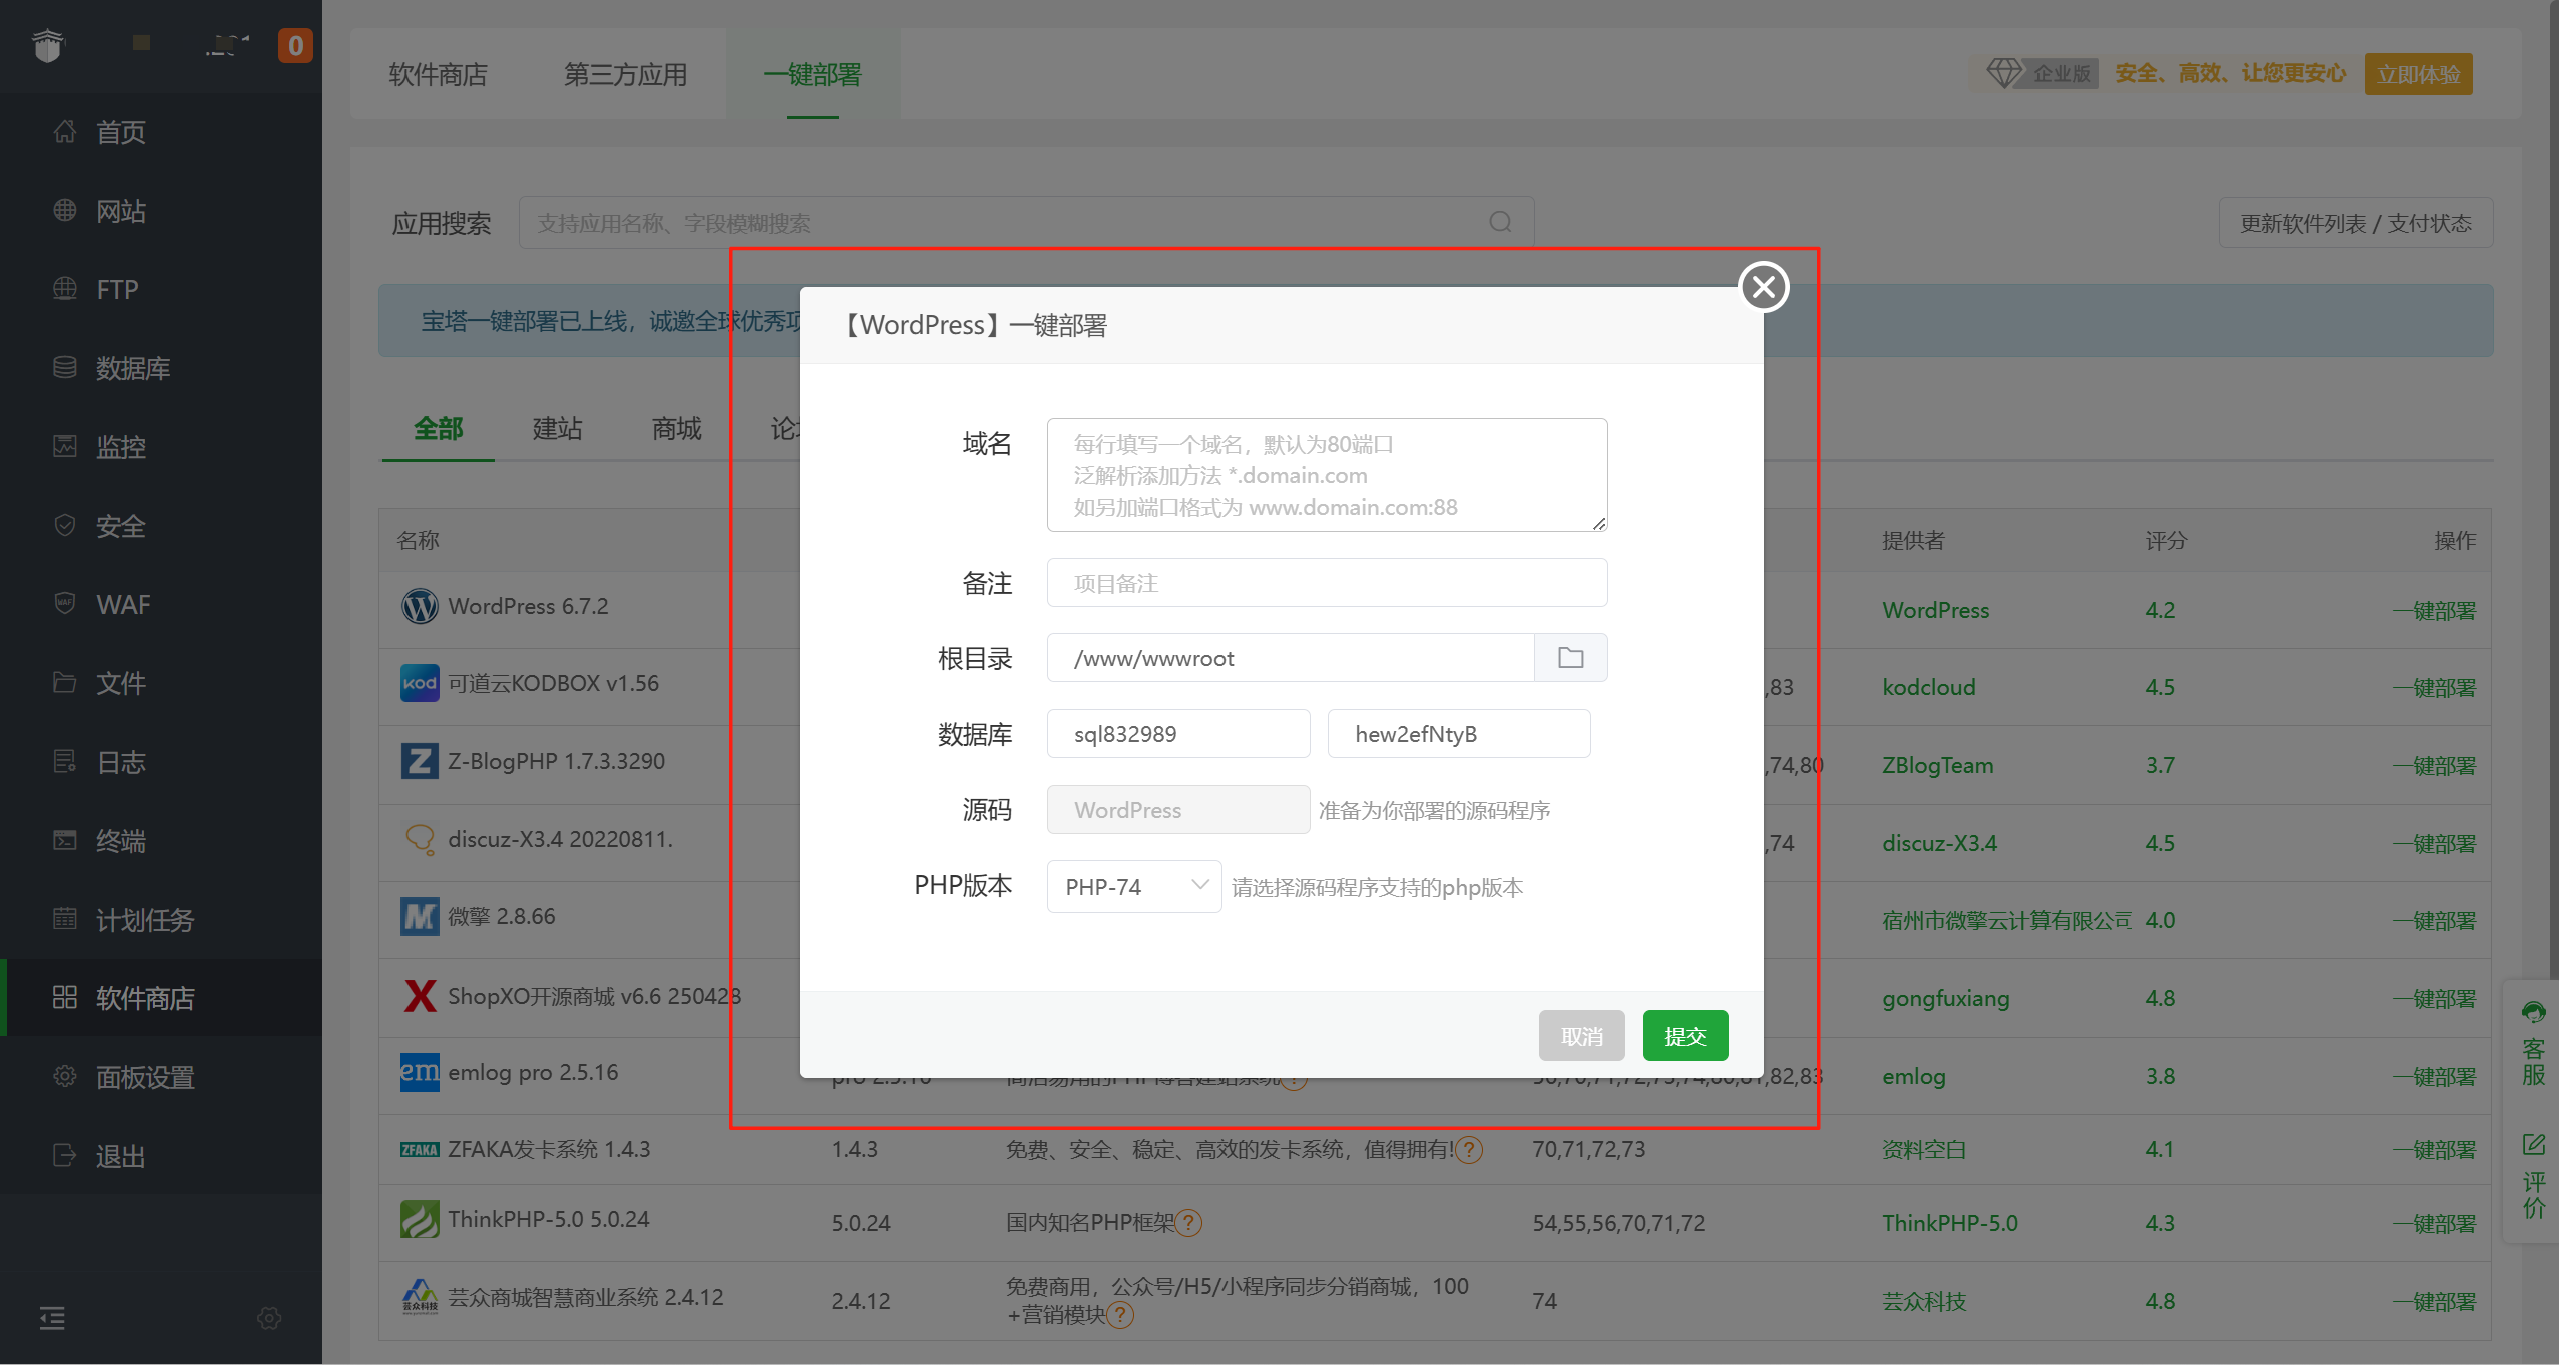
This step is the core settings part of WordPress one-click deployment. Each item must be set correctly to complete a successful WordPress installation. Before proceeding, please ensure that the DNS resolution of your domain name has been completed, with the A record correctly pointing to the current server IP address where WordPress one-click deployment is being performed. Also, ensure that the web runtime environment such as PHP, Nginx, and MySQL has been deployed. For the WordPress one-click deployment settings window shown above, I will now explain the correct way to set each item.
Domain
Fill in your website domain names, including both www and non-www versions, one domain per line, as demonstrated in the inline code block below.
szlogic.net
www.szlogic.net
Remarks
This is a remark field for the deployed project in the website list, not mandatory. It is only used for identifying the website project. You may fill it in or ignore it; it will not affect the program operation.
Root Directory
The root directory refers to the location on the server where website files are stored. Unless there are special requirements, it is recommended to keep the default www/wwwroot, which is the default directory for most Linux server web program files.
Database
After deploying the database runtime environment on the Linux system, a dedicated database will be created simultaneously when creating a new website project. This database will serve as the core data storage and management system for the WordPress website, responsible for storing articles, user information, settings, plugin data, and all other dynamic content. It is an indispensable part of the website’s normal operation.
PHP Version
The core language of WordPress is PHP. Therefore, PHP is an indispensable program in the WordPress runtime environment. Unlike MySQL or Nginx, multiple PHP versions can be deployed on a single Linux system. If your Linux system has only one PHP version, the system will select it by default in the one-click deployment settings window shown above, and you can keep the default. Conversely, if there are multiple PHP versions, select the needed PHP version as required.
Two、Choosing a WordPress Website Theme

After successfully installing WordPress on your host or VPS, the next step is to choose a suitable theme for your website. The theme is the core of WordPress website design and development; it determines the site’s appearance, structure, layout, and some functionality. Each time you install WordPress, the system automatically pre-installs a default theme. However, for most users with some WordPress experience, the default theme usually does not meet personalized needs and is insufficient for subsequent custom development requirements.
Whether you choose to buy a ready-made theme from third-party marketplaces or use a lightweight theme suitable for secondary development and customization, all subsequent page element construction, content presentation, and interaction design will be based on this theme framework. Therefore, choosing a theme that meets functional requirements and offers good extensibility is a key step in successfully building a WordPress website.
Three、Necessary System Settings in WordPress Backend
Before officially starting to build various page elements of the WordPress website, some necessary system settings must be performed in the WordPress backend. These basic settings are crucial for the normal operation of the website. They not only help ensure site stability and security but also lay a solid foundation for subsequent content management and feature expansion. If these settings are not correctly configured, unnecessary issues or failures may arise during later page construction. The following setting methods and key points will help ensure that basic configurations are in place early in the site development phase, thus avoiding unnecessary troubles later.
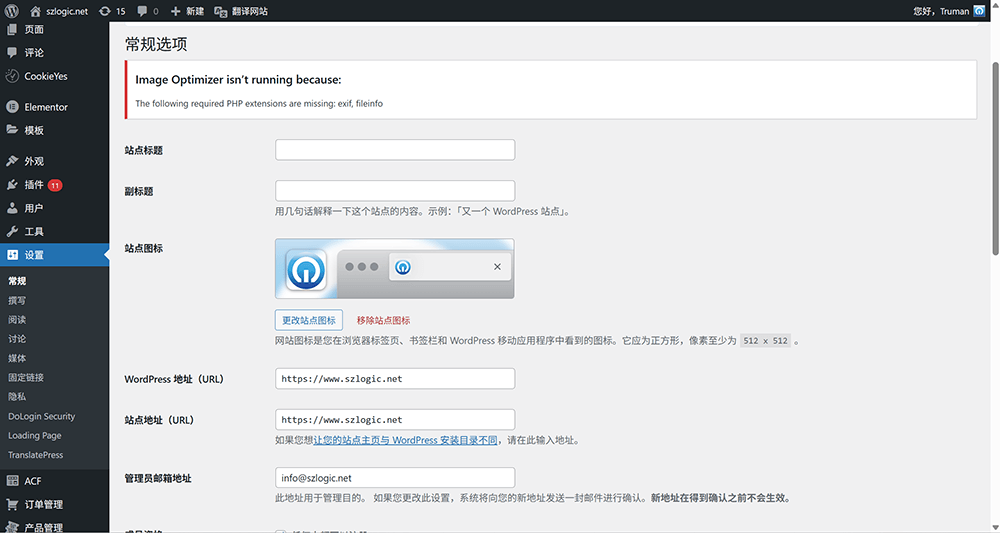
WordPress website site URL settings
In the WordPress admin dashboard, go to the left sidebar’s “Settings” > “General” page, where you can change and set the site’s domain name and protocol type. By default, the “WordPress Address (URL)” and “Site Address (URL)” in the “General” page use the HTTP protocol header. However, if you have already applied for and installed an SSL certificate on the server side, you need to change these two URL addresses’ protocols from HTTP to HTTPS to ensure site security and data encryption.
Switching to HTTPS enables encrypted connections, protects user information from third-party interception, enhances site trustworthiness, and complies with modern web security best practices. After this setting, all site traffic will be transmitted via encrypted channels, avoiding potential security risks.
After setting HTTPS, remember to clear caches and update internal site URL paths to ensure all pages and resources load correctly and to avoid “mixed content” issues.
WordPress website “Reading” settings
In the WordPress admin dashboard, go to the left sidebar’s “Settings” > “Reading” page, where you can find two crucial setting options: “Your homepage displays” and “Search engine visibility.” These two settings directly affect how the homepage is displayed and how the website performs in search engines.
First, under the “Your homepage displays” option, there are two display modes to choose from: “Your latest posts” and “A static page.” Selecting “Your latest posts” makes the homepage automatically show the latest blog updates, which is suitable for blog sites or frequently updated content websites. Choosing “A static page” sets the homepage to a fixed page, commonly used for corporate websites, brand sites, or pages requiring specific designs. This setting determines what users see as the homepage content when they enter the site.
Next, the “Search engine visibility” setting controls whether the site is allowed to be crawled by search engines. If the option “Discourage search engines from indexing this site” is checked, search engines will not index your pages, preventing your content from appearing in search results. This option is usually enabled temporarily during development or when the site is not ready to go live, to prevent unfinished content from being crawled by search engines.
These two settings have a direct impact on the website’s presentation and SEO performance, so it is essential to configure them appropriately according to actual needs when starting website construction.
Permalinks
Permalinks refer to the URL format settings for each page, post, and other content on the website. In WordPress, permalink settings help improve the website’s optimization in search engines and enhance user experience. The permalink settings can be accessed from the WordPress admin dashboard’s left sidebar under “Settings” > “Permalinks.”
WordPress provides multiple permalink formats by default, allowing users to choose the format that best suits their site needs. Common choices include URL structures based on post titles, dates, or categories. Additionally, WordPress allows users to customize the permalink structure according to actual needs. By adding specific tags in the “Custom Structure” field, URLs can be flexibly adjusted to better align with the site’s overall structure and SEO strategy. Common custom tags include:
% postname %: The title of the post or page% category %: The category to which the article belongs% author %: The author of the article% year %,% monthnum %,% day %: year, month, day of the article
For example, if you want the URL of the article to include category information, you can set the custom structure to: /% category %/% postname %/, so that each article URL will include its category and title, improving SEO and helping users better understand the page content.
Enable Child Theme
When installing and activating a WordPress theme, by default, the site uses the parent theme. This approach may seem simple and effective in the short term, but from the perspective of long-term maintenance and version upgrades, it can pose significant risks. The reason is that when the parent theme updates, any custom code, style modifications, or functional adjustments you made may be overwritten or lost. This means that without preventive measures, each time the parent theme updates, you would need to manually reapply or adjust these customizations, increasing maintenance complexity and risk.
To solve this problem, WordPress provides the "child theme" feature. By enabling a child theme, you can place all custom code, styles, and functional extensions inside the child theme instead of modifying the parent theme directly. This not only ensures that updates to the parent theme do not affect your customizations but also maintains the integrity and safety of your custom content during theme updates.
The process of enabling a child theme is very simple: first, create a new child theme folder, including a style.css and a functions.php file. The style.css defines the child theme’s information, while functions.php is used to enqueue the parent theme’s styles and functions. In this way, the child theme inherits all the functionalities of the parent theme, allowing you to customize freely without worrying about update impacts.
Four、 Installing Elementor Pro as the WordPress Website Page Editor

WordPress website page editors are not limited to just Elementor; there are also WPBakery and Gutenberg. These three are well-known page builders in the WordPress plugin ecosystem. However, in terms of user experience, Elementor is the largest and most widely used. The author most frequently uses Elementor for WordPress site building in daily practice, so Elementor will be used here for explanation.
Methods to install Elementor
You can install it directly through the WordPress plugin directory. The installation path is very simple: in the WordPress admin dashboard, click “Plugins” in the left sidebar, then select “Add New” to enter the official WordPress plugin repository.
Enter “Elementor” in the search box at the top right of the page, and the system will automatically display related search results. Find “Elementor Website Builder” in the list, click the “Install Now” button next to it, and once the installation is complete, click “Activate” to finish the plugin activation process.
After successful installation, Elementor will integrate its visual builder tool into the page editing interface in the backend. You can enter the editing mode by clicking the “Edit with Elementor” button, freely drag and drop components, and design page layouts and content.
How to purchase Elementor Pro
Note that the free version of Elementor provides basic page building features. If you need access to advanced widgets, theme builder, forms, dynamic content, and other extended functions, you must install and activate Elementor Pro. You can choose to purchase Elementor Pro directly from the official Elementor website or from domestic agents. Generally, purchasing from domestic agents also poses no risks, as they also offer genuine licenses. However, it is best to confirm with the seller before purchase whether the license is genuine and supports updates, to avoid unscrupulous vendors selling cracked versions as genuine licenses.
Five、Starting to Build Webpage Elements Using Elementor Pro
After completing all previous preparation steps, you can start creating new pages and enter Elementor’s editing mode for page construction. In Elementor’s editing mode, you can flexibly set layouts according to your design needs and use a variety of components to build page elements. Whether adding text, images, buttons, or more complex dynamic content and interactive effects, Elementor offers intuitive drag-and-drop operations that make web design simpler and more efficient.
With Elementor Pro’s advanced features, you can further expand page design options, such as customizing headers and footers using the theme builder, collecting user data with form widgets, and even setting responsive layouts for different devices to ensure the site looks perfect on all screens. During this process, Elementor’s real-time preview lets you instantly see the design results, ensuring every detail meets expectations.
Two ways to enter Elementor edit mode
There are two common ways to enter Elementor editing mode, and users can choose the most convenient method according to their needs.
Method One is through the WordPress backend page management list. When you select “Pages” > “All Pages” in the left sidebar of the WordPress admin dashboard, you will see all the pages created on the site. Find the page you want to edit in the list and click its name to enter the page detail management interface. At the top of this interface, you will see a button labeled “Edit with Elementor.” Click this button to enter Elementor editing mode. Note that for newly created pages that have never been edited with Elementor before, this is the required way to enter the editing interface for the first time.
Method Two is to access the page from the WordPress frontend and enter editing mode directly. When you are logged into the WordPress backend and remain logged in, open any page of your site in the browser. At the top of that page, you will see the WordPress admin toolbar, which includes an option called “Edit with Elementor.” Clicking this option takes you directly into the Elementor editing mode for the current page. This method is especially useful when you want to quickly edit the page you are viewing from the frontend.
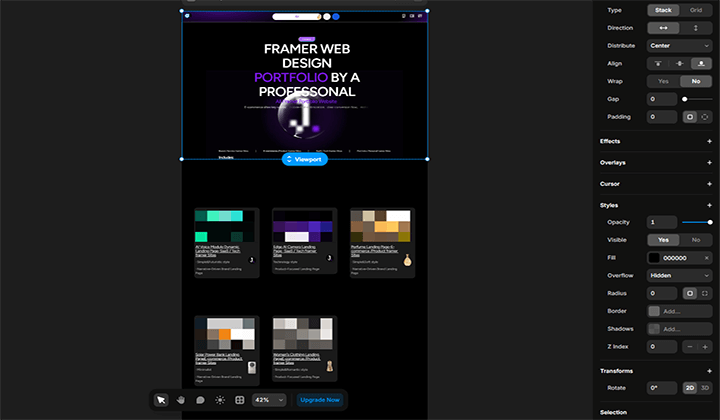
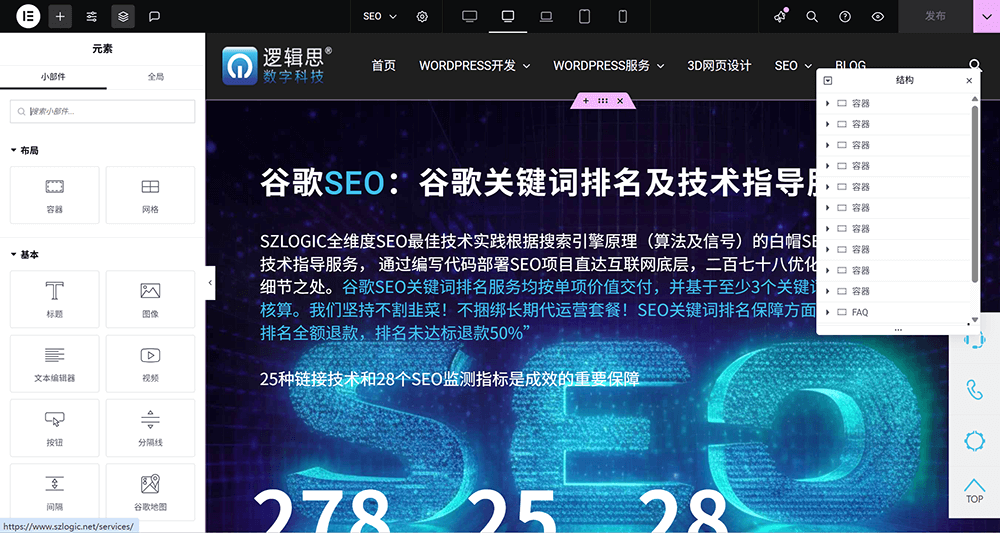
Parts of the Elementor operation interface
As shown in the above image, the Elementor interface mainly consists of three core parts: the central visual editing area, the left-side widget panel, and the navigator tool that can be summoned anytime on the right side of the page. These three parts work together to form the complete Elementor editing environment, enabling users to efficiently design and adjust webpage content.
The central area is the visual editing zone of the page, where all content layout, widget placement, and style adjustments can be done directly with a what-you-see-is-what-you-get approach. You can drag with the mouse, click to select, or directly edit text, and preview the page effects in real-time.
The left-side widget panel is the collection area for functional widgets. It includes all the tools Elementor provides (such as text boxes, buttons, images, videos, forms, etc.), as well as basic page structure components (such as containers, columns, spacing). You can drag the needed widgets directly from this panel into the central visual area to build your page content.
The navigator is an overview tool for the page structure, hidden by default on the right side of the interface. You can invoke it via right-click menu or shortcut keys. The navigator displays the current page layout hierarchy in a tree structure, allowing you to quickly locate, select, or reorder sections, containers, and widgets. It is especially useful when dealing with complex page structures.
Through the coordinated operation of these three areas, Elementor achieves a high degree of freedom and efficiency in page building, helping users easily create professional and beautiful web interfaces.
Conclusion
In this article, we have detailed the key steps of building a website using WordPress. From installing WordPress, selecting themes, to installing and using Elementor Pro to construct exquisite page elements, every step is crucial. Proper implementation of each step not only ensures the website’s stability and security but also greatly improves usability and user experience. It is worth noting that website building is an ongoing process of optimization and iteration. As technology advances and user needs evolve, the website should also be regularly updated in functionality and content. Mastering WordPress building skills and tools enables you to quickly respond to various changes within the WordPress environment and optimize or expand the site as needed.
If you have limited time and do not plan to operate it yourself but wish to entrust professional technical work to a more experienced team, you can choose to contact the SZLOGIC Digital Technology team. We specialize in WordPress website design and development and will provide you with efficient and professional solutions.
This article is copyrighted by Logic Digital Technology (SZLOGIC) . Personal sharing and learning are welcome. Unauthorized use for any commercial purposes or reproduction of this article is strictly prohibited.