2025 Twitter (X) Registration Guide – Tested & Effective

Twitter (now renamed X) underwent a major rebranding after being acquired by Elon Musk in 2022. One of the most notable changes was the renaming of Twitter to X, followed by the replacement of the iconic Twitter bird logo with a simple X letter icon. Additionally, Twitter's domain name also changed, with the original twitter.com being redirected to the new x.com via a 302 status code. This change marks a new brand direction for Twitter under Musk's leadership. It is worth mentioning that the 302 status code is a HTTP response code, indicating that the requested page has been temporarily moved to another URL or domain name, and the browser will automatically direct users to the new address.
Twitter offers users a service experience similar to that of China's Weibo, primarily through posting short blog posts in either multi-media combinations or simple text formats to record and share personal experiences and opinions. However, a key prerequisite for using Twitter is the ability to connect to international networks. Since Twitter is not directly accessible in China, its user base is relatively small. In fact, many domestic users are not even familiar with Twitter, and most of their understanding comes from forwarded content on domestic self-media platforms. As a result, many people are unfamiliar and confused about how to use Twitter, especially how to register an account. Even when some attempt to register on Twitter, they often face obstacles due to network or technical issues. Against this backdrop, the author wrote the article "Twitter Registration Tutorial [2025 X Registration Method, Tested and Effective]" to help more people successfully complete their Twitter account registration. Whether commercial users looking to use Twitter for cross-border e-commerce website promotion and traffic generation or individual users seeking international information and global social participation, both can follow the detailed steps provided in this article to register.
To make it easier for readers to choose the appropriate Twitter registration method, the blogger has carefully organized the table of contents in the article "Twitter Registration Tutorial [2025 X Registration Method, Tested and Effective]." The table of contents is located at the bottom of the article and is displayed in list form, providing clear navigation for the readers. Each item in the table of contents is linked to the corresponding section, allowing readers to quickly jump to the relevant part of the article with just one click, saving unnecessary browsing time. The table of contents for the article "Twitter Registration Tutorial [2025 X Registration Method, Tested and Effective]" is as follows:
Ⅰ、How to register a Twitter (X) account
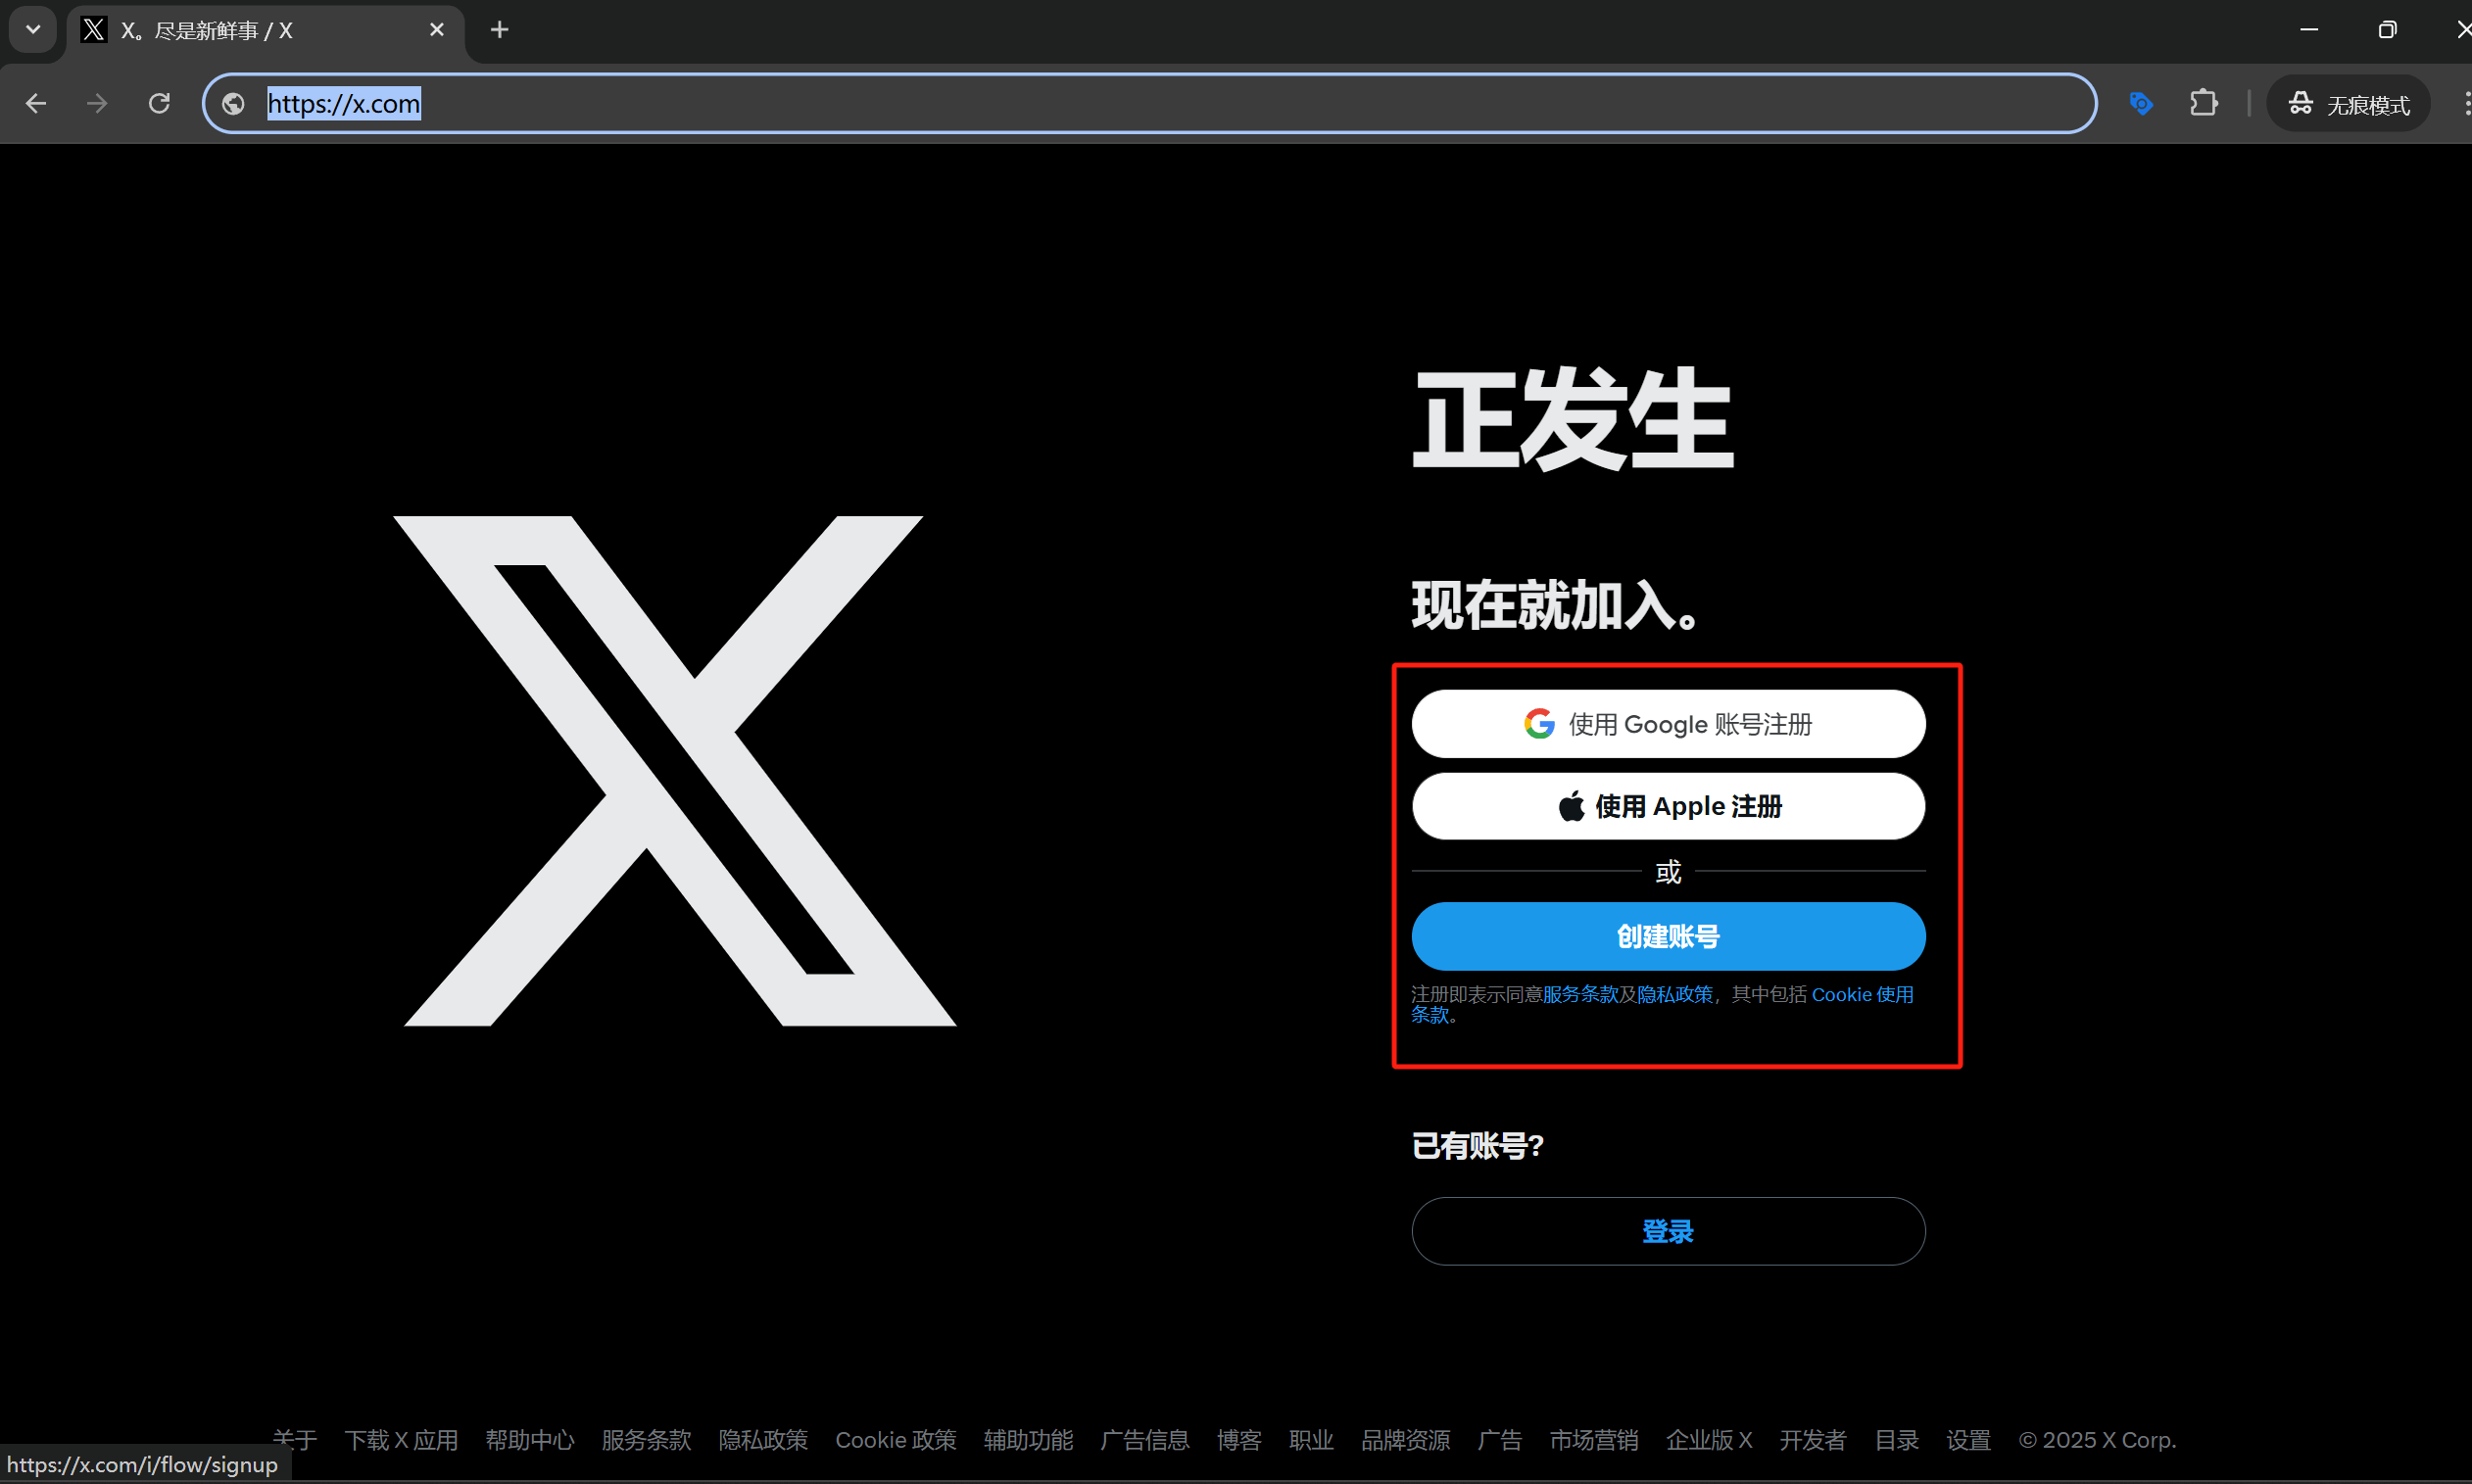
On a computer, you first need to ensure that a stable and available internet tool is enabled to successfully connect to international networks. Once the connection is successful, users can choose to use internationally common browsers, such as Chrome or Edge, as these browsers generally do not impose restrictions on accessing international websites. Next, you need to enter the homepage URL of Twitter (x.com) in the browser’s address bar and visit the site. Once the visit is successful, the browser page will load and display the Twitter login and registration page (i.e., Twitter's homepage), as shown in the image above. In the example image of Twitter's homepage, within the red-boxed area, you can see that Twitter provides three different ways to register an account. The author will now explain in detail the specific methods for these three registration options. No matter which one you choose, you will be able to successfully complete the registration for a Twitter account (Readers can choose the most suitable method for themselves to complete the Twitter account registration). The author will demonstrate each of the three options within the red-boxed area one by one: from top to bottom, they are registering with a Google account, registering with an Apple account, and creating a Twitter account. Each method will be shown step by step with pictures and text, and the author will guide everyone through the entire Twitter account registration process, ensuring that each reader can successfully complete the registration and start using Twitter.
1. Register a Twitter account using your Google account
The first method in the red-boxed area of the image above is to register a Twitter account using a Google account. For readers who already have a Google account (Gmail), this is the best choice for registering a Twitter account. The process of registering a Twitter account using a Google account is also the simplest; just follow the usual steps for logging into Google email for verification. For readers who do not have a Google account, you may first refer to the author's previously published article, Google Account Registration Tutorial (2025 Latest Gmail Registration Tested and Effective), to follow the steps in the article and complete the Google account registration, and then use the successfully registered Google account to follow the specific steps below to complete the Twitter account registration process.
(1) Step 1: Select the "Register with Google Account" method on the Twitter login registration page (click the "Register with Google Account" button)
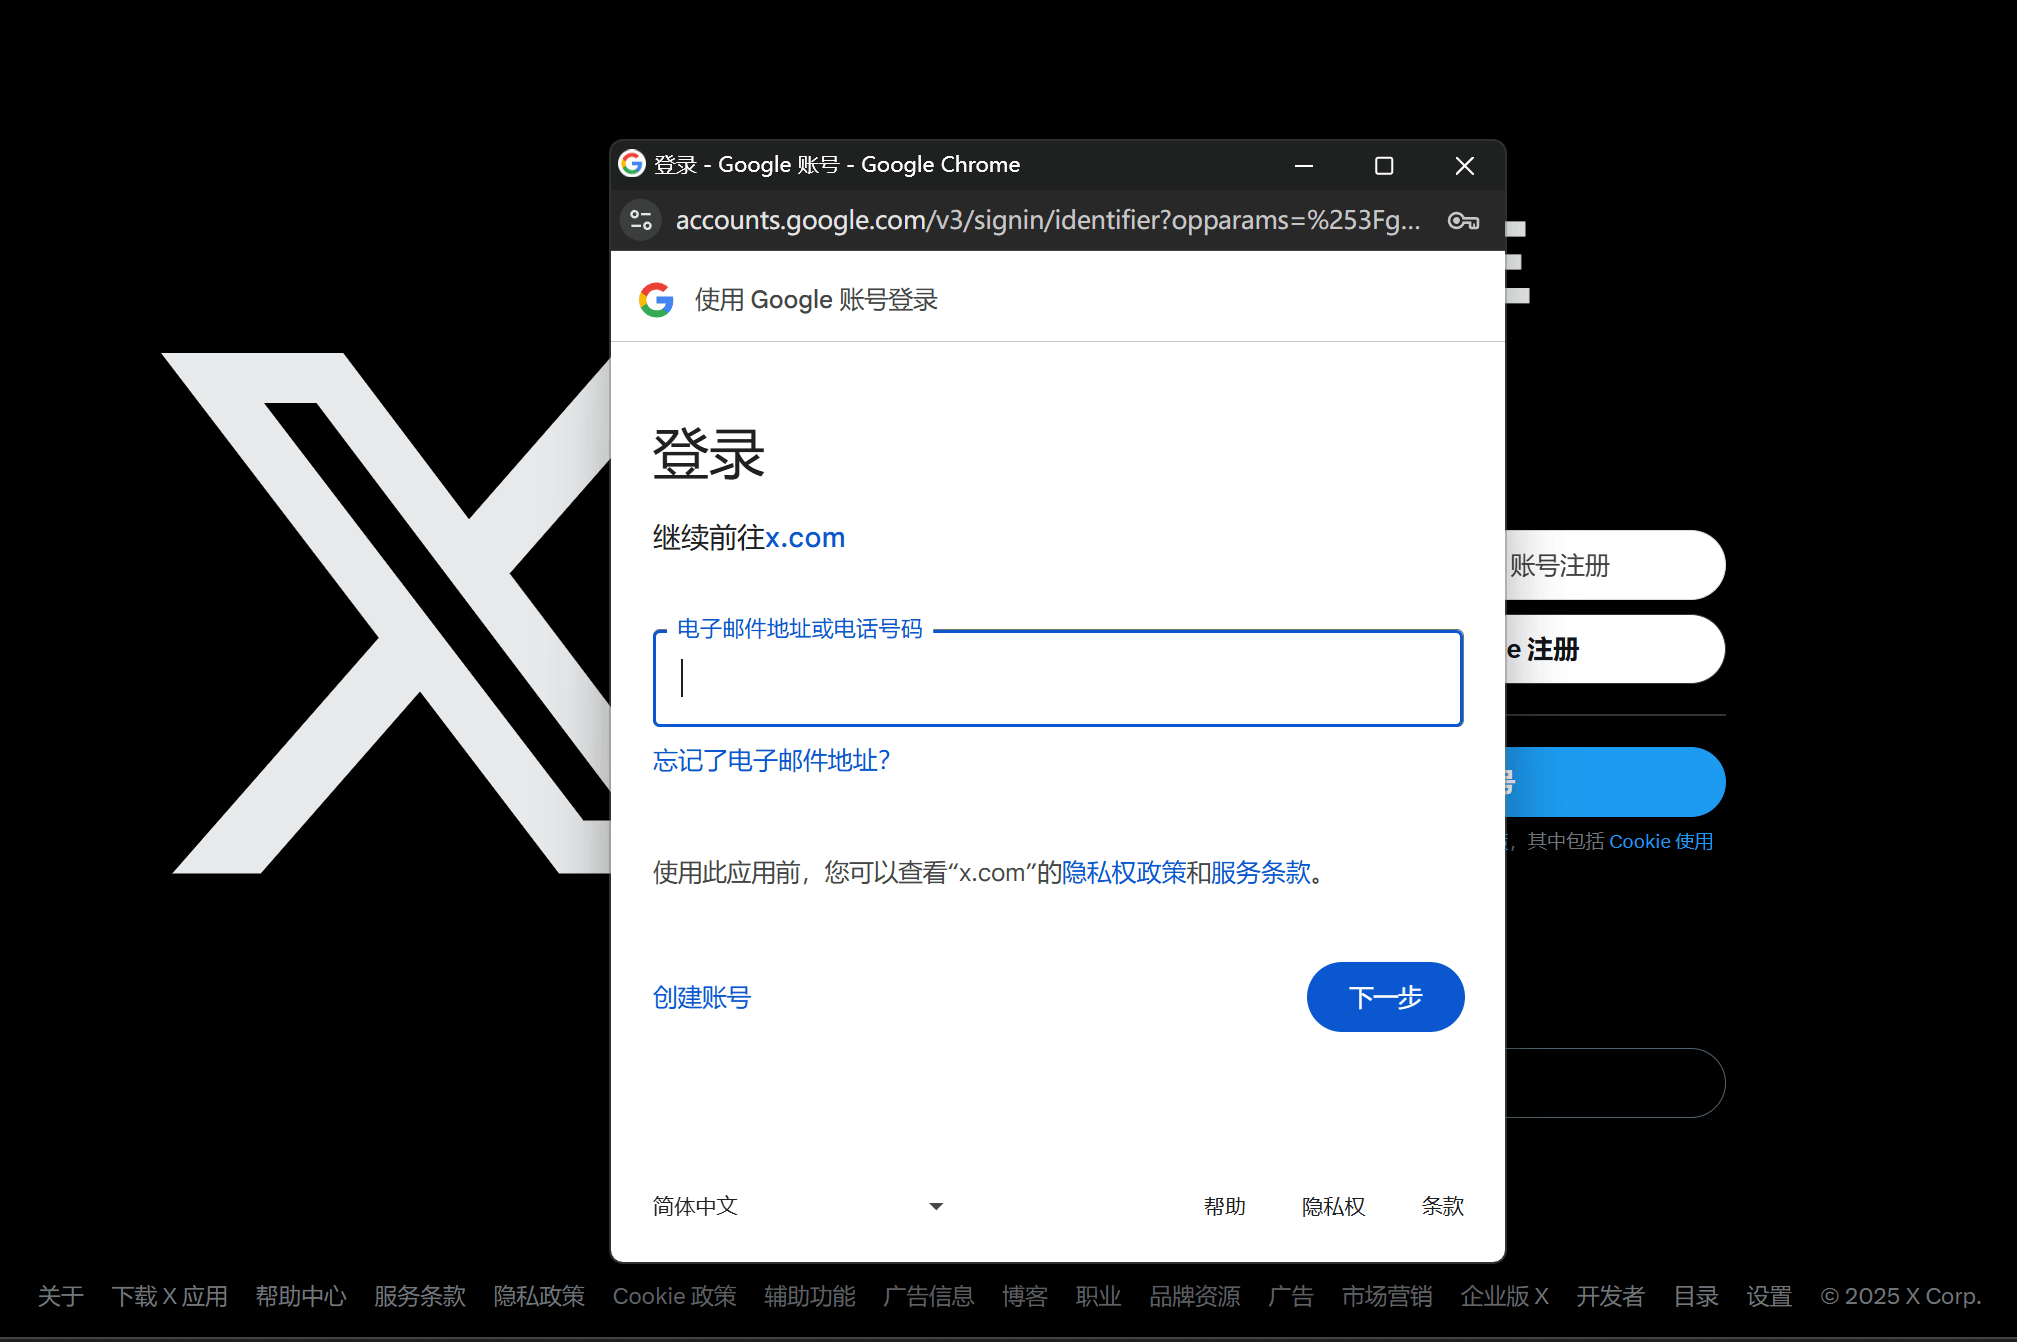
After clicking the "Register with Google Account" button on the Twitter login and registration page, a window will pop up as shown in the image above for logging in with a Google account. In the email address or phone number input field, enter your Google account information. After entering it, click the "Next" button to proceed to the next registration step.
(2) Step 2: Enter the Google account password used to register Twitter
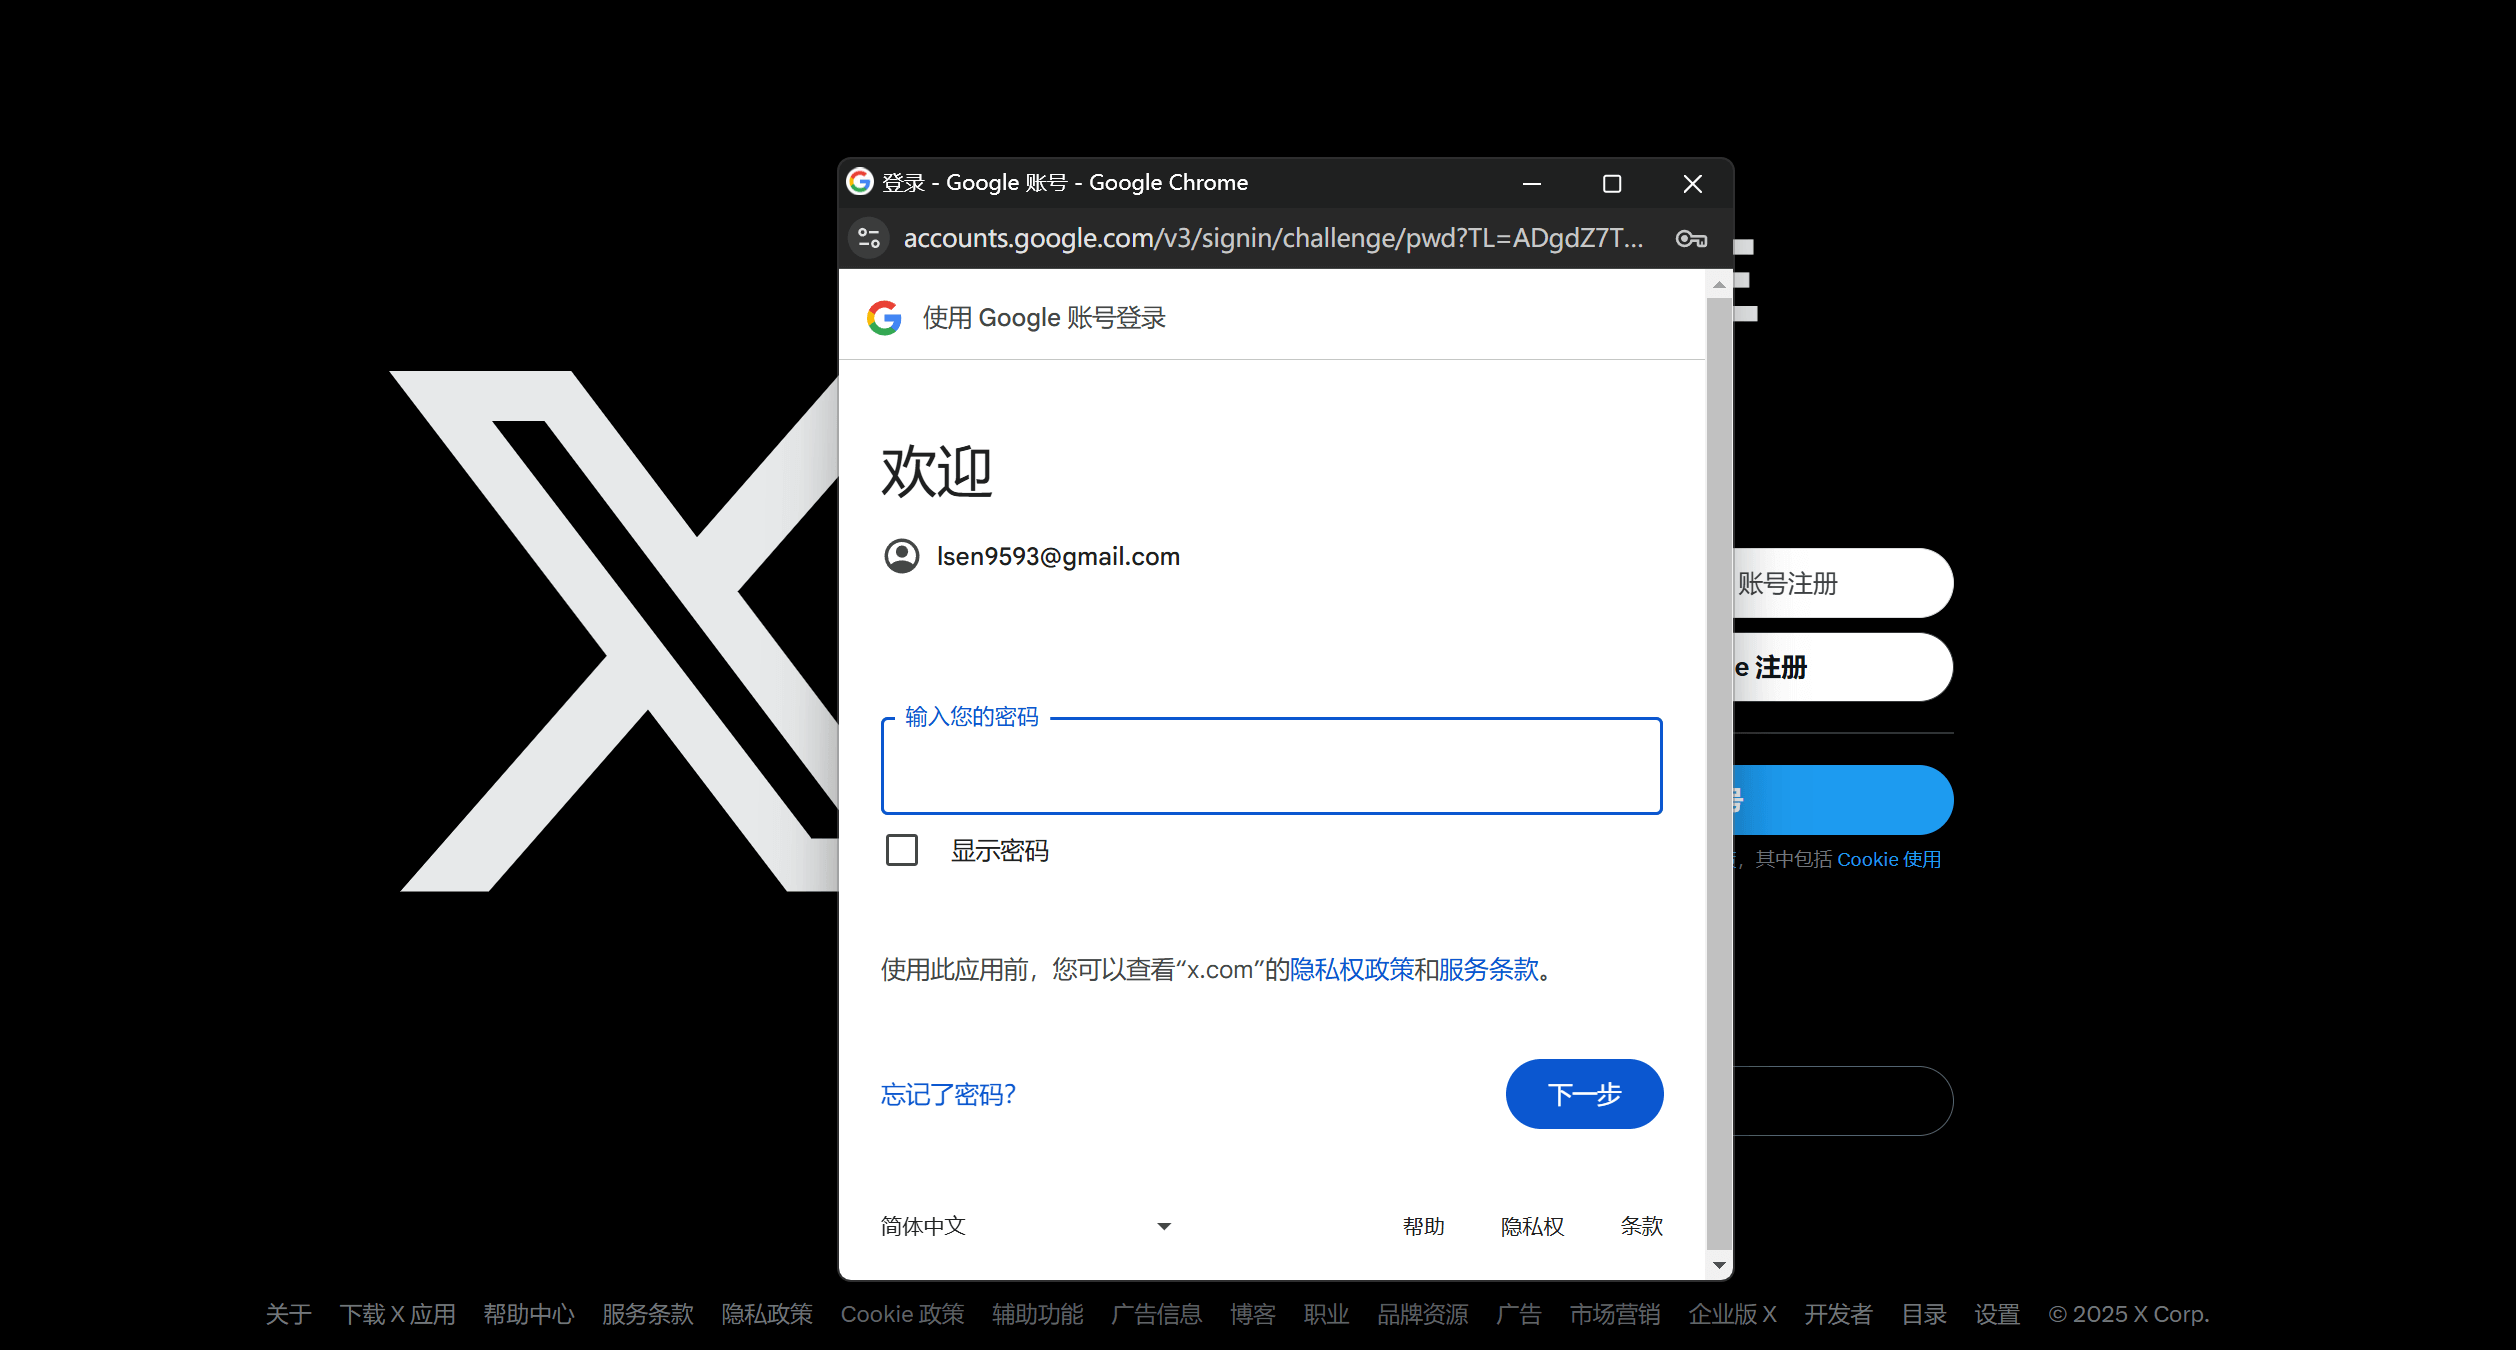
As shown in the picture above, this step is to enter the password of the Google account used in the previous step. After entering the password in the input box, if you need to check the correctness, check "Show password" to see the entered password characters. After checking, click the "Next" button to continue.
(3) Step 3: Confirm authorization to log in to Twitter with your Google account
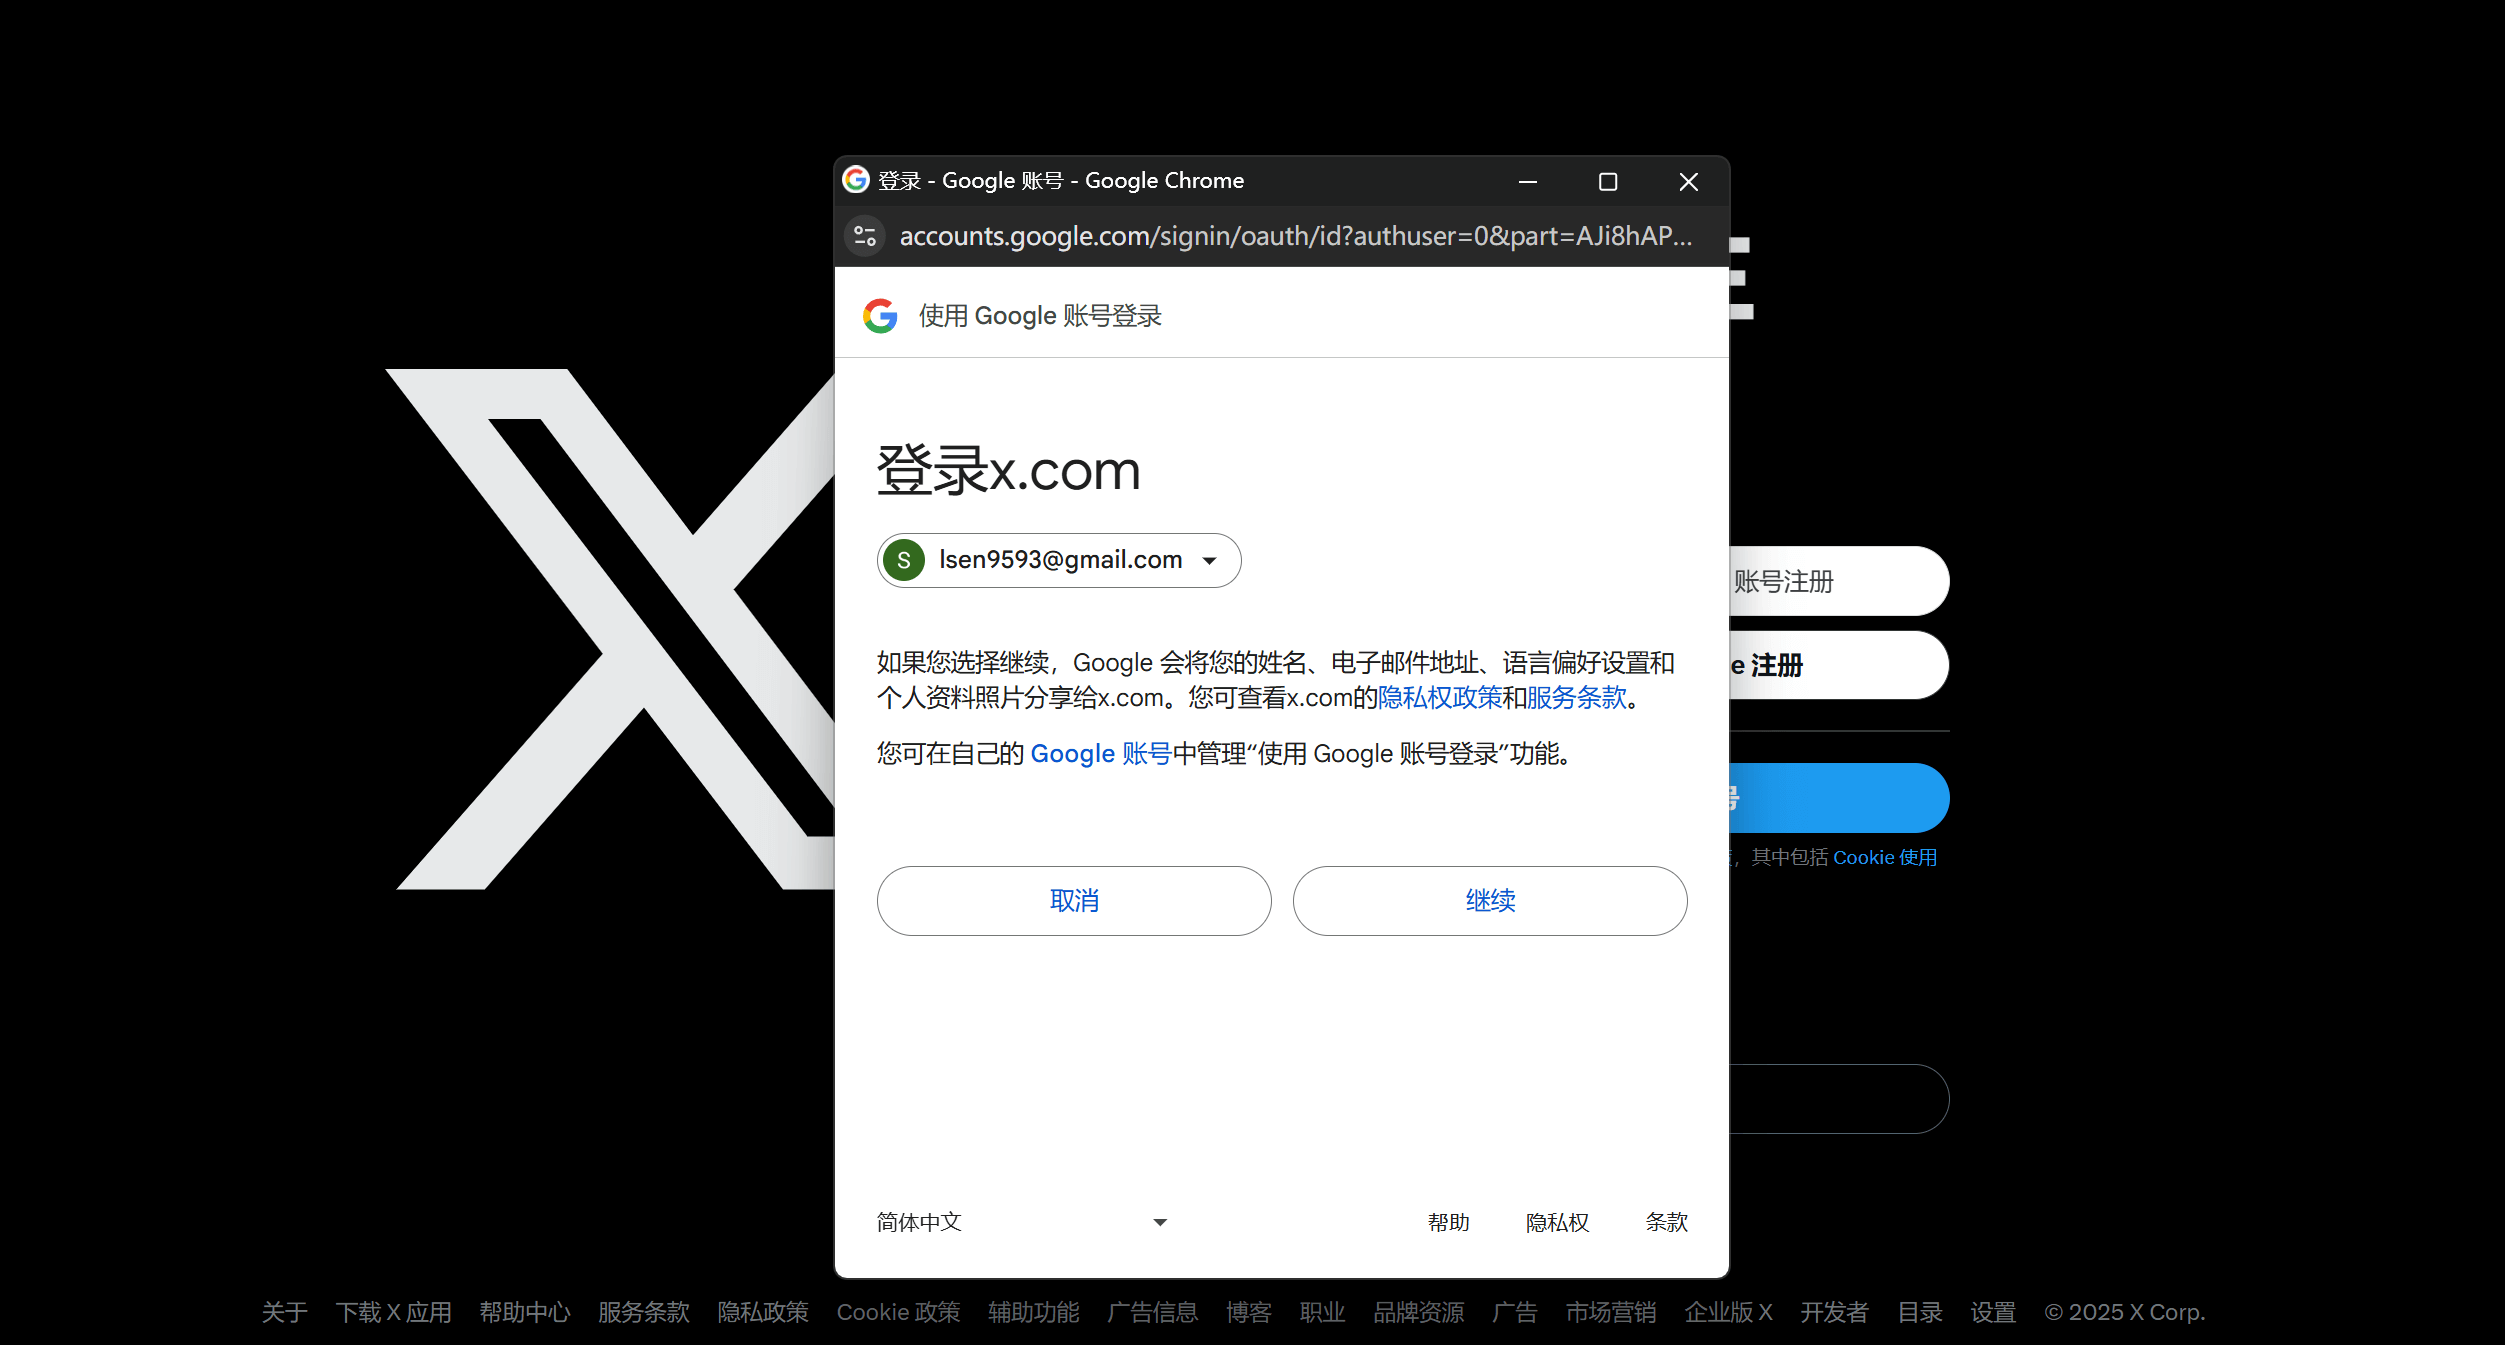
The operation interface is shown in the figure above. This is the authorization window prompted by the Google account to confirm the use of the Google account to log in to Twitter. Click the "Continue" button on the right to complete the authorization confirmation and go to the next step to continue filling in the Twitter account information.
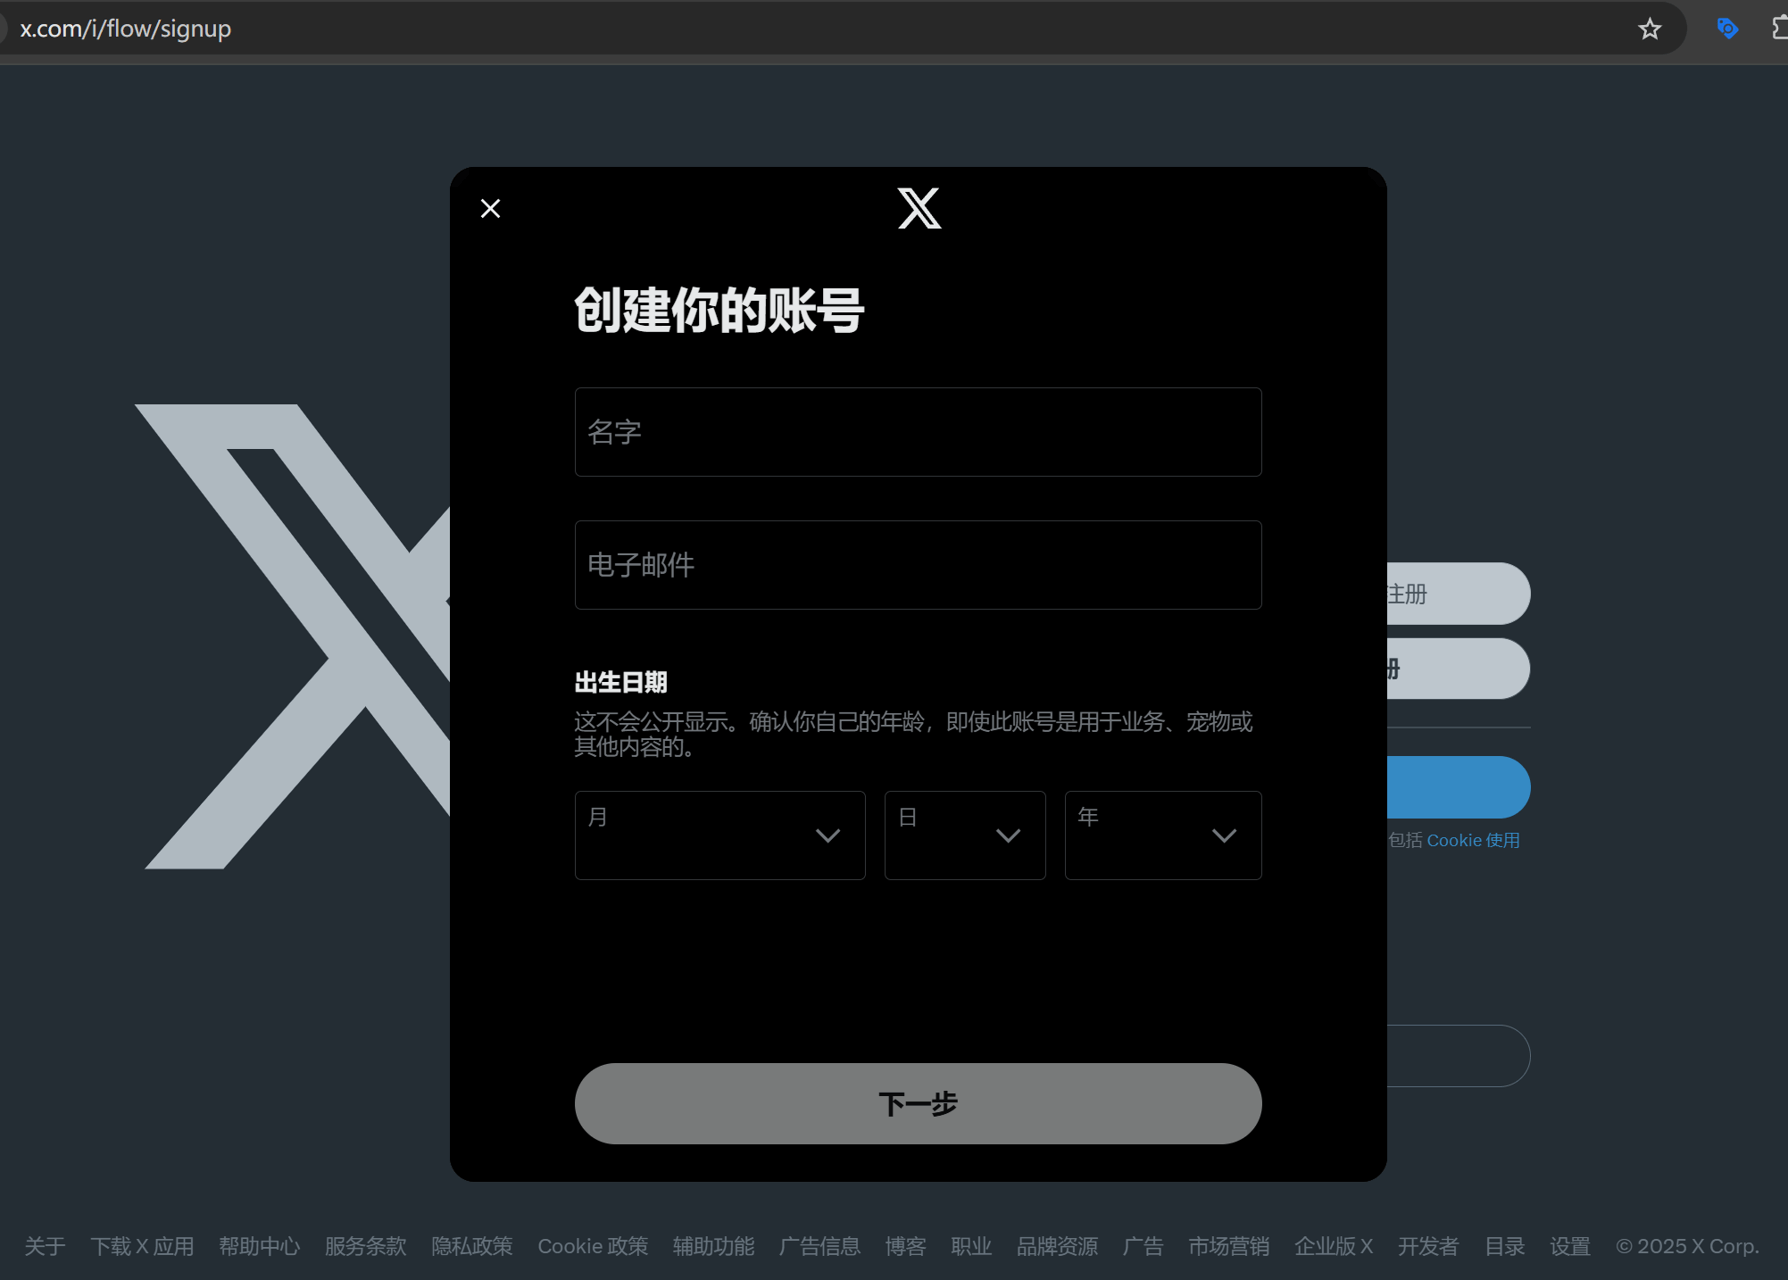
(4) Step 4: Fill in the date of birth of the Twitter registered user
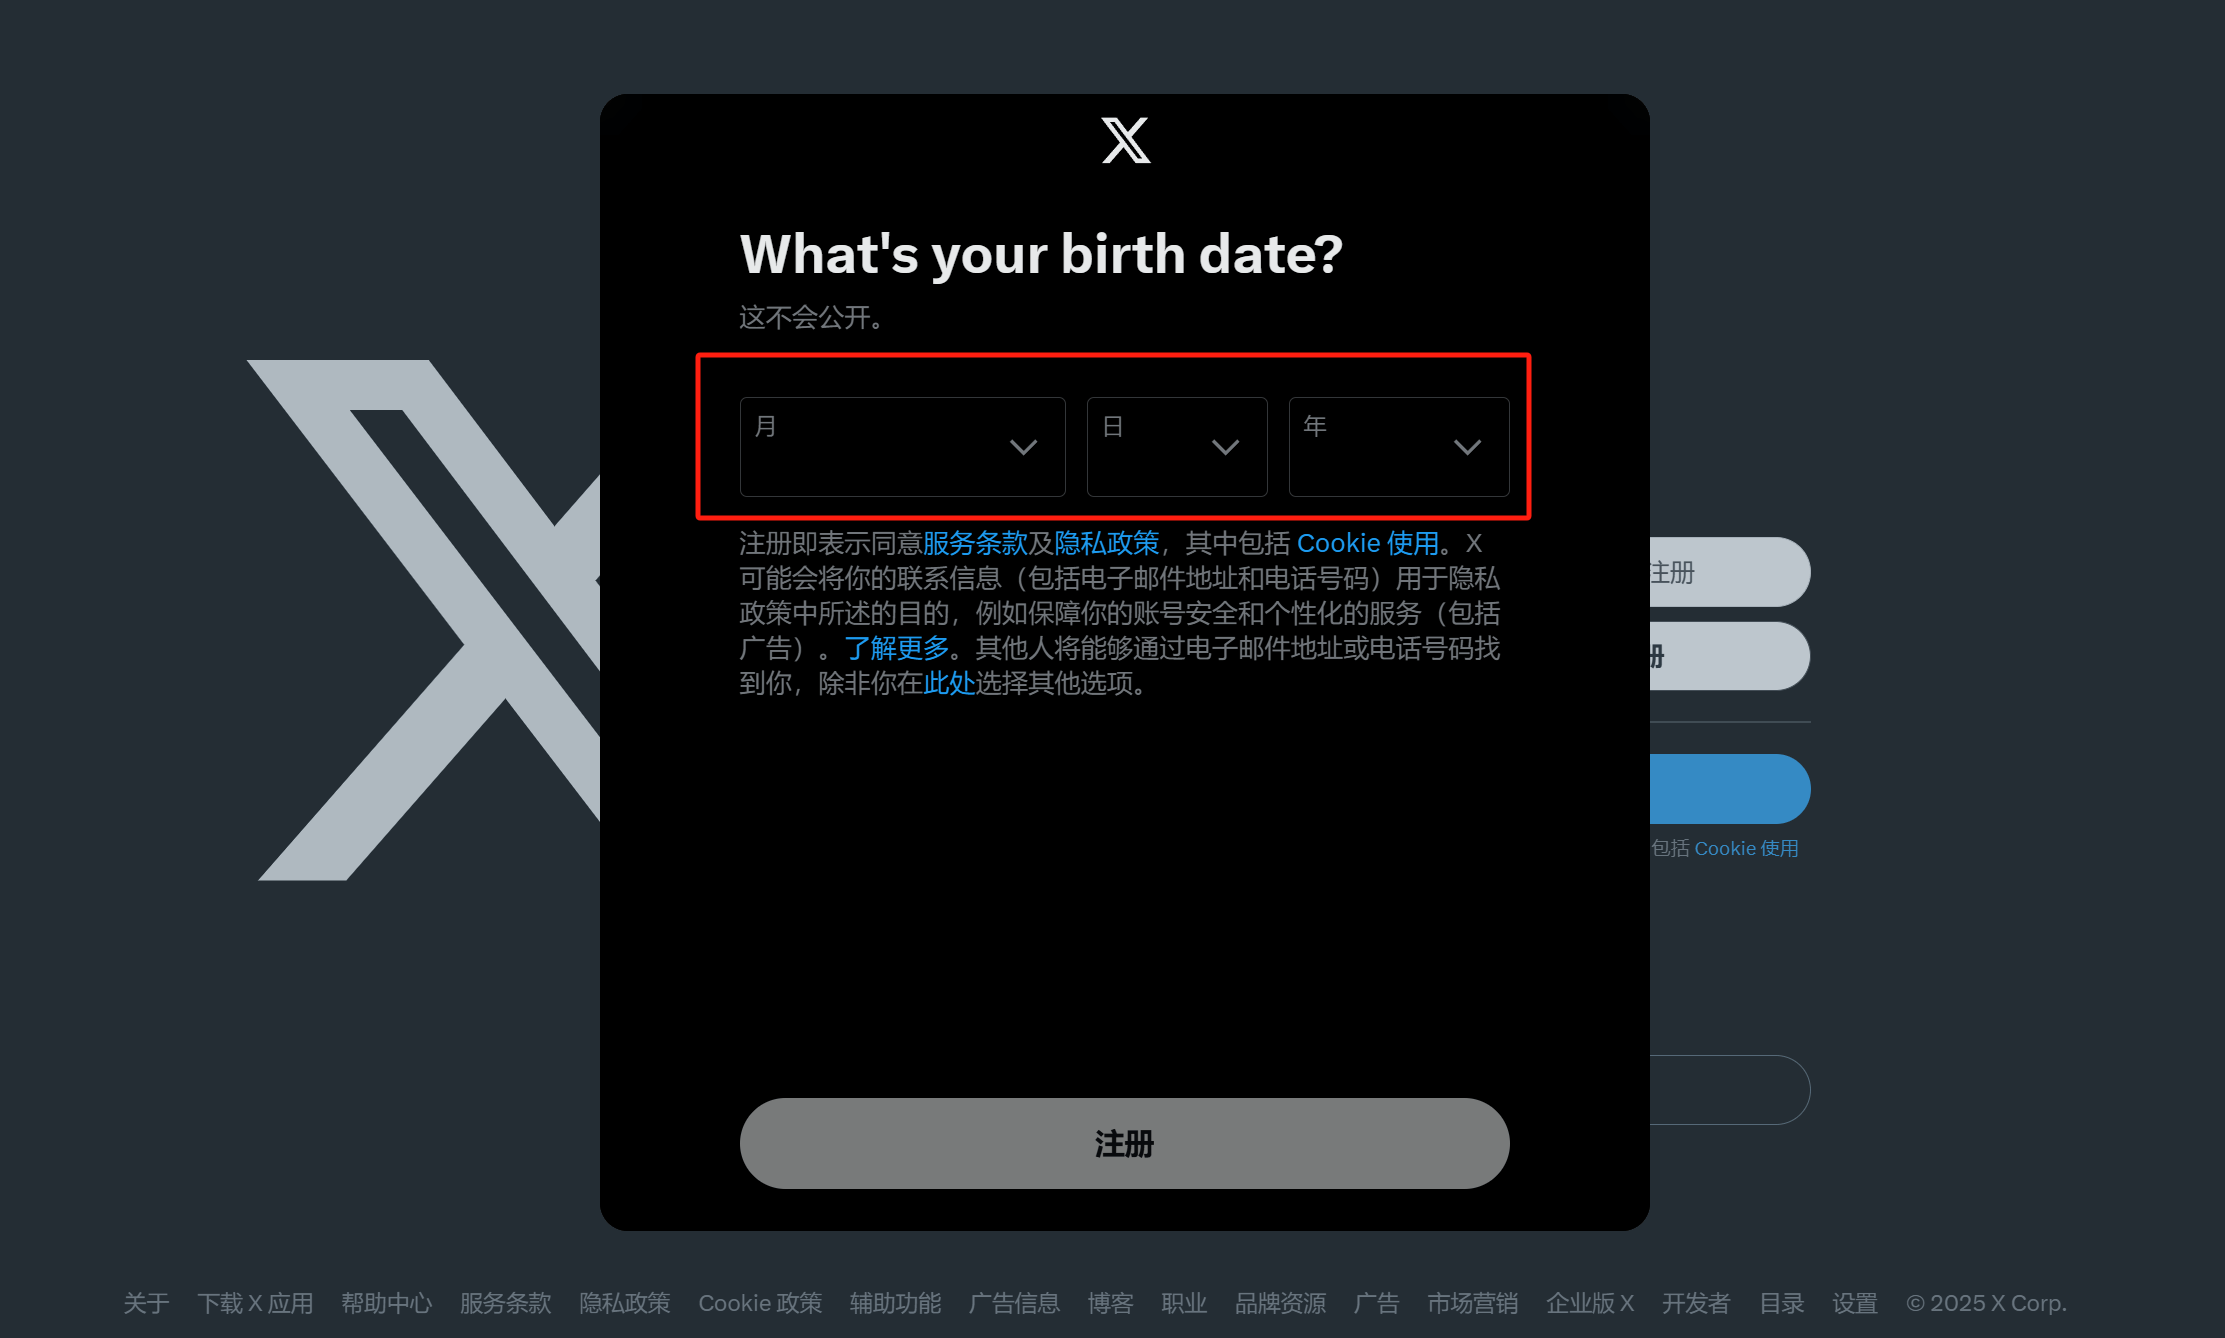
After successfully verifying the Google account login password, the operation window will lead to the screen for entering the user's birthdate, as shown in the image above. In the year/month/day selection fields, select the corresponding date numbers. There is also a brief description of Twitter’s terms of service in the paragraph, which includes anchor links to the full terms and privacy policy. Readers interested in the complete Twitter terms of use and privacy policy can click the links to read them.
(5) Step 5: Set your Twitter account username
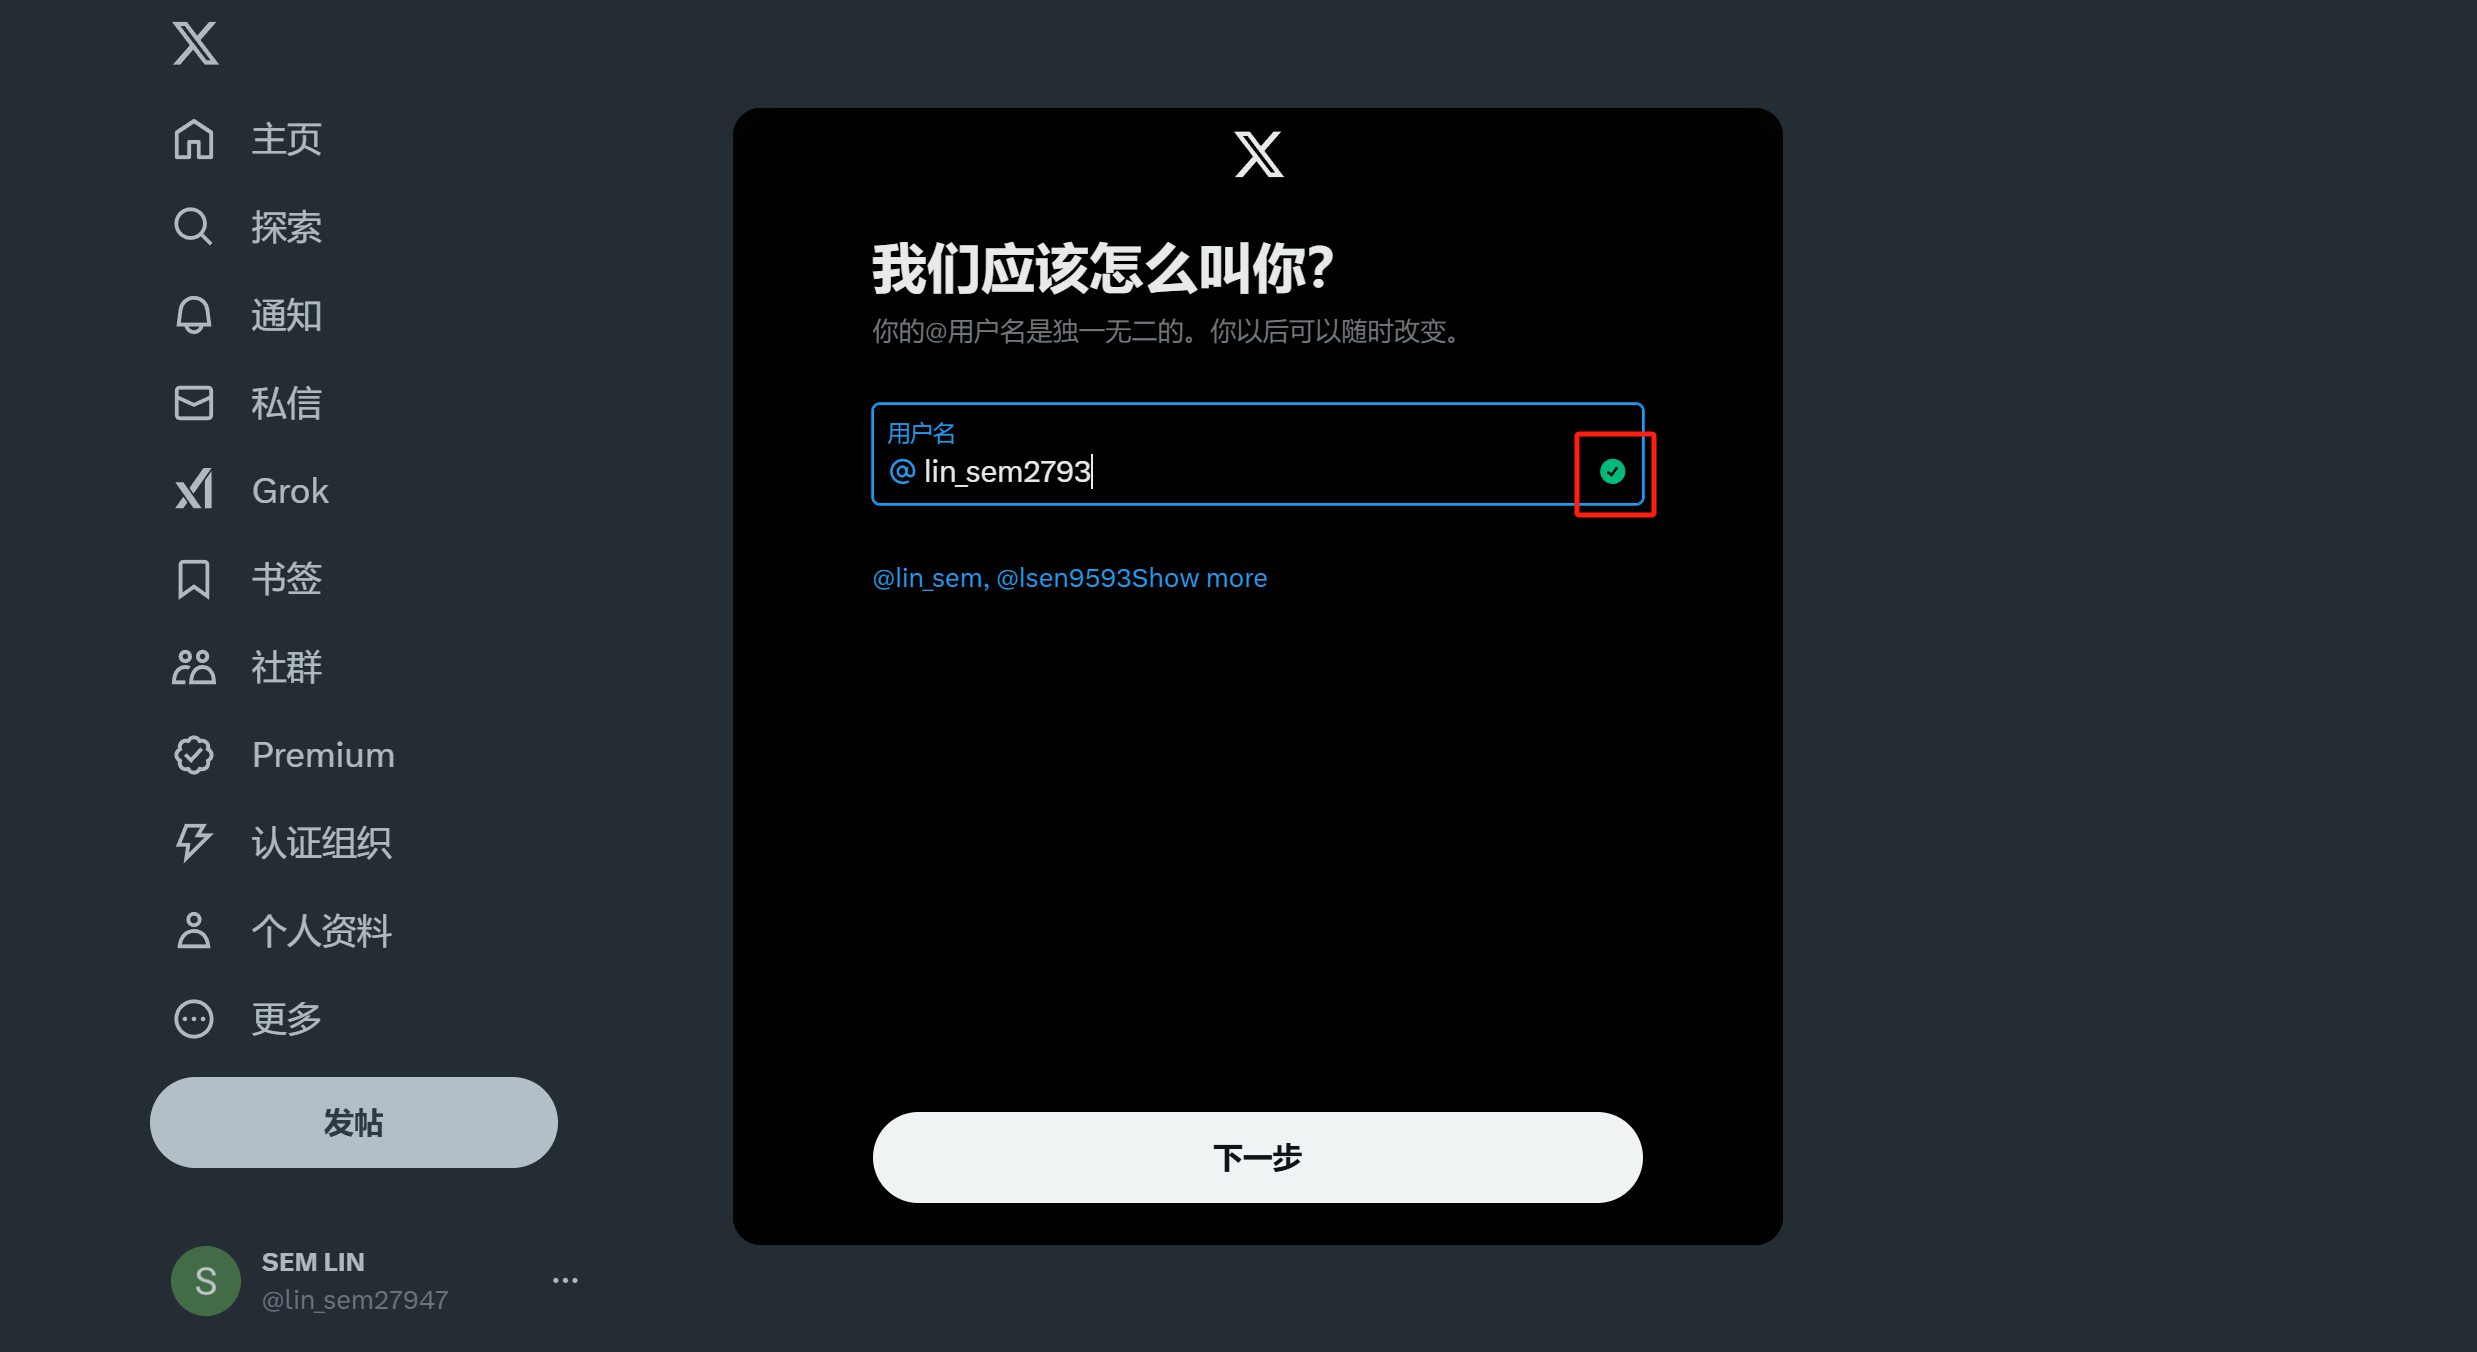
As shown in the image above, in this step, you can customize the username for your Twitter account. The Twitter system will automatically suggest available usernames that are not taken. You can either select one of these or input a custom one. When entering a custom username, pay attention to the system's detection icon on the right side of the username input field, as highlighted in the red box in the image. A "✓" indicates that the username is available, while a "✘" indicates that the username is already taken. After entering your custom username or selecting one recommended by the system, click the "Next" button to continue with the account initialization setup.
(6) Step 6: Select recommended content for new Twitter accounts
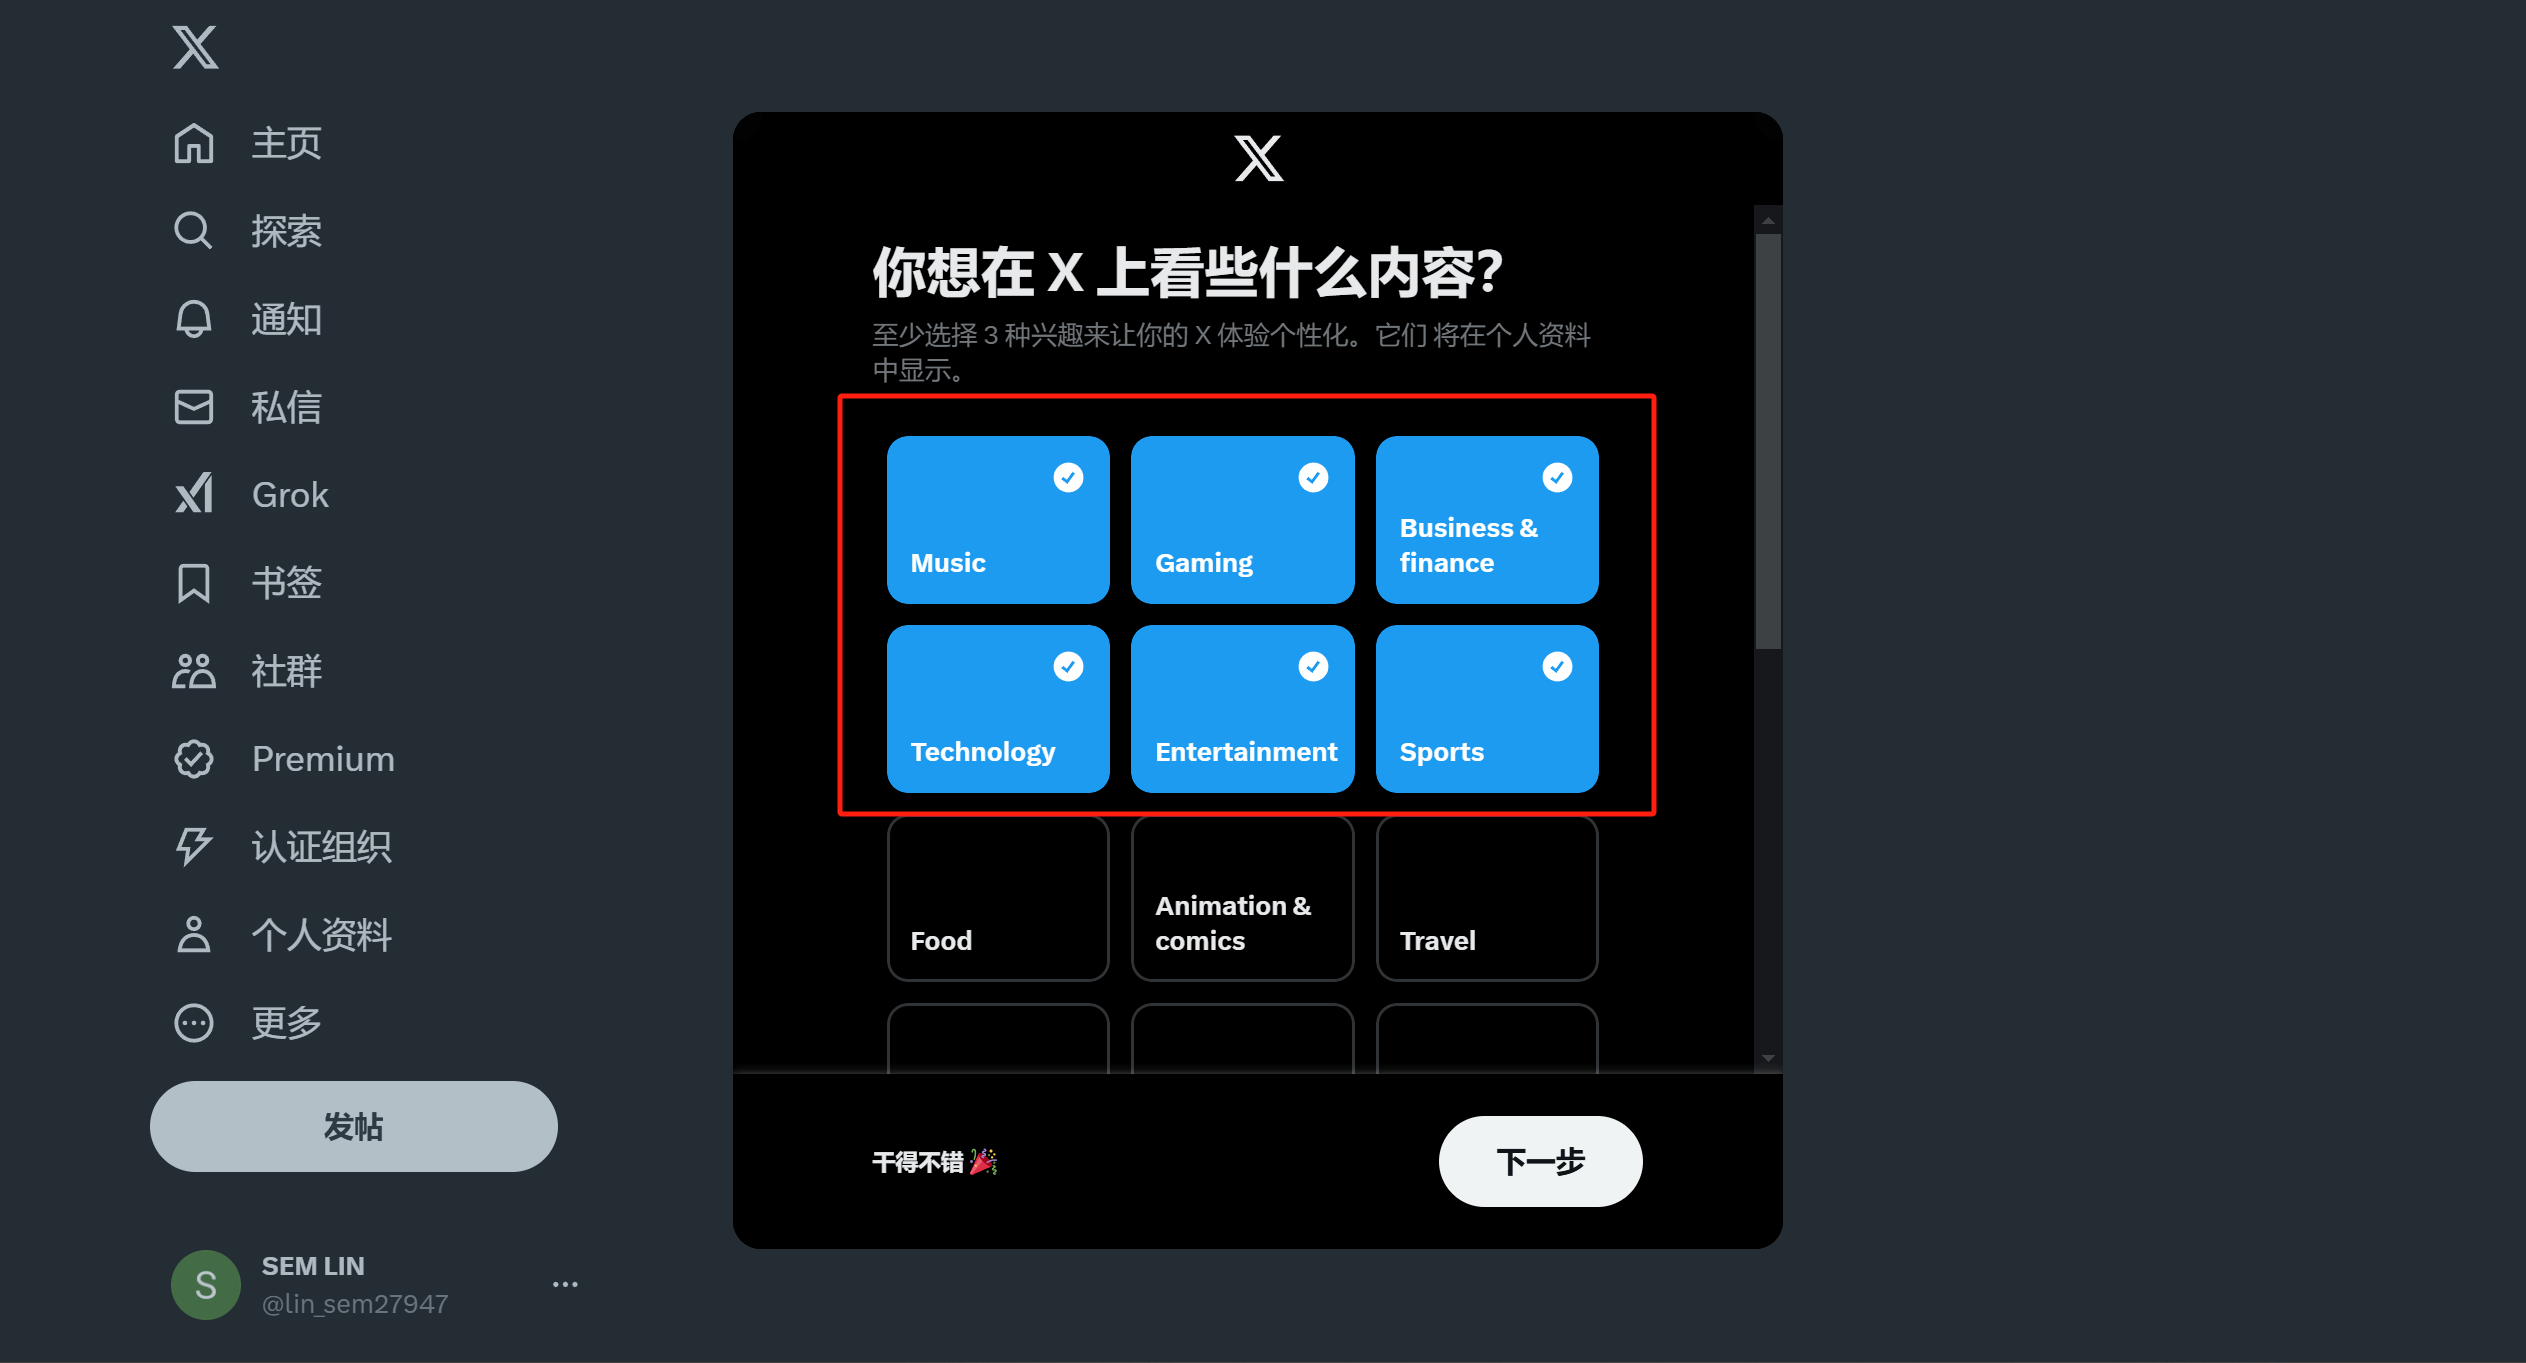
When you first log in to the newly created Twitter account, the system will pop up a "What content would you like to see on X?" setup window. In the content type selection area of this window, you can check the types of content you're interested in, and the selected options will be highlighted (as shown in the image above). After confirming your selection, click the "Next" button. Normally, after completing this step, the page will directly lead you to the Twitter account homepage. However, due to certain network issues, it's possible that the account may be locked after the initialization setup is completed. In such cases, there's no need to worry. Simply follow the blogger's unlocking solution below to perform a security verification and unlock the account.
(7) Step 7: Solution to the problem of a new Twitter account being locked
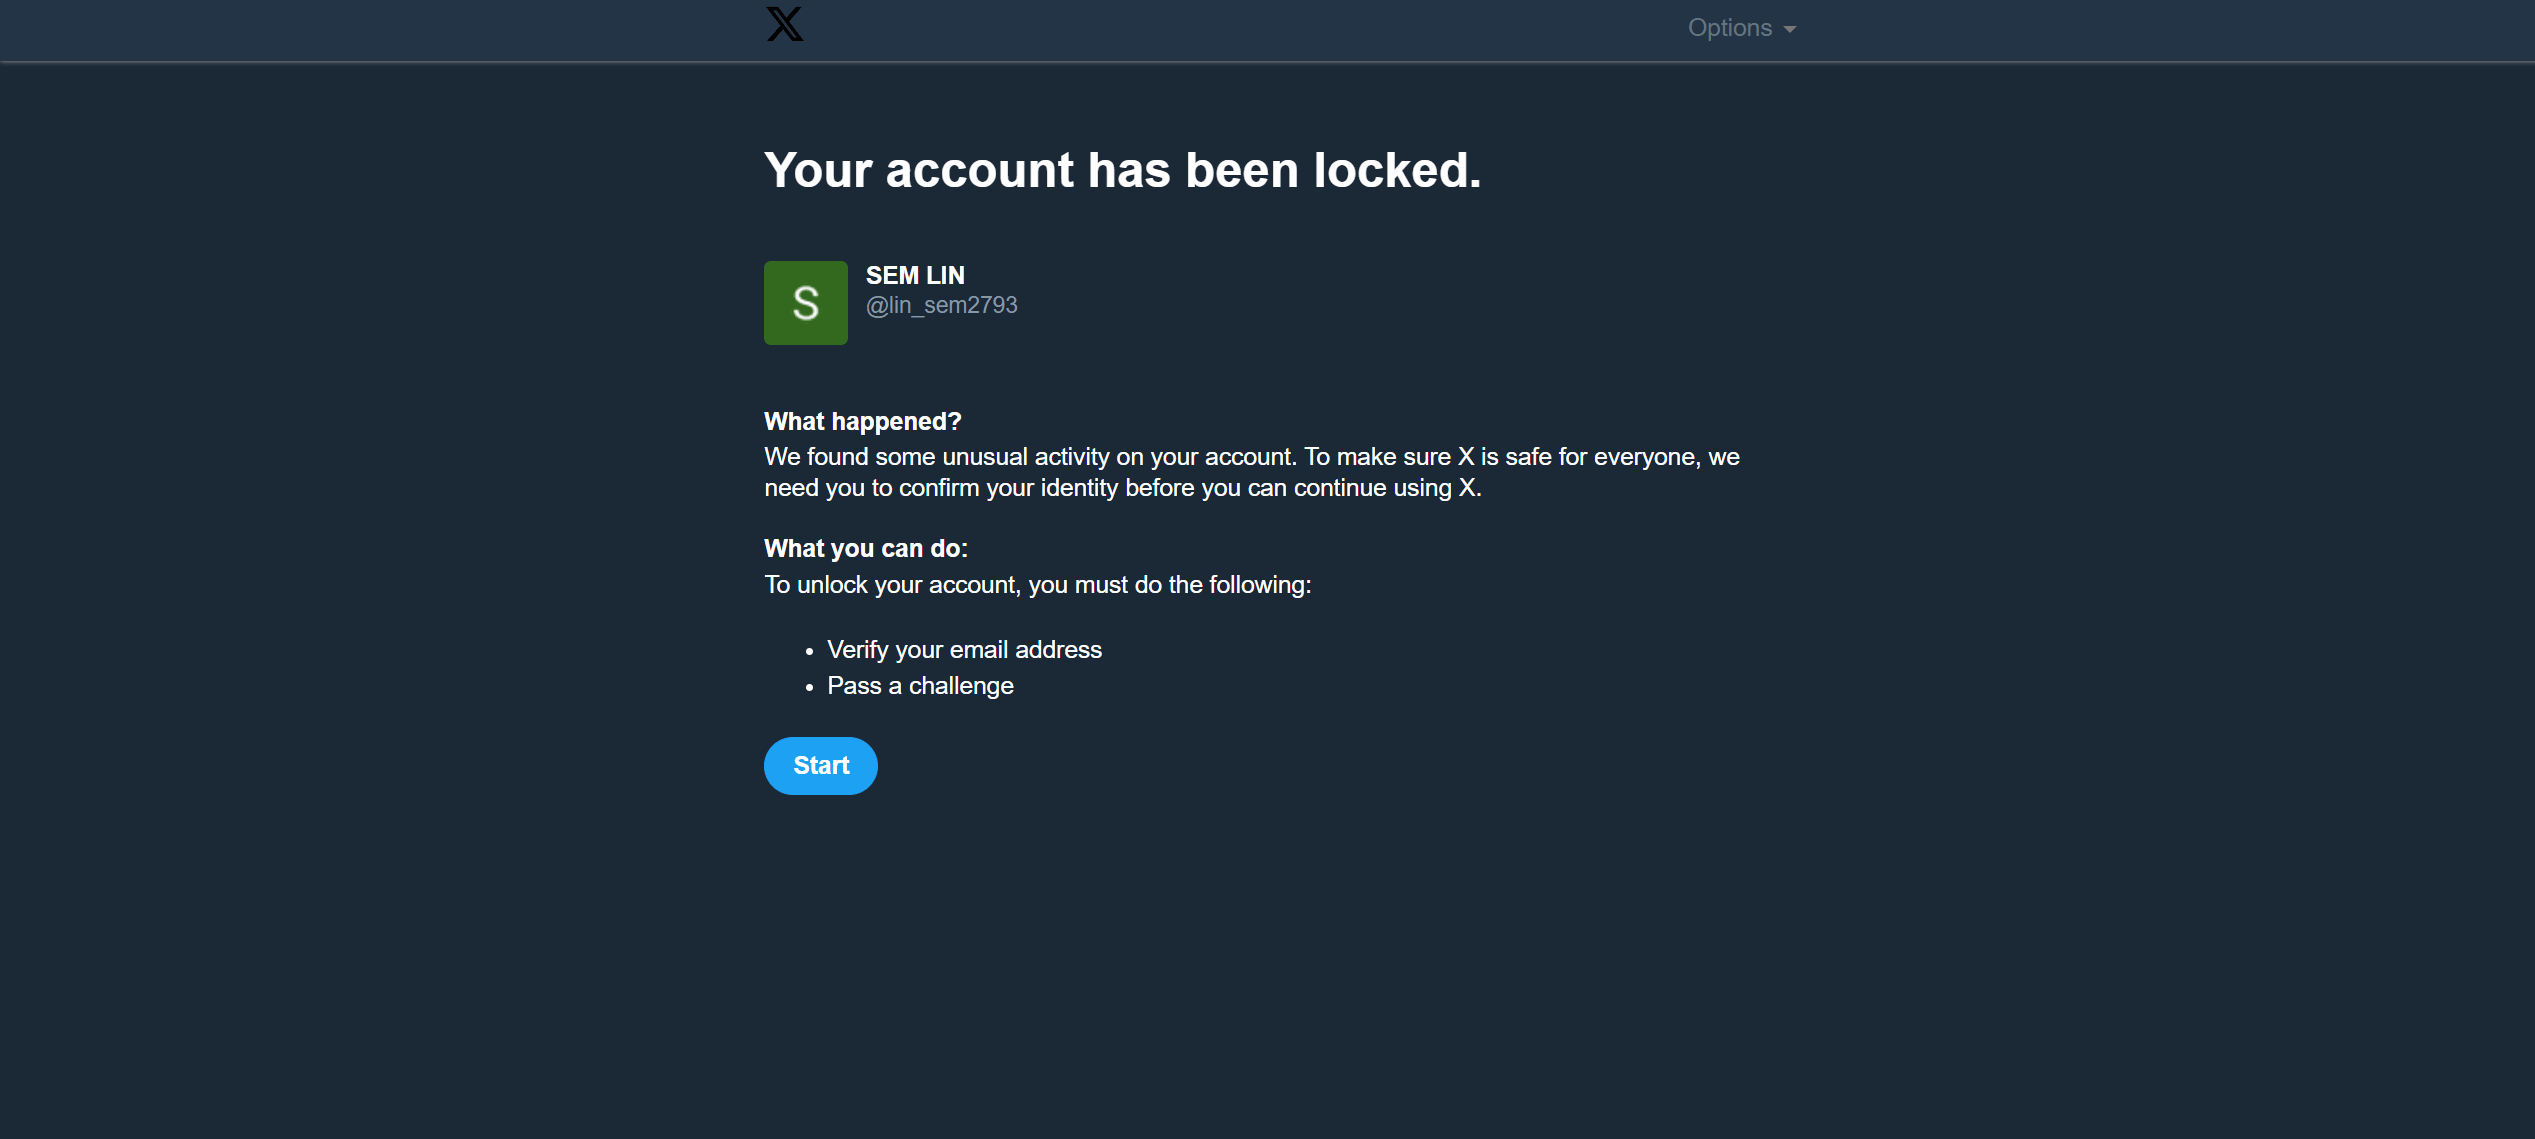
After selecting the content types to follow on Twitter and clicking the "Next" button, if your Twitter page displays the message "Your account has been locked," as it did for the blogger, there's no need to panic. Simply follow the blogger's instructions to complete the Twitter account security verification to unlock it. Below are the specific steps to unlock your account, with detailed image and text explanations for each step. Just follow the instructions to proceed.
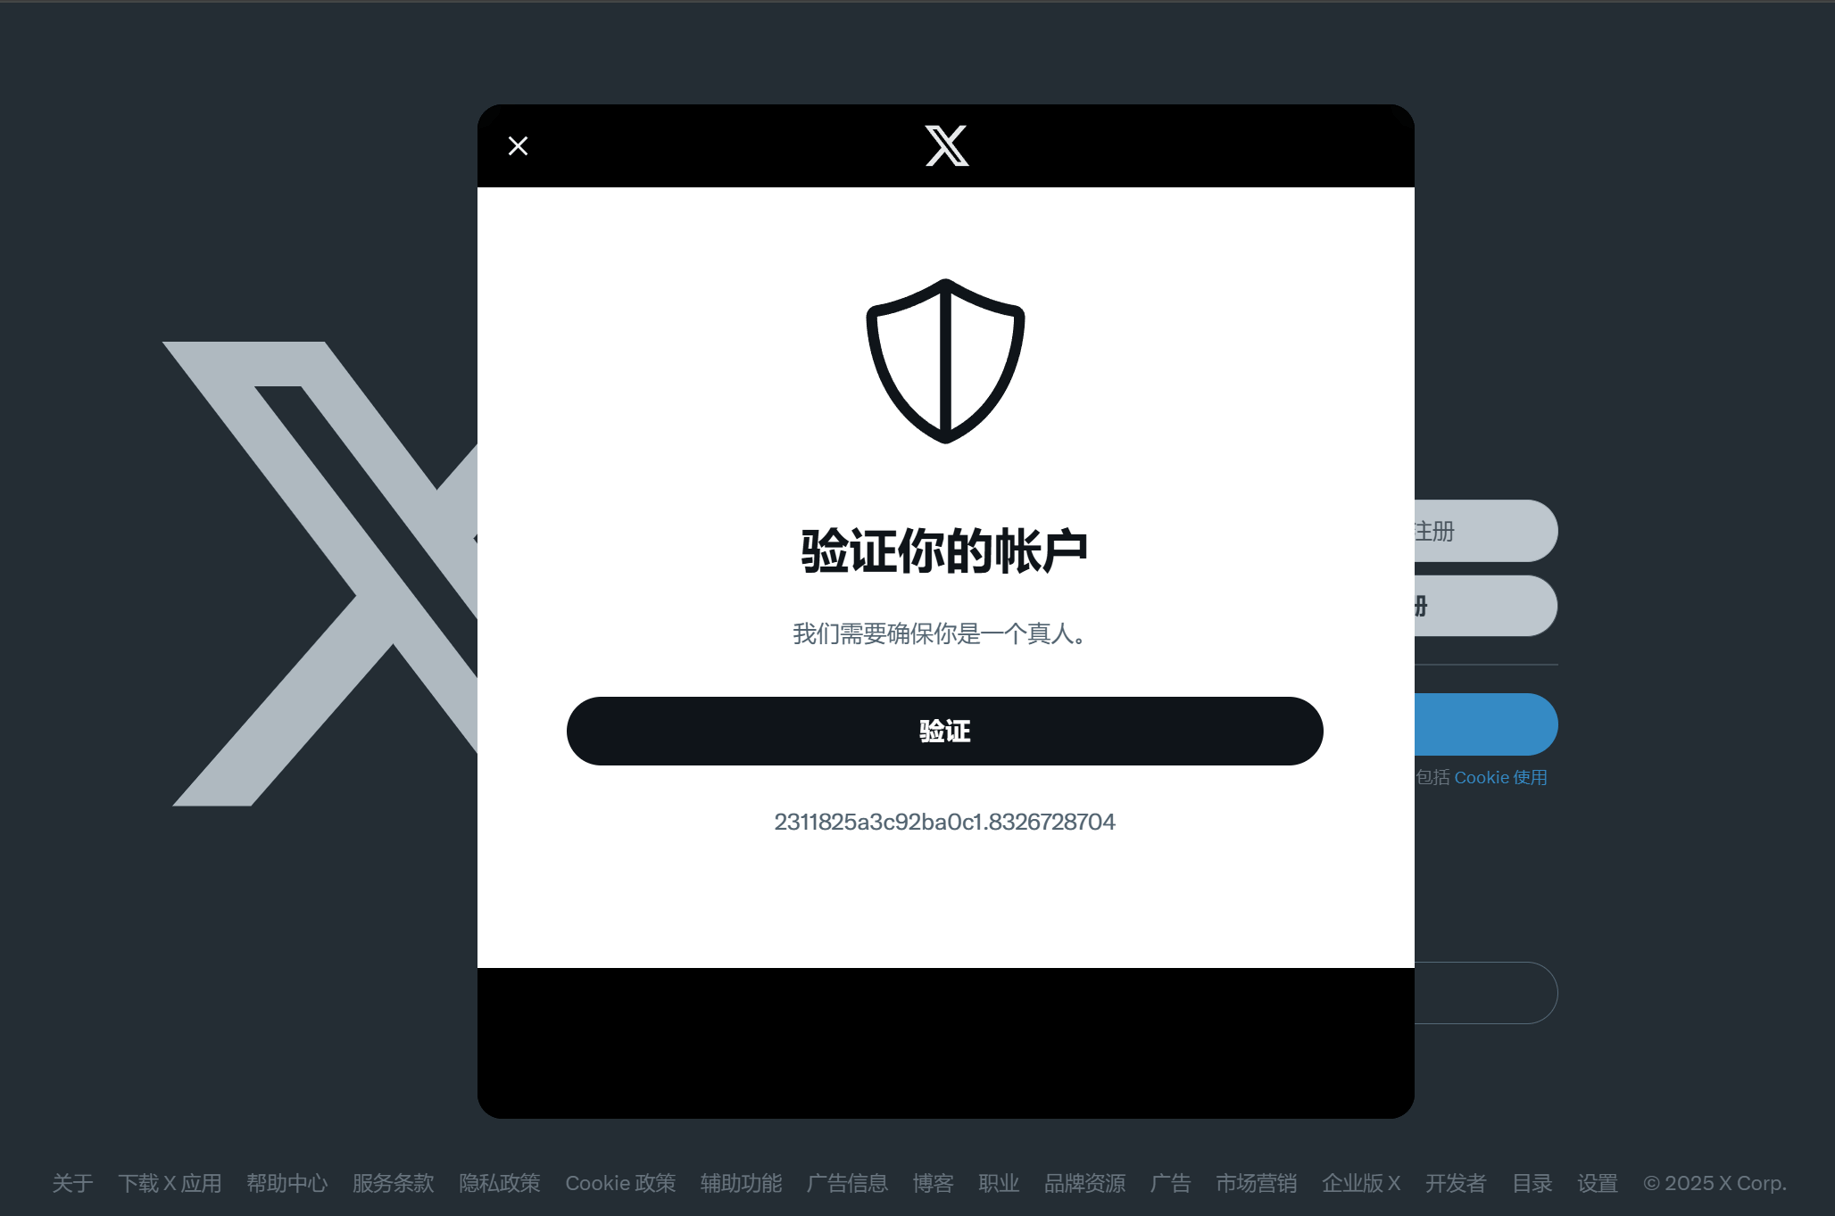
Twitter new account security verification unlock step 1: start the verification process
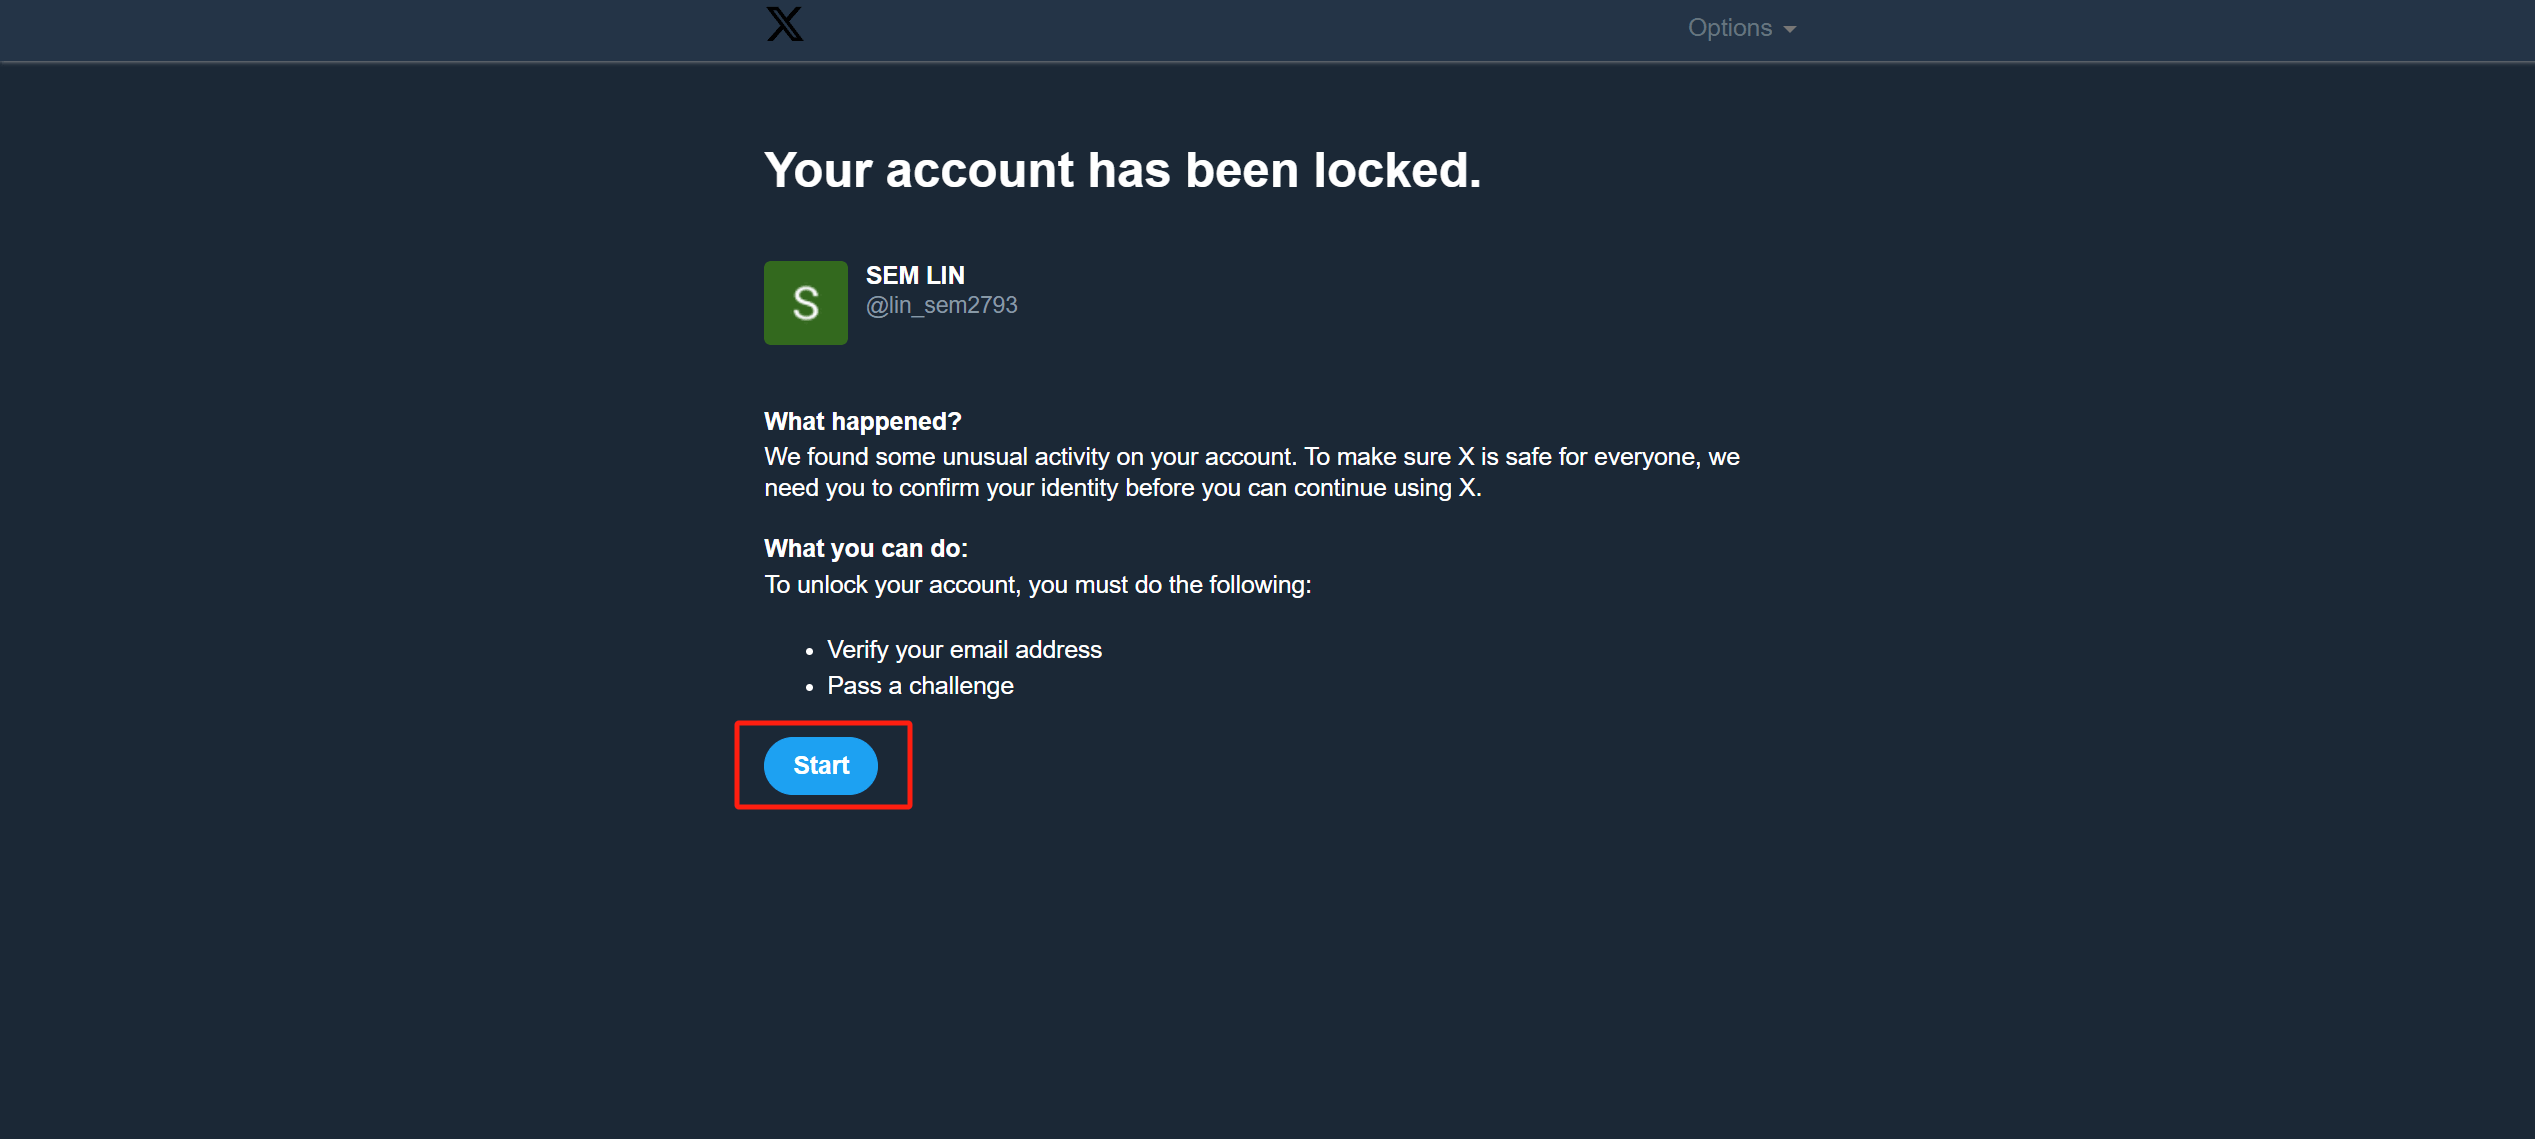
First, click the “Start” button marked with a red box in the page above to start the Twitter account verification process.
Twitter new account security verification unlock step 2: send the Twitter verification code to the account registration email
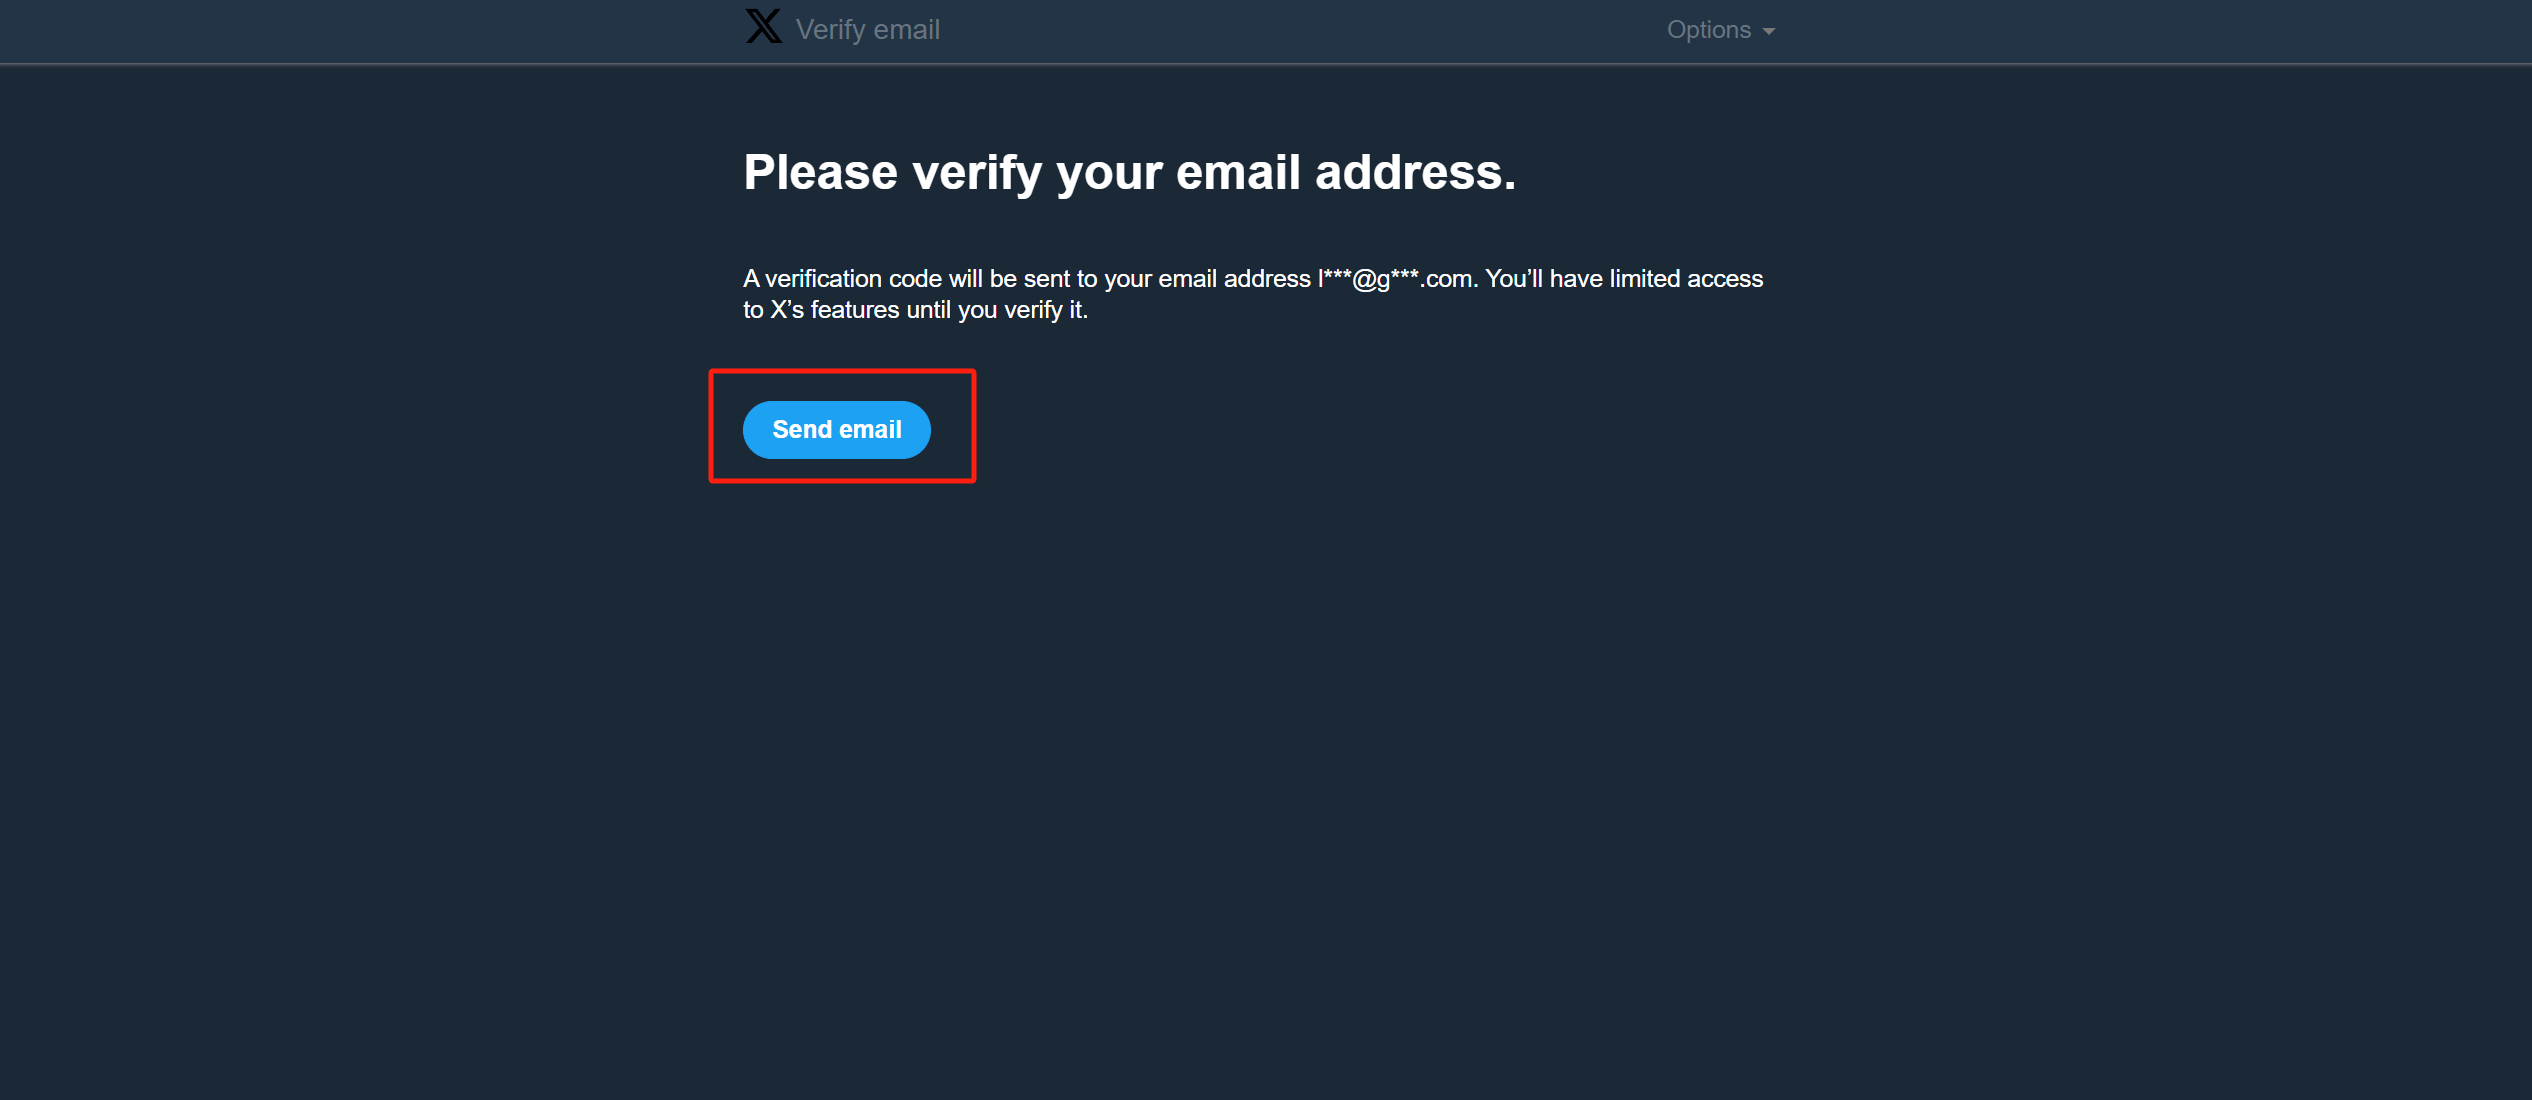
Click the "Send email" button on the page as shown above to send the Twitter verification code to the registered email address of the account. If the email address registered by the blogger during the demonstration is Gmail, go to Gmail to find the verification code email sent by Twitter.
Twitter new account security verification unlock step 3: enter or copy and paste the Twitter verification code
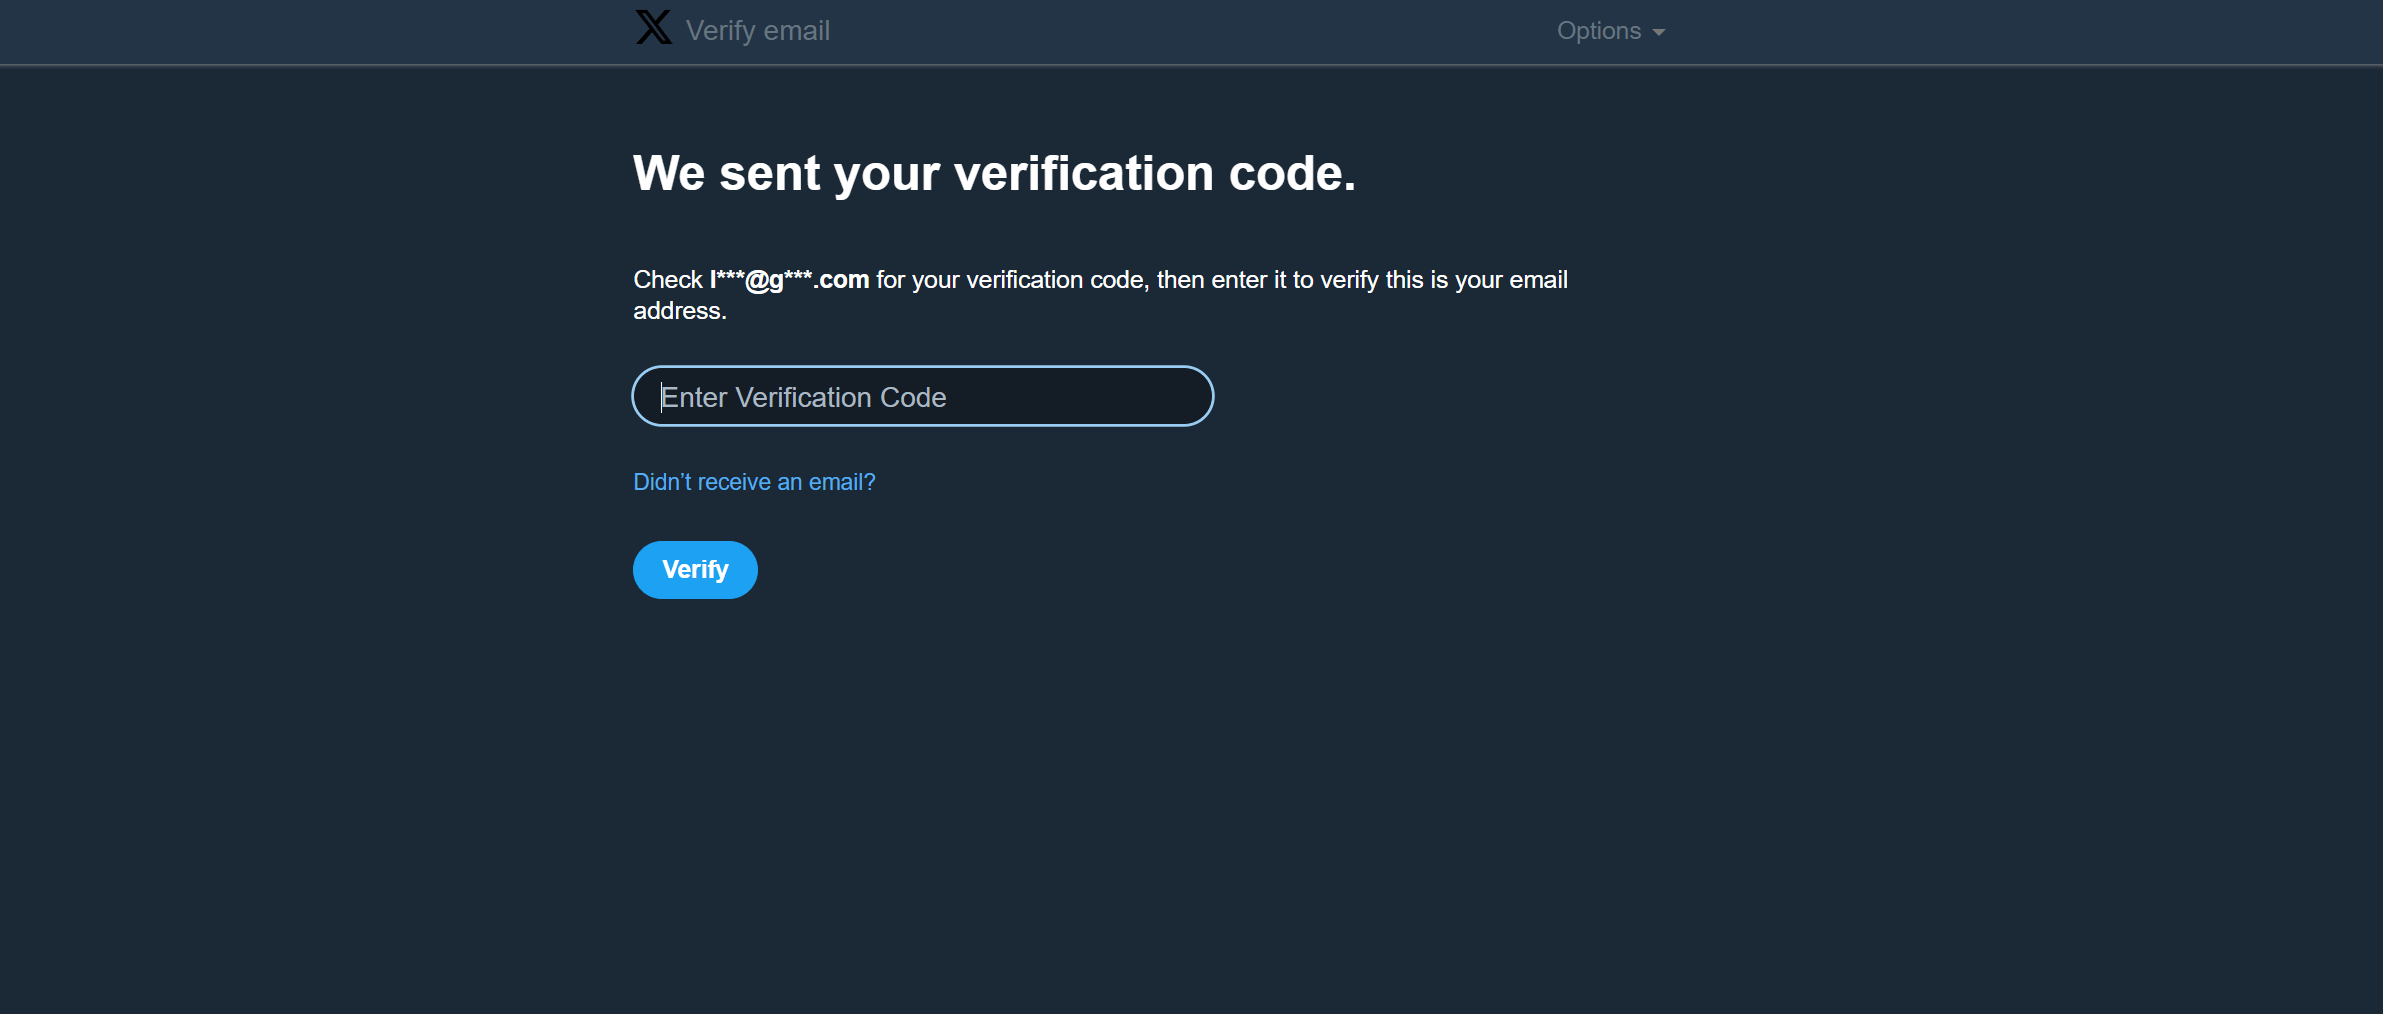
Enter or copy and paste the verification code received in the email address where you registered your Twitter account into the verification code input box on the page shown above, click the "Verify" button below to verify and jump to the next page.
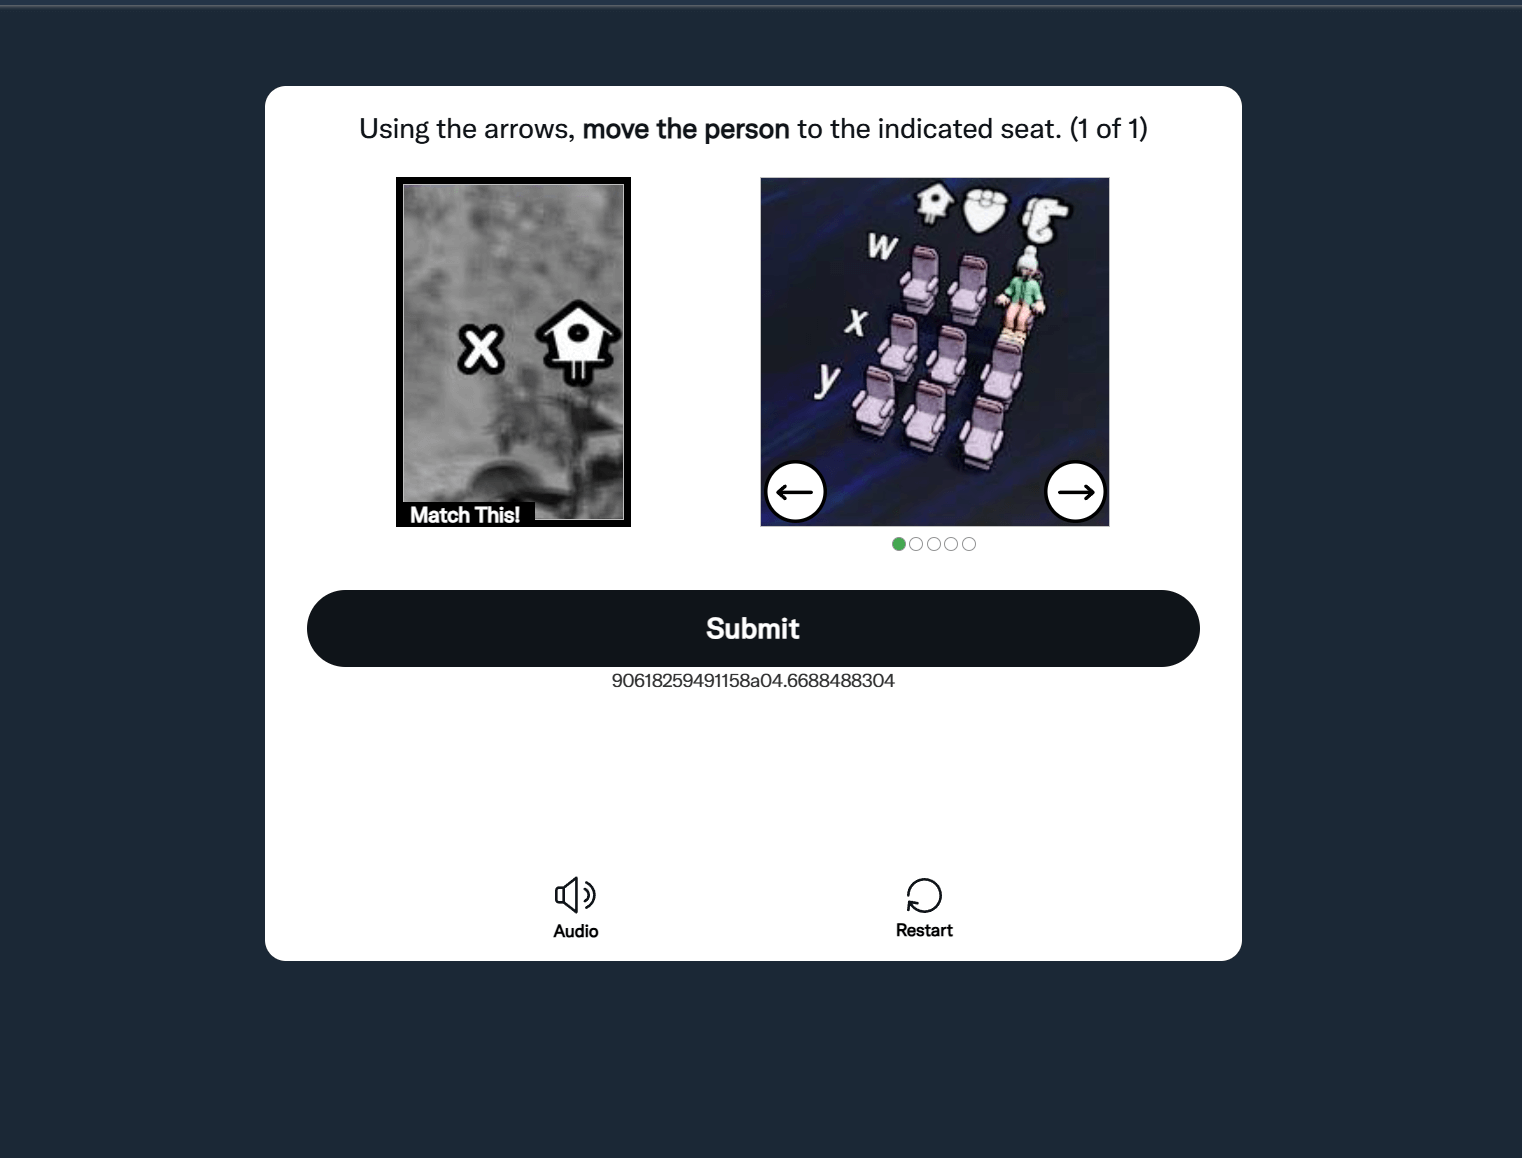
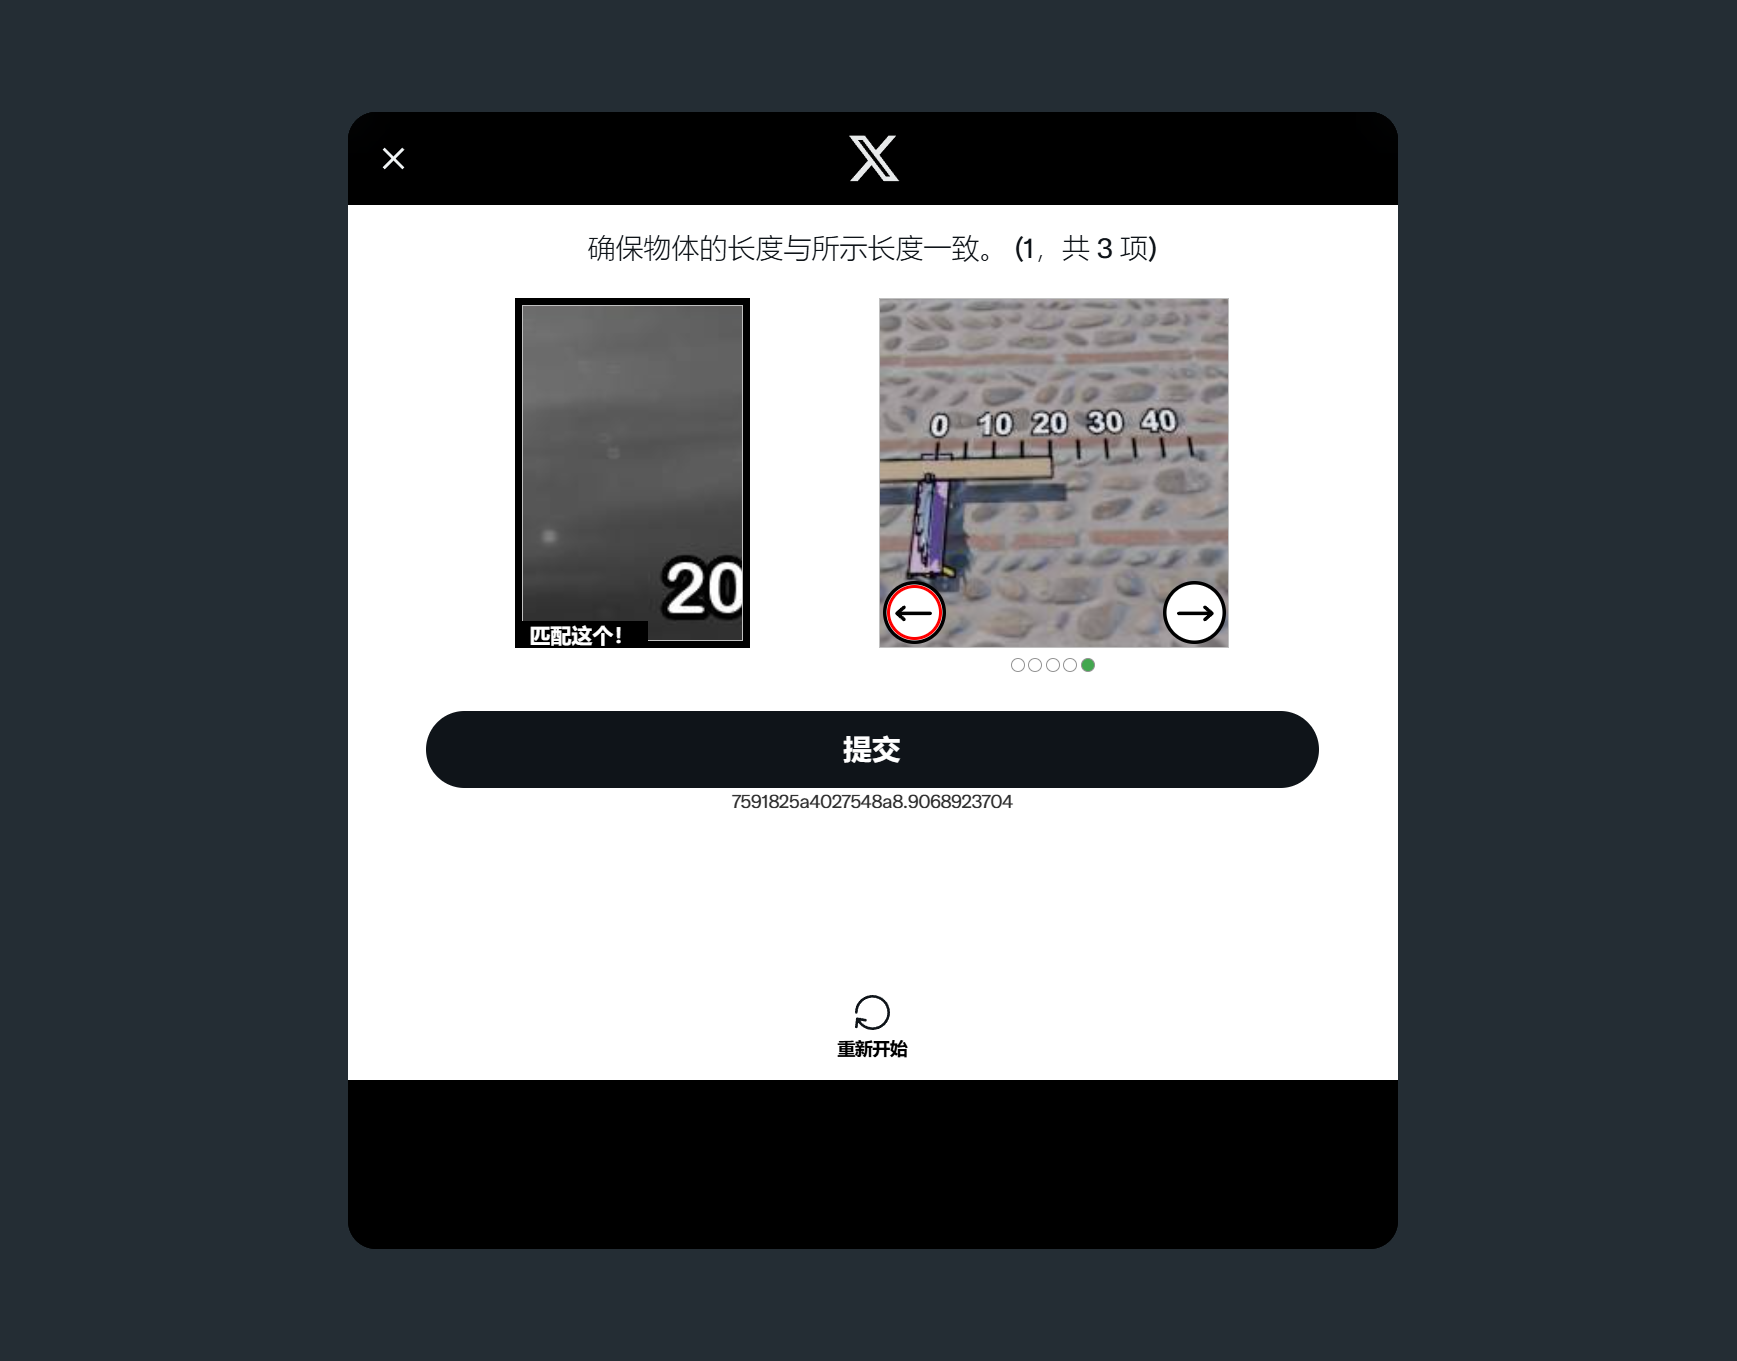
Step 4 of Twitter's new account security verification unlocking: Twitter's anti-robot human verification operation
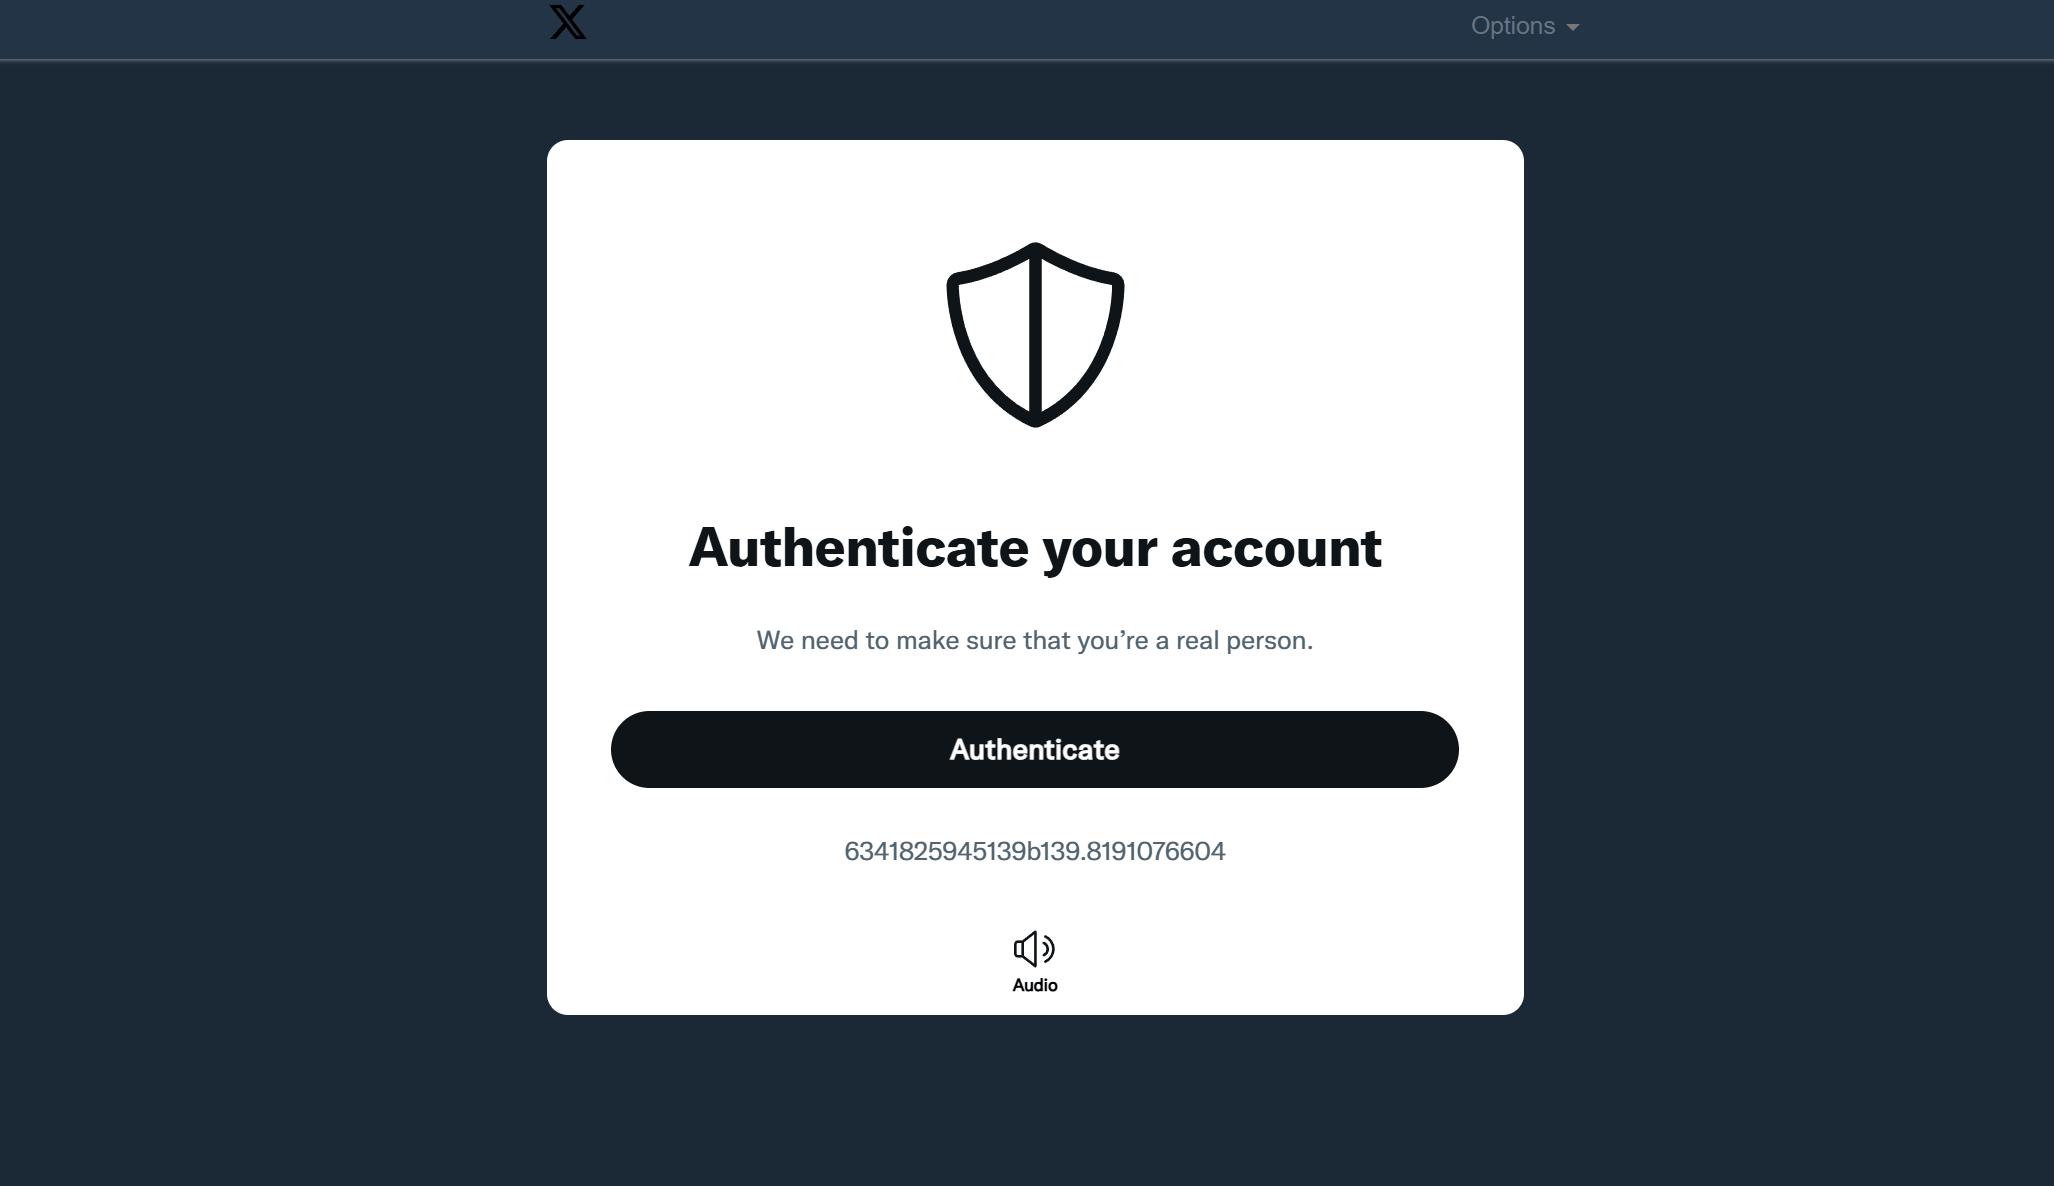
After translating the English text on this page into Chinese, we can see that this is the human verification process required by Twitter. It is a measure to prevent automated bot actions. After clicking the "Authenticate" button, the page will redirect to the human verification interface shown in the image below. Follow the English instructions at the top of the interface and the guide image on the left to provide the correct answers. If you are using Chrome or Edge browsers, you can right-click on the page and select the "Translate to Chinese" option from the menu, which will translate the English content into Chinese. This will help avoid difficulties caused by language barriers. Once you have completed the verification process by answering the questions correctly as required, click the "Submit" button. After the answer is successfully verified by Twitter’s system, the page will redirect to the next login step.
Step 5 of Twitter new account security verification unlock: Continue to log in to the Twitter account homepage
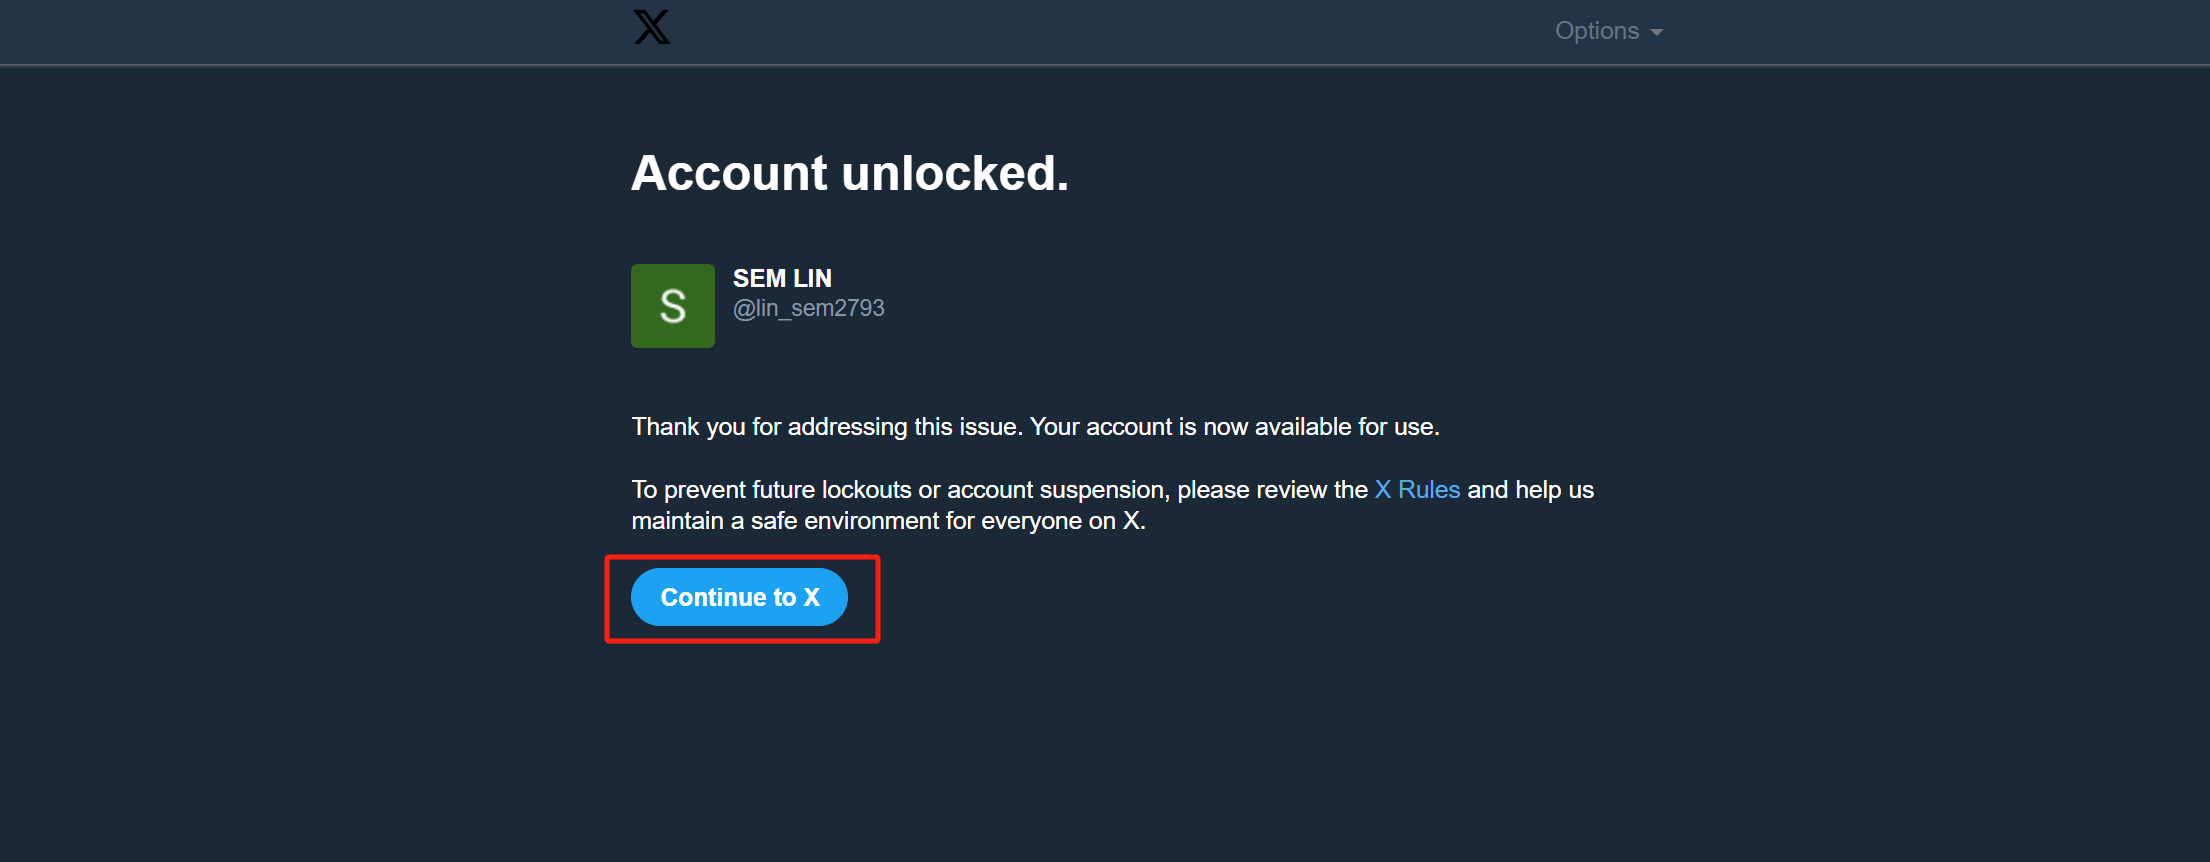
When we reach the page shown in the image above, it means that we have successfully completed all the verification steps, and the account has been unlocked and is now ready for normal use. On this page, click the "Continue to X" button, as highlighted in the red box in the image above, and we will successfully log in to the Twitter account homepage.
(8) Step 8: Register using your Google account and successfully log in to your Twitter account homepage
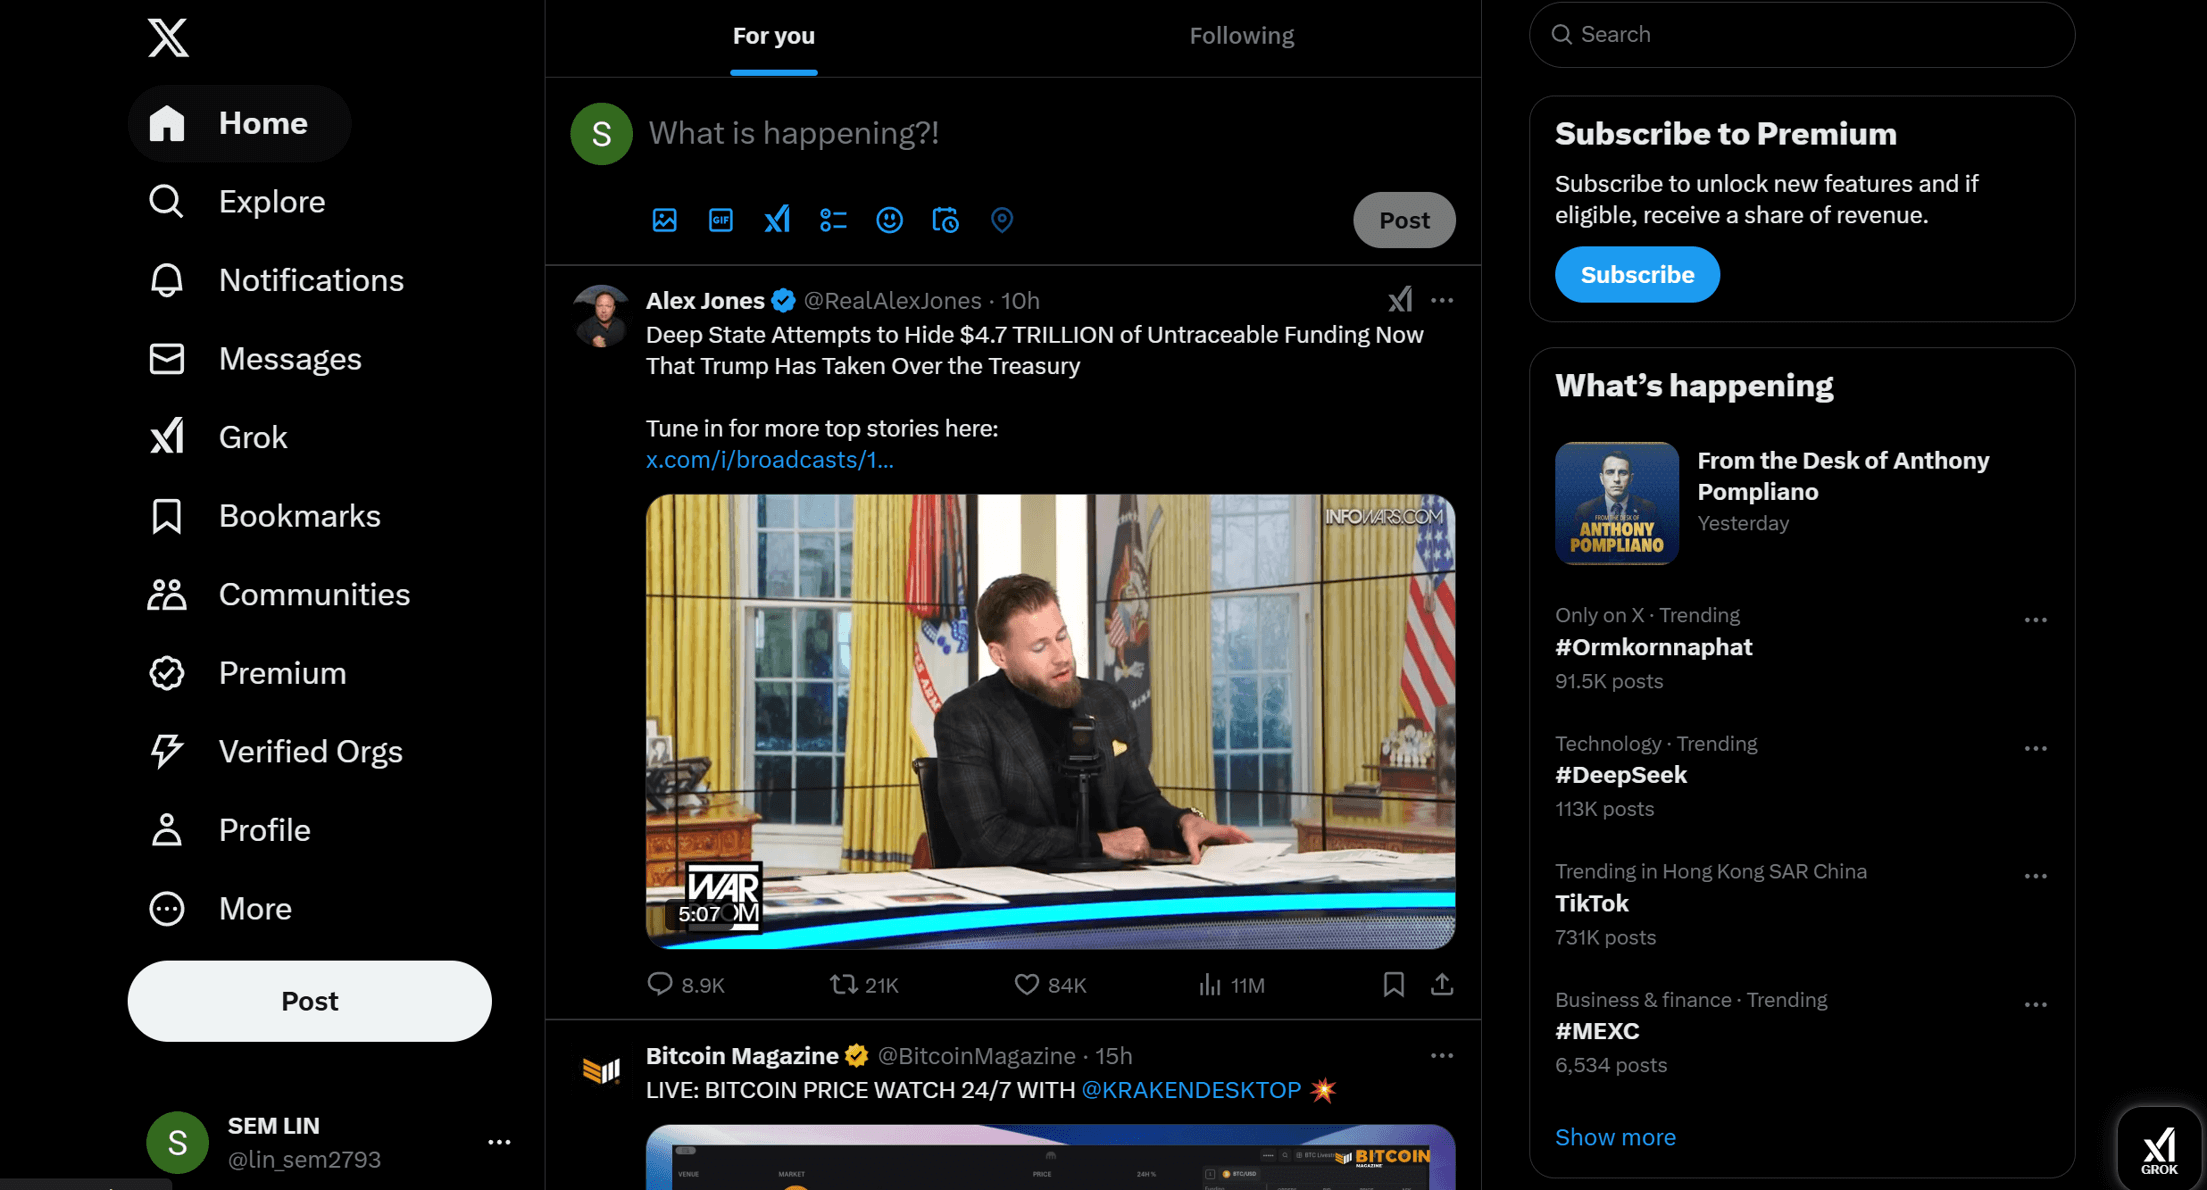
At this point, we have successfully registered a Twitter account using a Google account. Now, you can easily explore the various features of the platform from the left sidebar of your Twitter homepage to set up a personalized user experience. At the bottom of the left sidebar, click the account icon, and a menu will pop up to guide you in completing your profile, including setting your avatar, bio, and contact information. Further optimize your account and start your new social journey!
2. Register a Twitter account using Apple
(1) Step 1: Choose to use Apple registration method
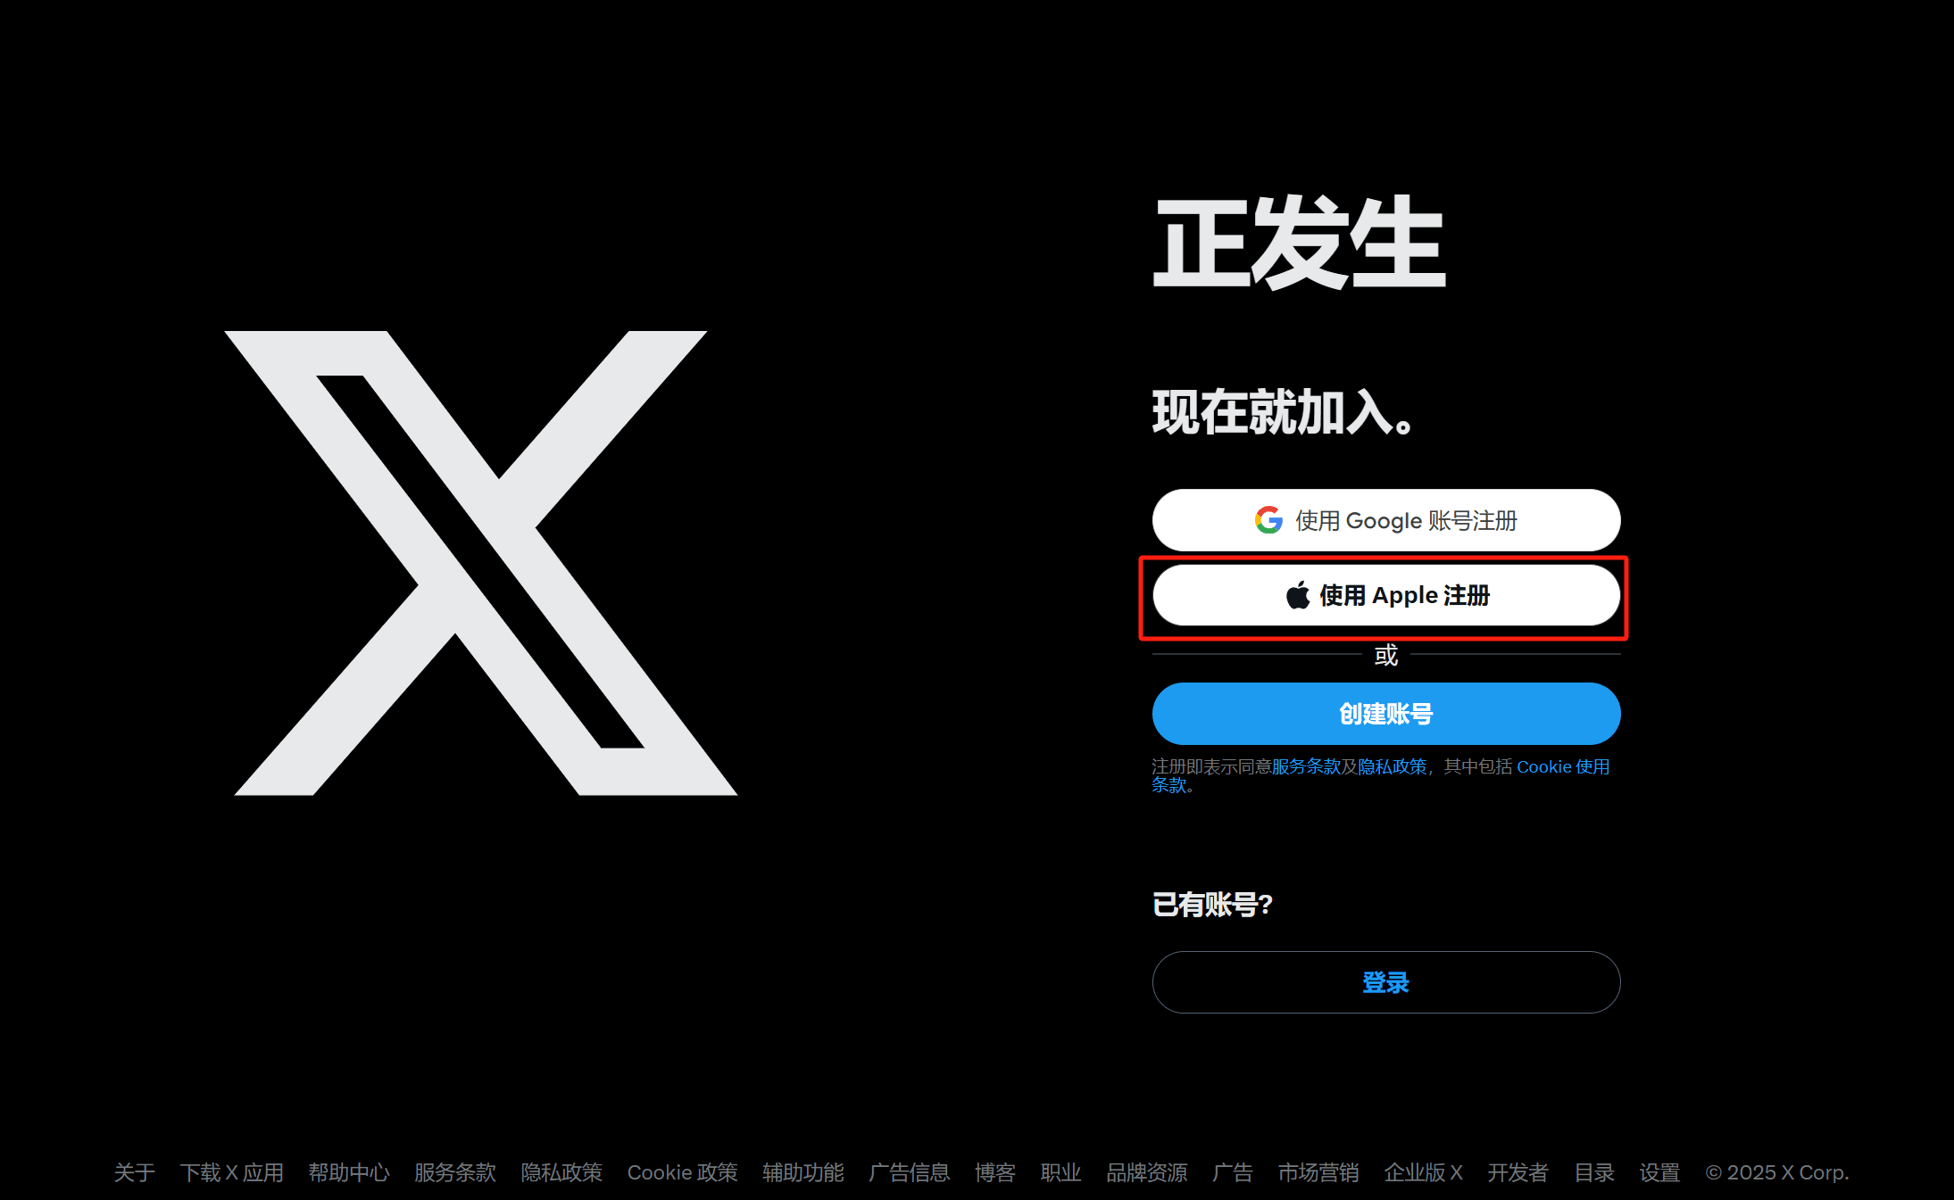
Select and click the "Sign up with Apple" button on the Twitter login and registration homepage. Click this function to officially enter the process of registering a Twitter account using Apple.
(2) Step 2: Enter your Apple ID account

As shown in the picture above, enter your Apple ID or mobile phone number in the input box for logging in with an Apple account. After entering your Apple ID or mobile phone number, click the next arrow icon on the right side of the input box to enter your Apple ID login password in the next operation window.
(3) Step 3: Enter your Apple ID password
In this step as shown in the picture above, we need to enter our Apple ID password in the password input box. After entering the password, click the next arrow icon on the right side of the password input box to continue the registration process.
(4) Step 4: Fill in the verification code received on the iPhone used by your Apple ID
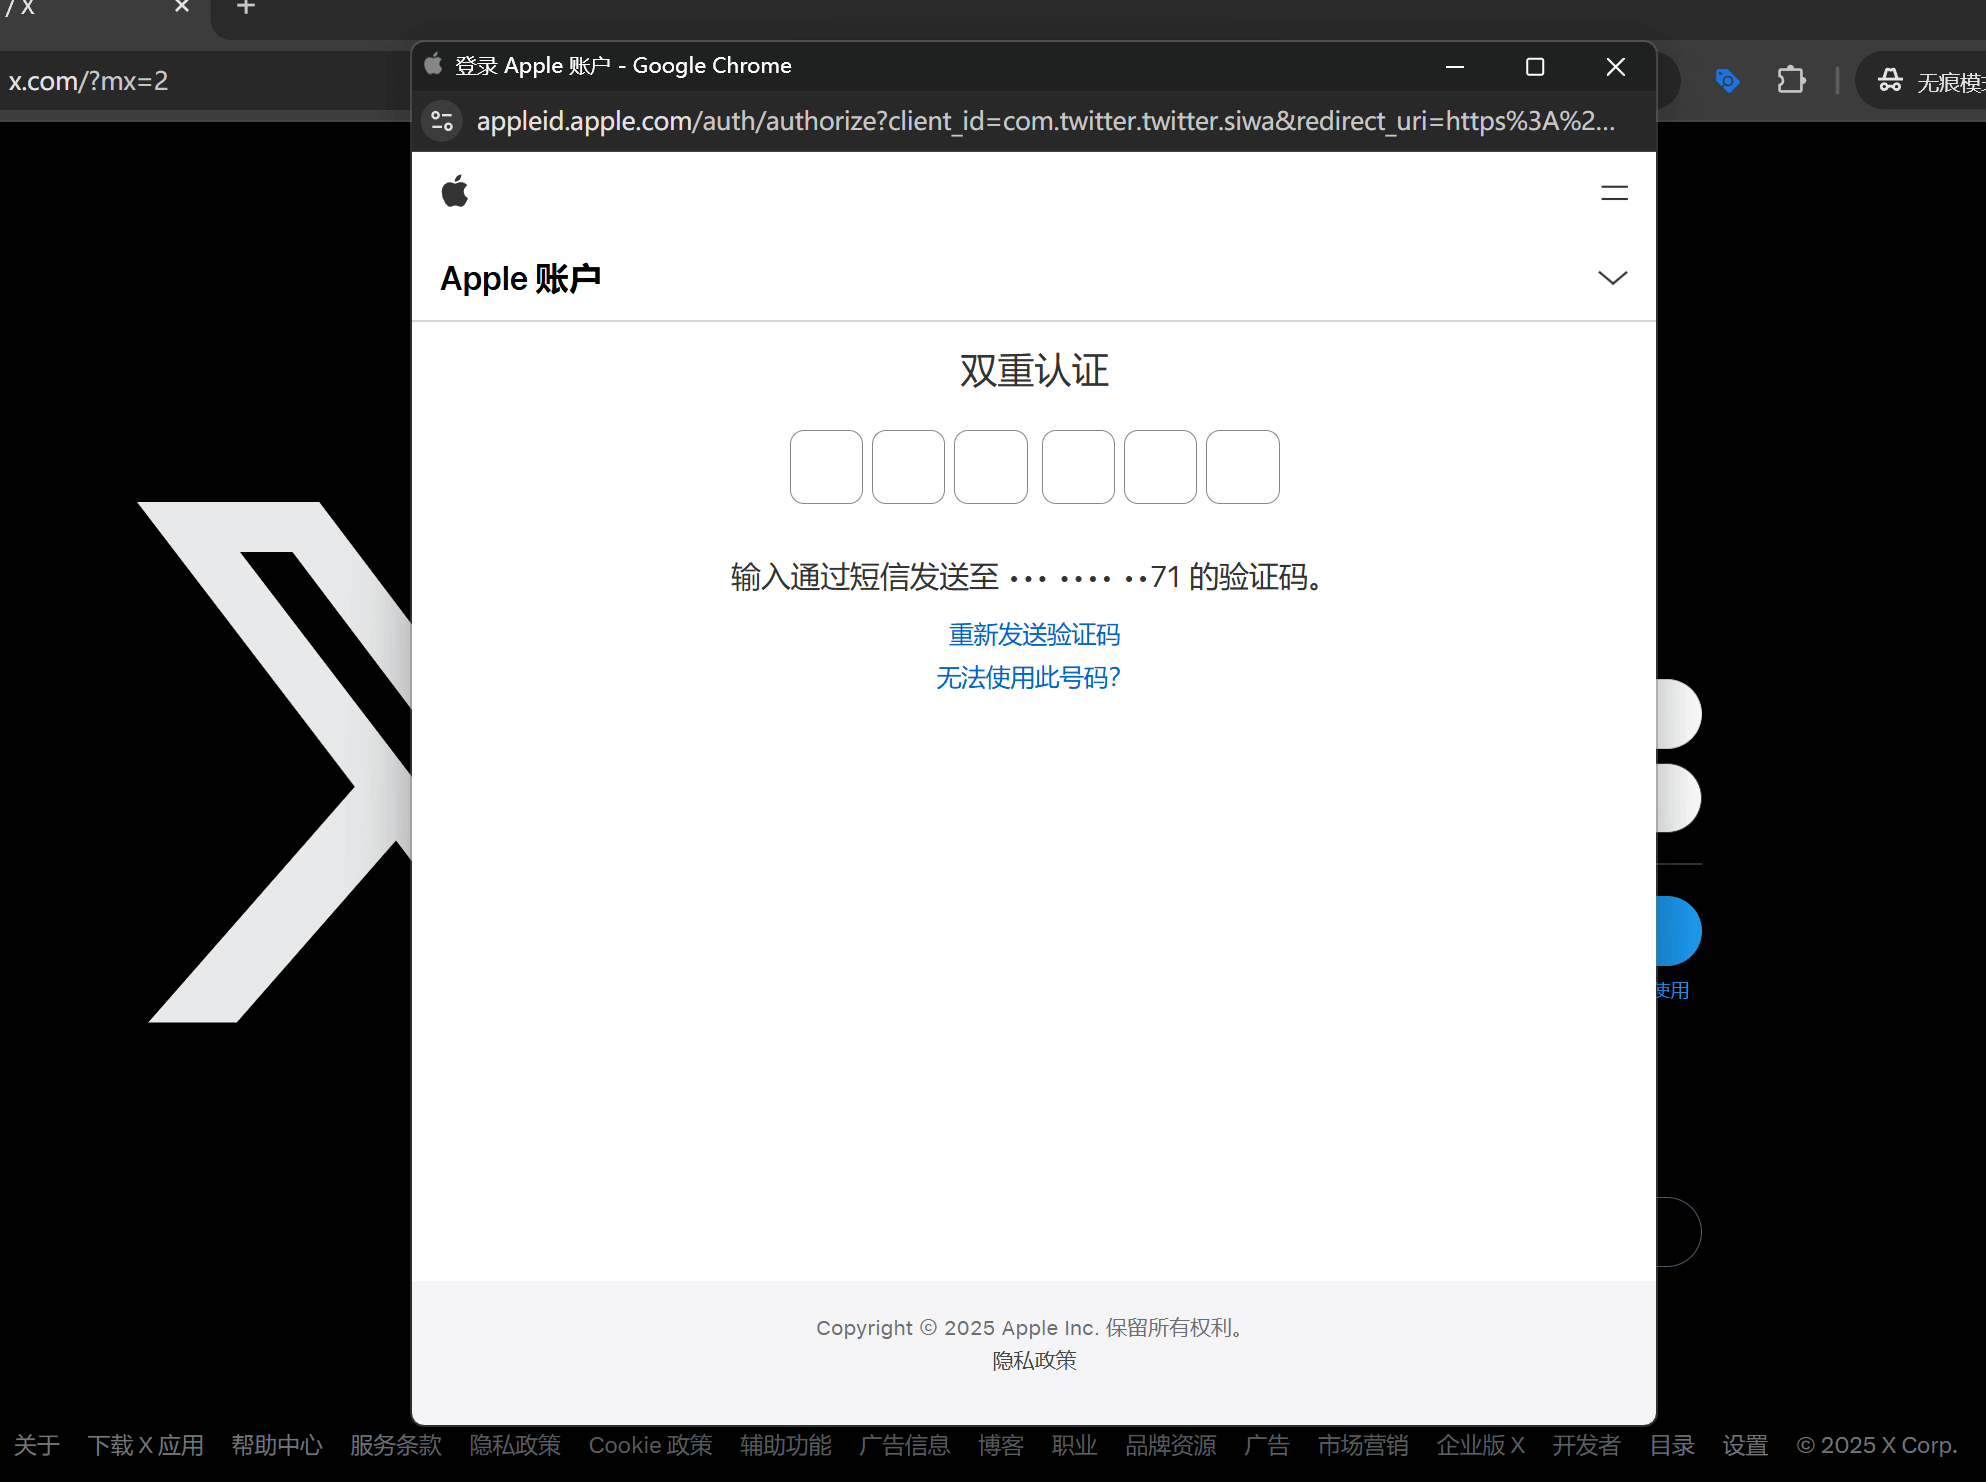
In the above step, after successfully verifying the Apple ID and password, registering for Twitter using an Apple account still requires completing an additional verification process, as shown in the image above. At this point, Apple will send a 6-digit verification code via SMS to the Apple phone associated with your Apple ID. Simply enter the received verification code into the input field shown in the image and click the verification button. If the code is entered correctly and passes verification, the operation window will automatically proceed to the next screen to continue the registration process.
(5) Step 5: Authorization to log in to Twitter using your Apple ID

As shown in the image above, in this step, we need to complete the authorization confirmation for logging into Twitter using the Apple account. By clicking the "Continue" button, you will grant Twitter access to your Apple account information and complete the authorization process. Once the authorization is confirmed, you will be able to log into Twitter using your Apple account.
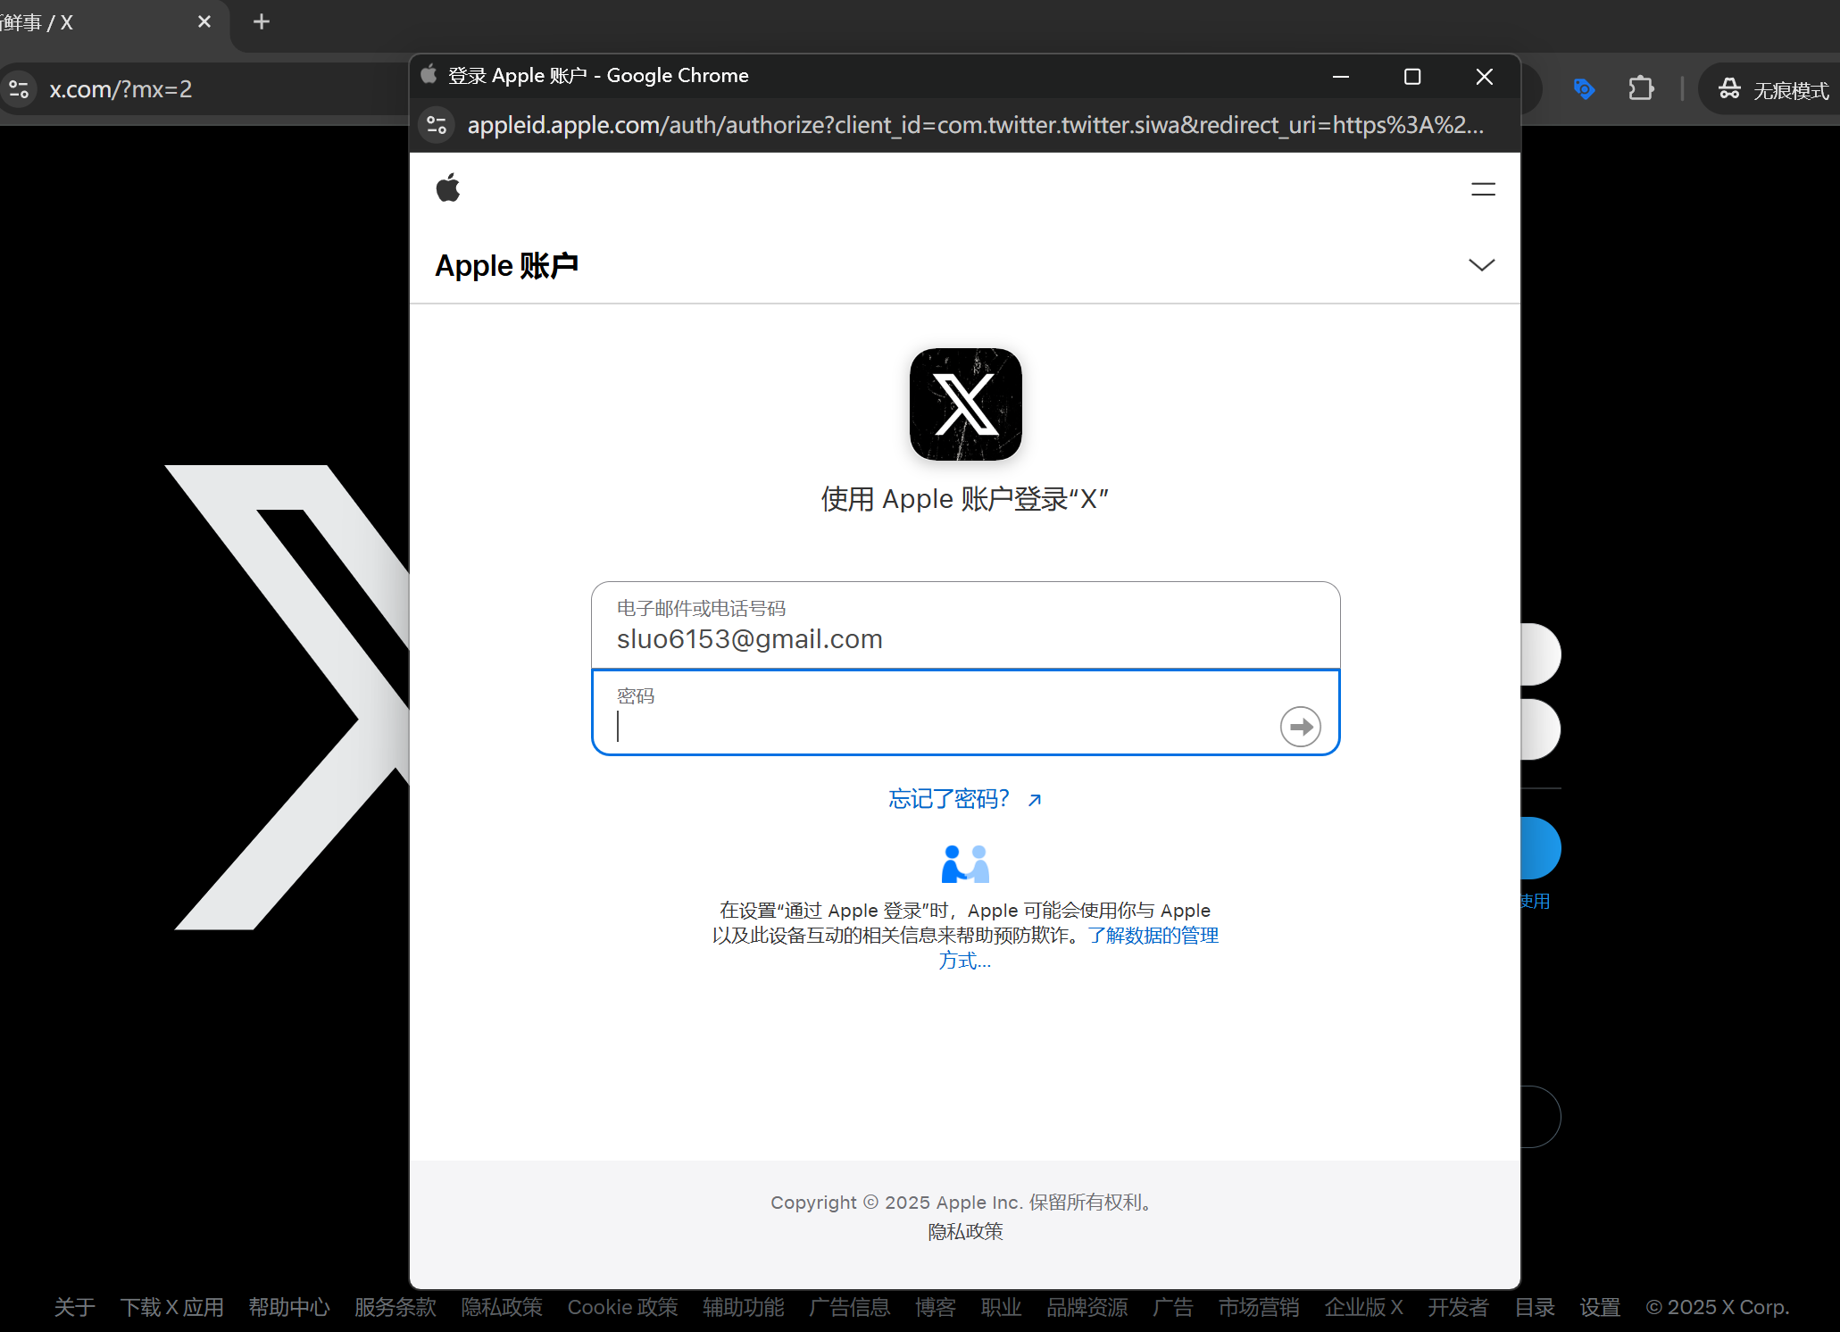
(6) Step 6: Hide or show the email address of the Twitter account
It is recommended that users in China registering for Twitter follow the settings shown in the example image above to avoid email spam and minimize potential policy risks. After selecting "Hide email address," click the "Continue" button to proceed to the next step and complete the process.
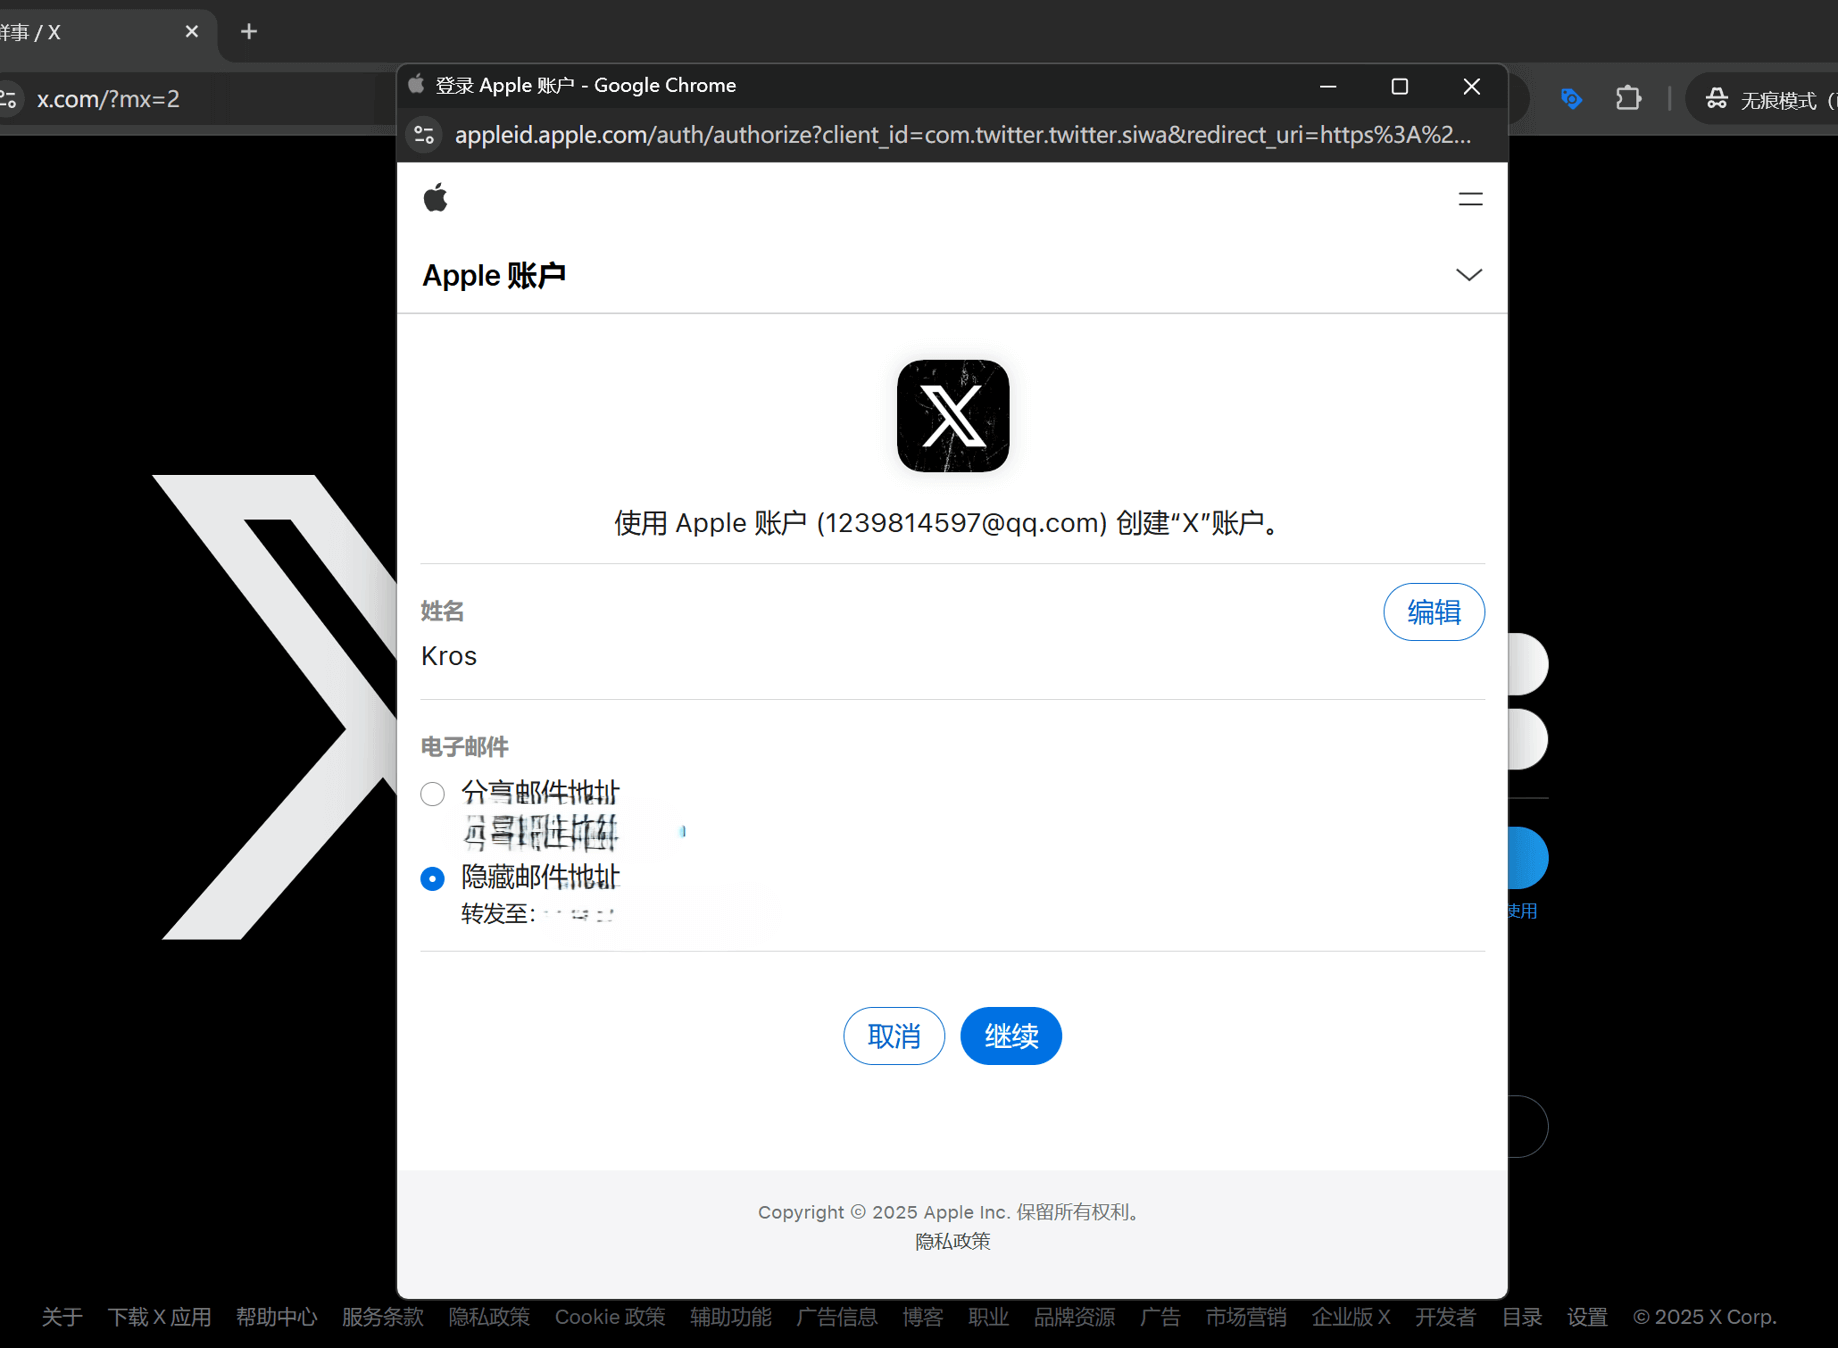
(7) Step 7: Fill in the registration information of the Twitter account
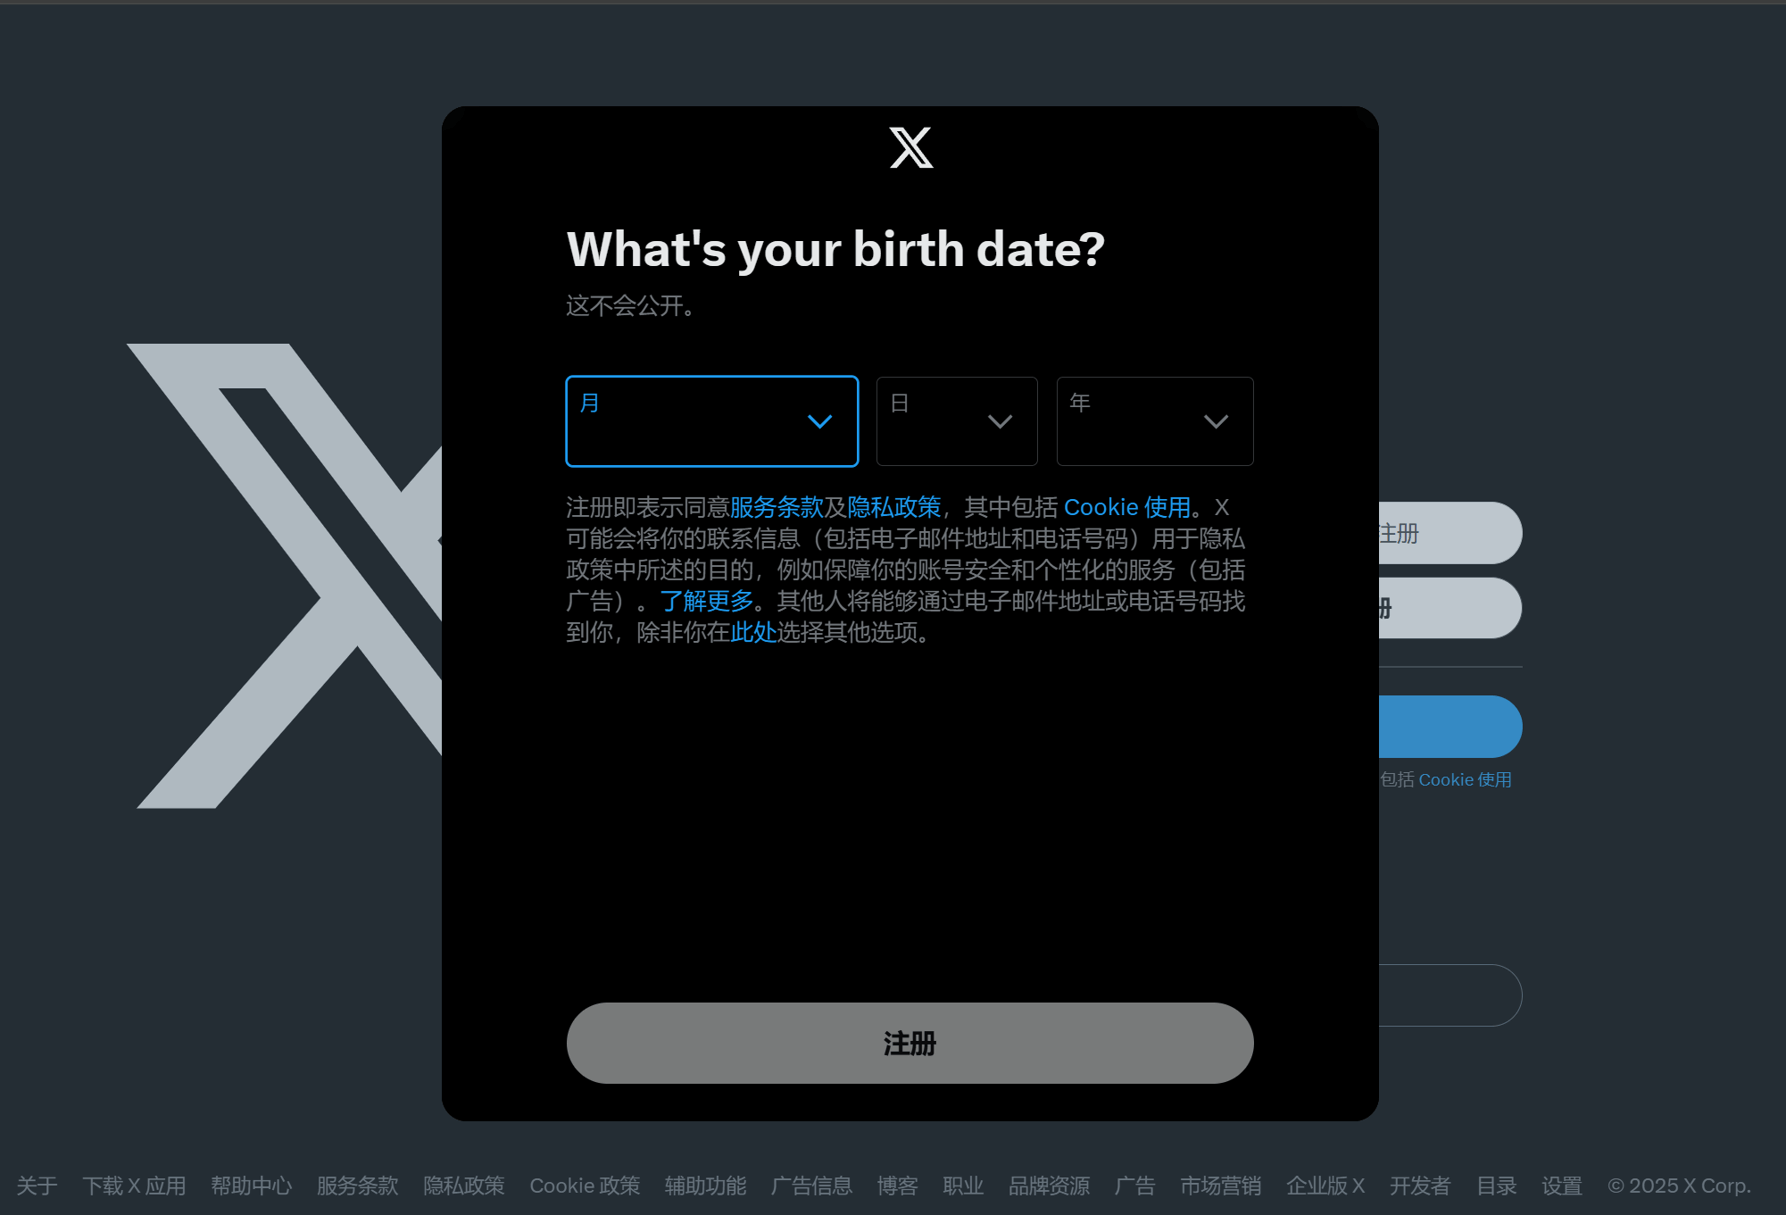
As shown in the image above, this is the user registration information entry interface for registering a Twitter account using an Apple account. You only need to select the birth year, month, and day of the registering user in the corresponding year/month/day selection boxes. Below the year/month/day section, there is also a paragraph about the Twitter Service Terms, Privacy Policy, and Cookie usage instructions. If you're interested, you can click to open them; otherwise, simply click the "Register" button below to complete the entire process of registering a Twitter account using an Apple account. The next steps are technically not part of the registration process but are instead the initialization settings for an already registered Twitter account.
(8) Step 8: Set your Twitter account profile picture
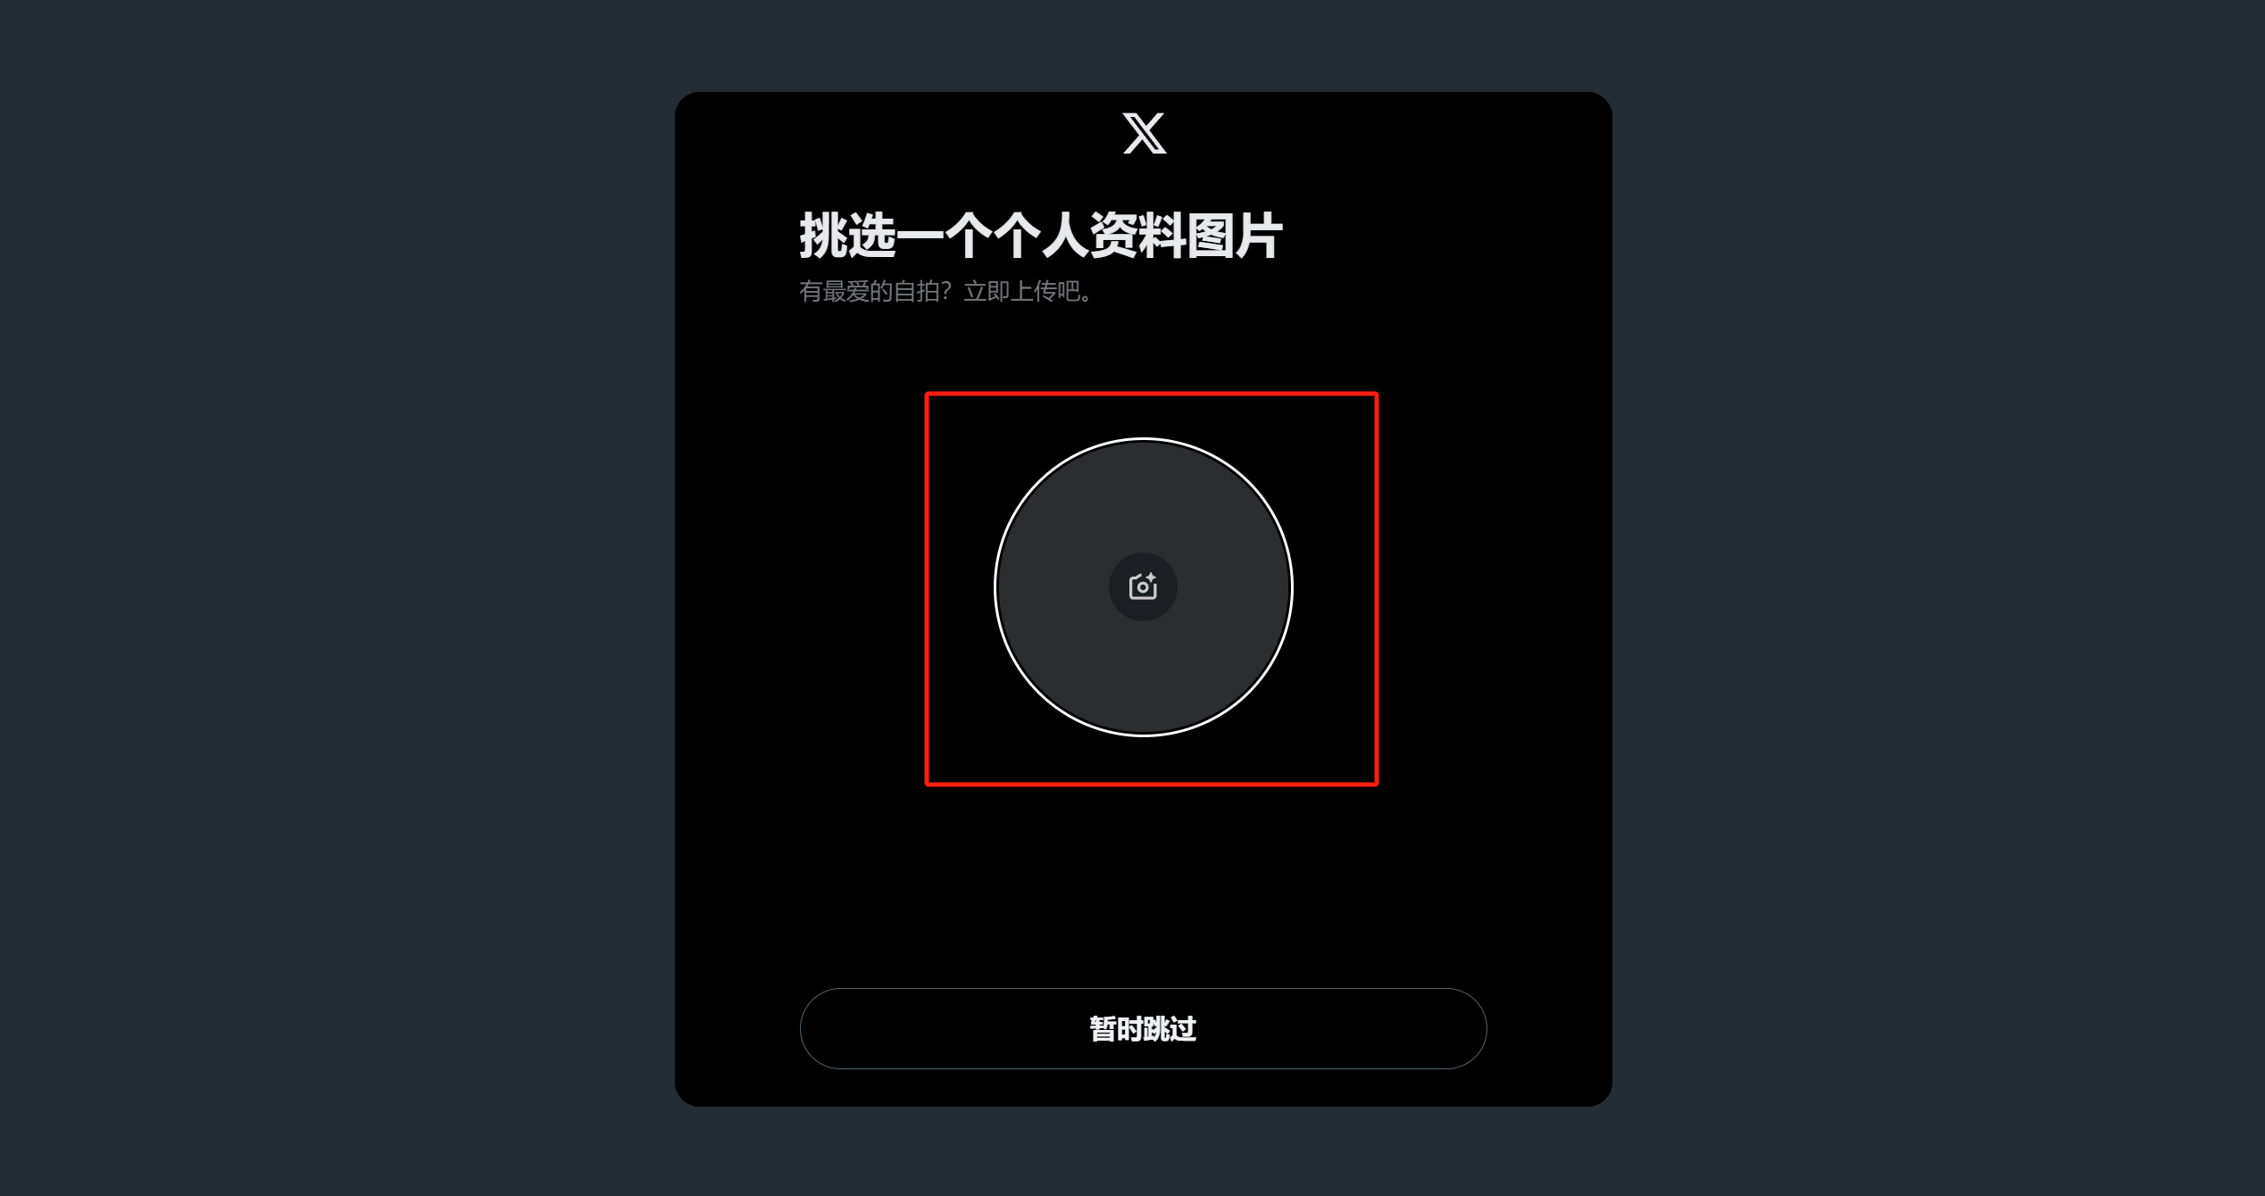
In the current setup window, as shown in the image above, you can set a profile picture for your new Twitter account. Simply click on the area highlighted in the red box in the image to open the avatar file upload feature, choose and upload the avatar you want to use. In this step, you can either set the avatar immediately, or if you prefer not to set it right away, you can click the "Skip for now" button and set it later on your personal homepage. Regardless of the choice, you can always go back to your homepage later to modify and update your avatar.
(9) Step 9: Set your Twitter account username (nickname)
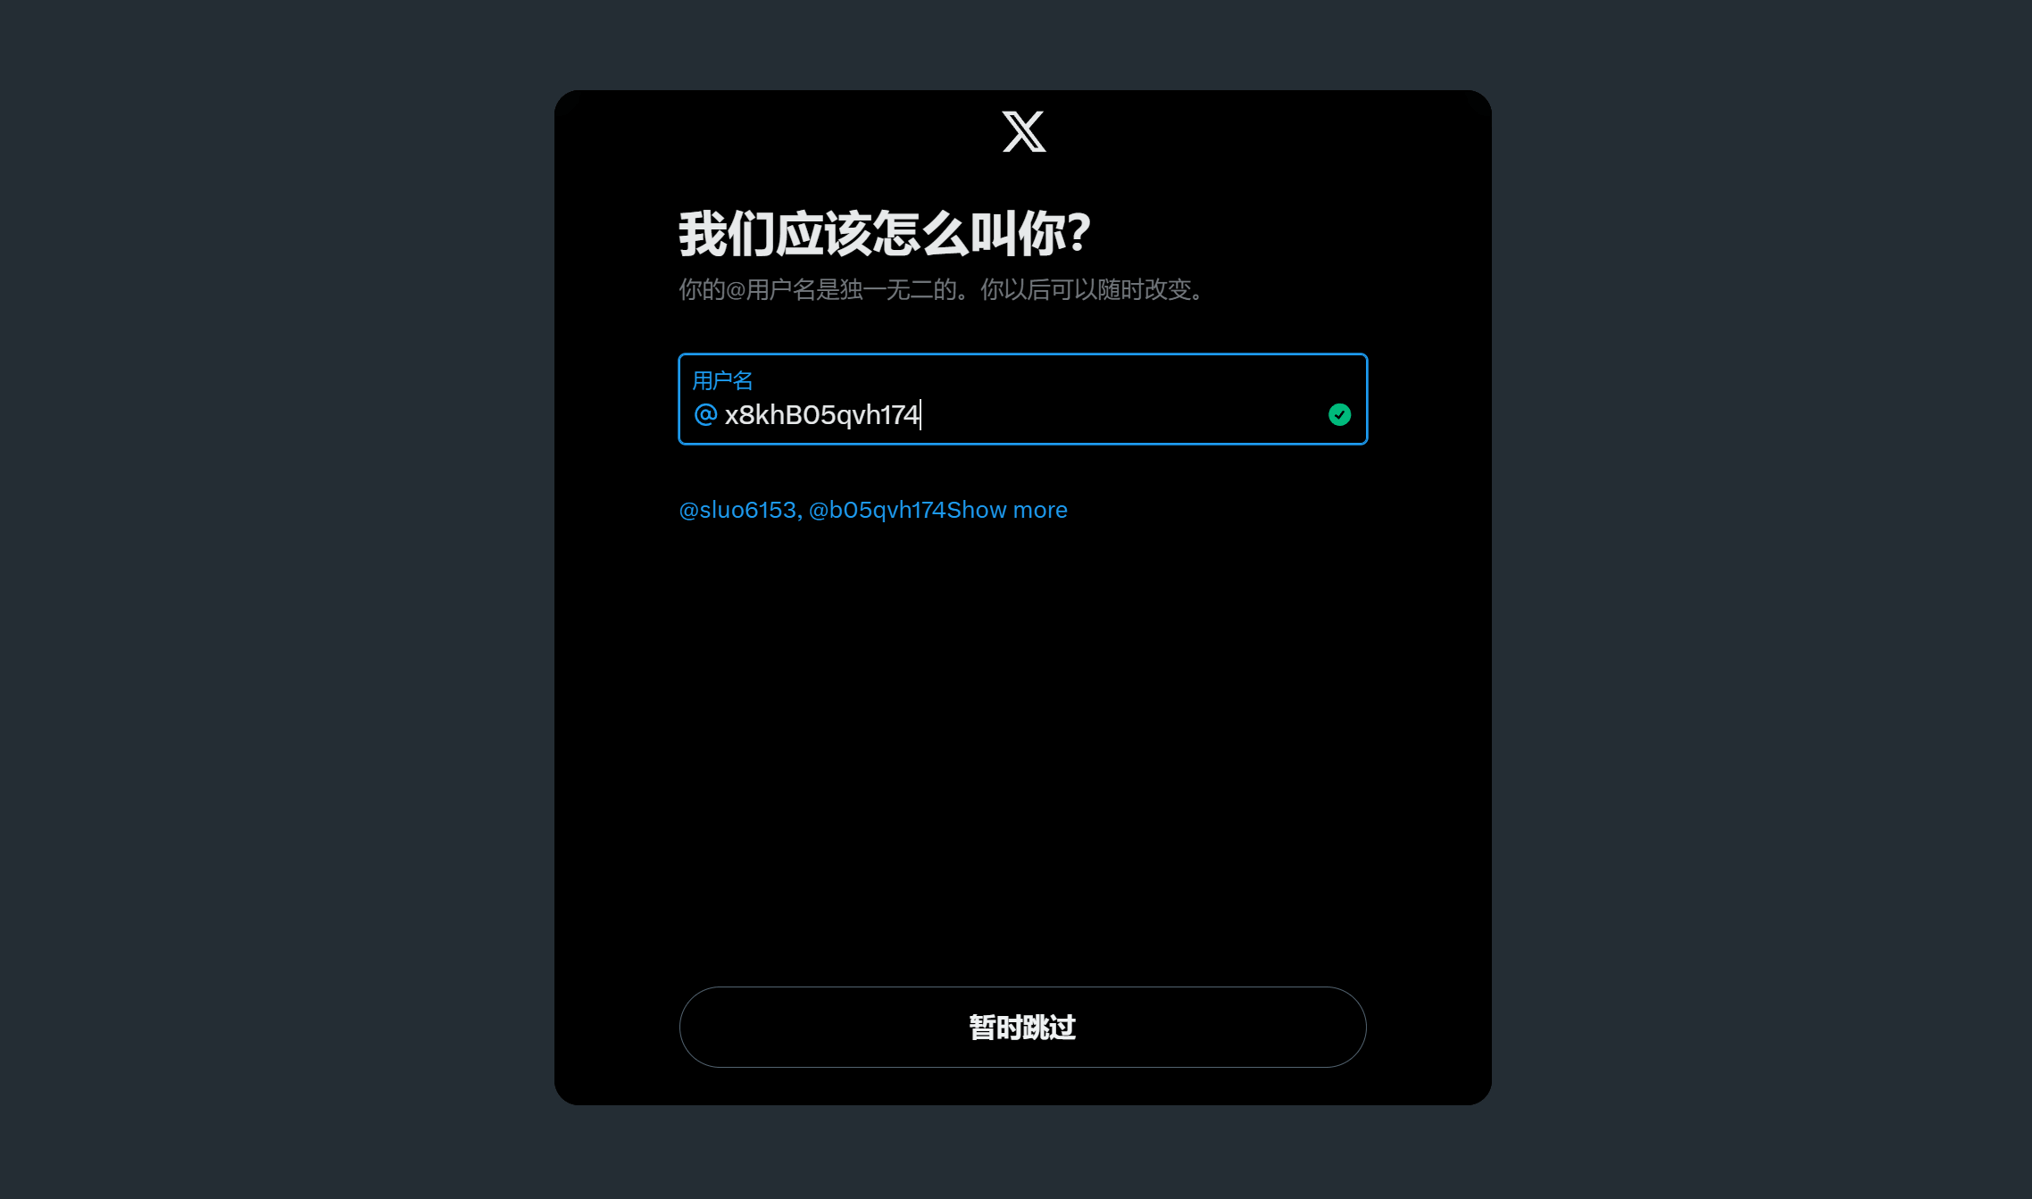
As shown in the image above, this is the window for setting the Twitter account username. The username is the nickname that other users can see on Twitter. You can customize the username here or choose to modify and update it later when you go to your personal homepage. Click the "Skip for now" or "Next" button on the setup window to proceed to the next step and complete the account initialization process.
(10) Step 10: Select the type of content you are interested in watching
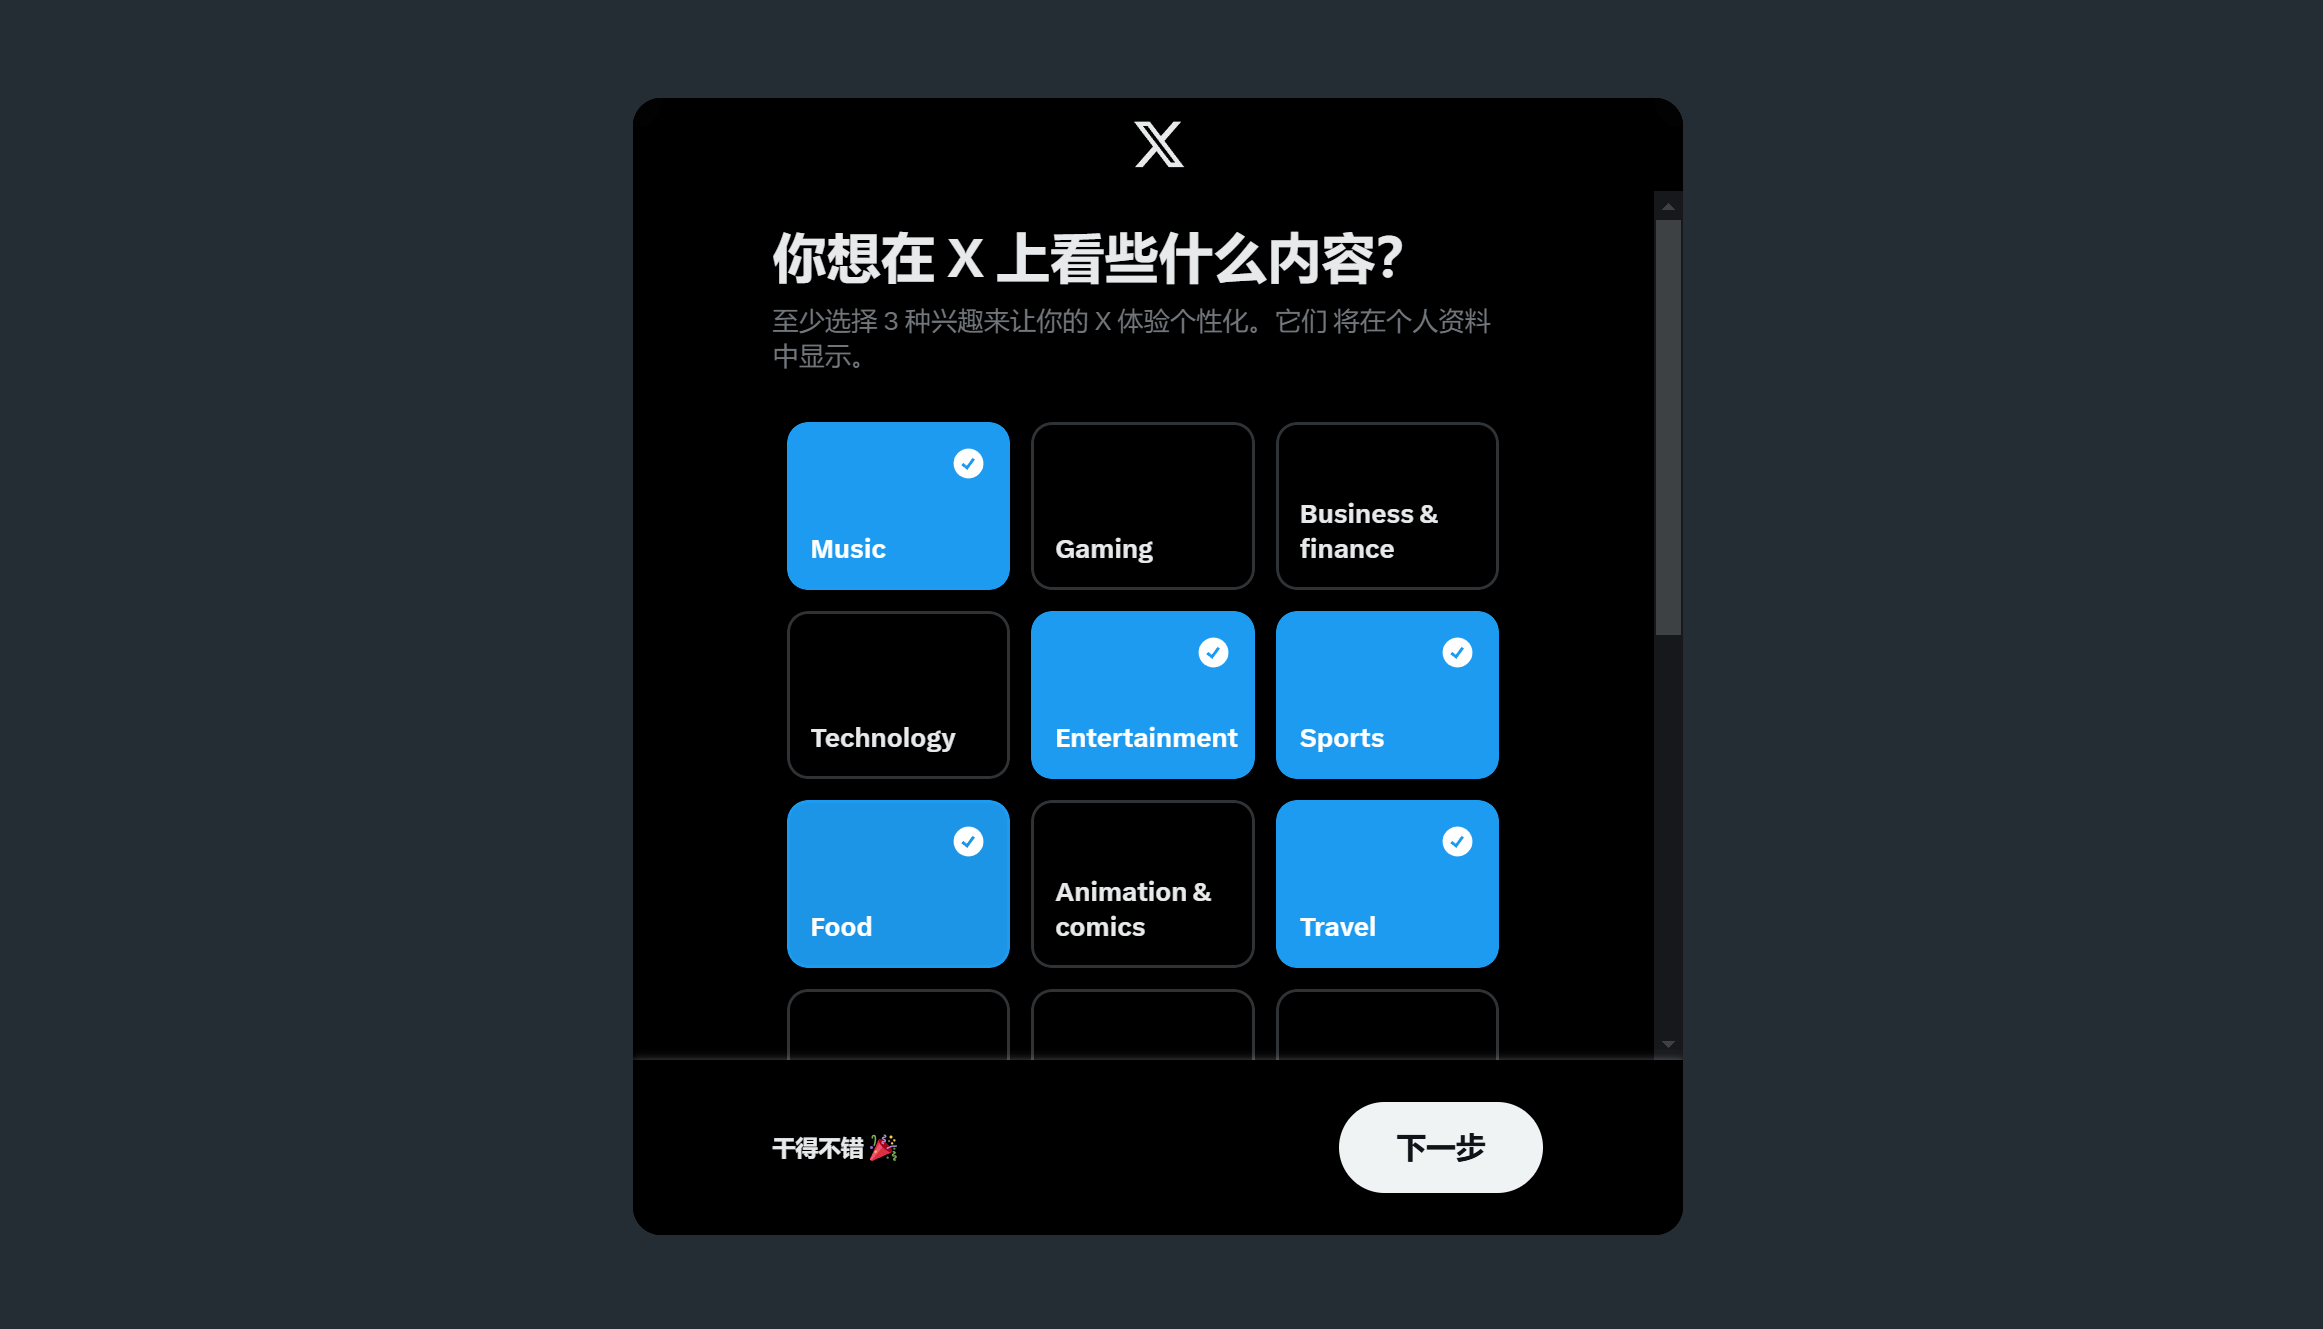
As shown in the image above, during the initialization setup of your new Twitter account, the system will require you to select at least three content types as your interest preferences. This step is designed to help Twitter better understand your interests so it can recommend relevant accounts, topics, and content. Simply click on the options that correspond to your interests, and the selected content types will be highlighted. Once completed, you can proceed to the next setup step.
(11) Step 11: Choose to follow blogger accounts recommended by Twitter
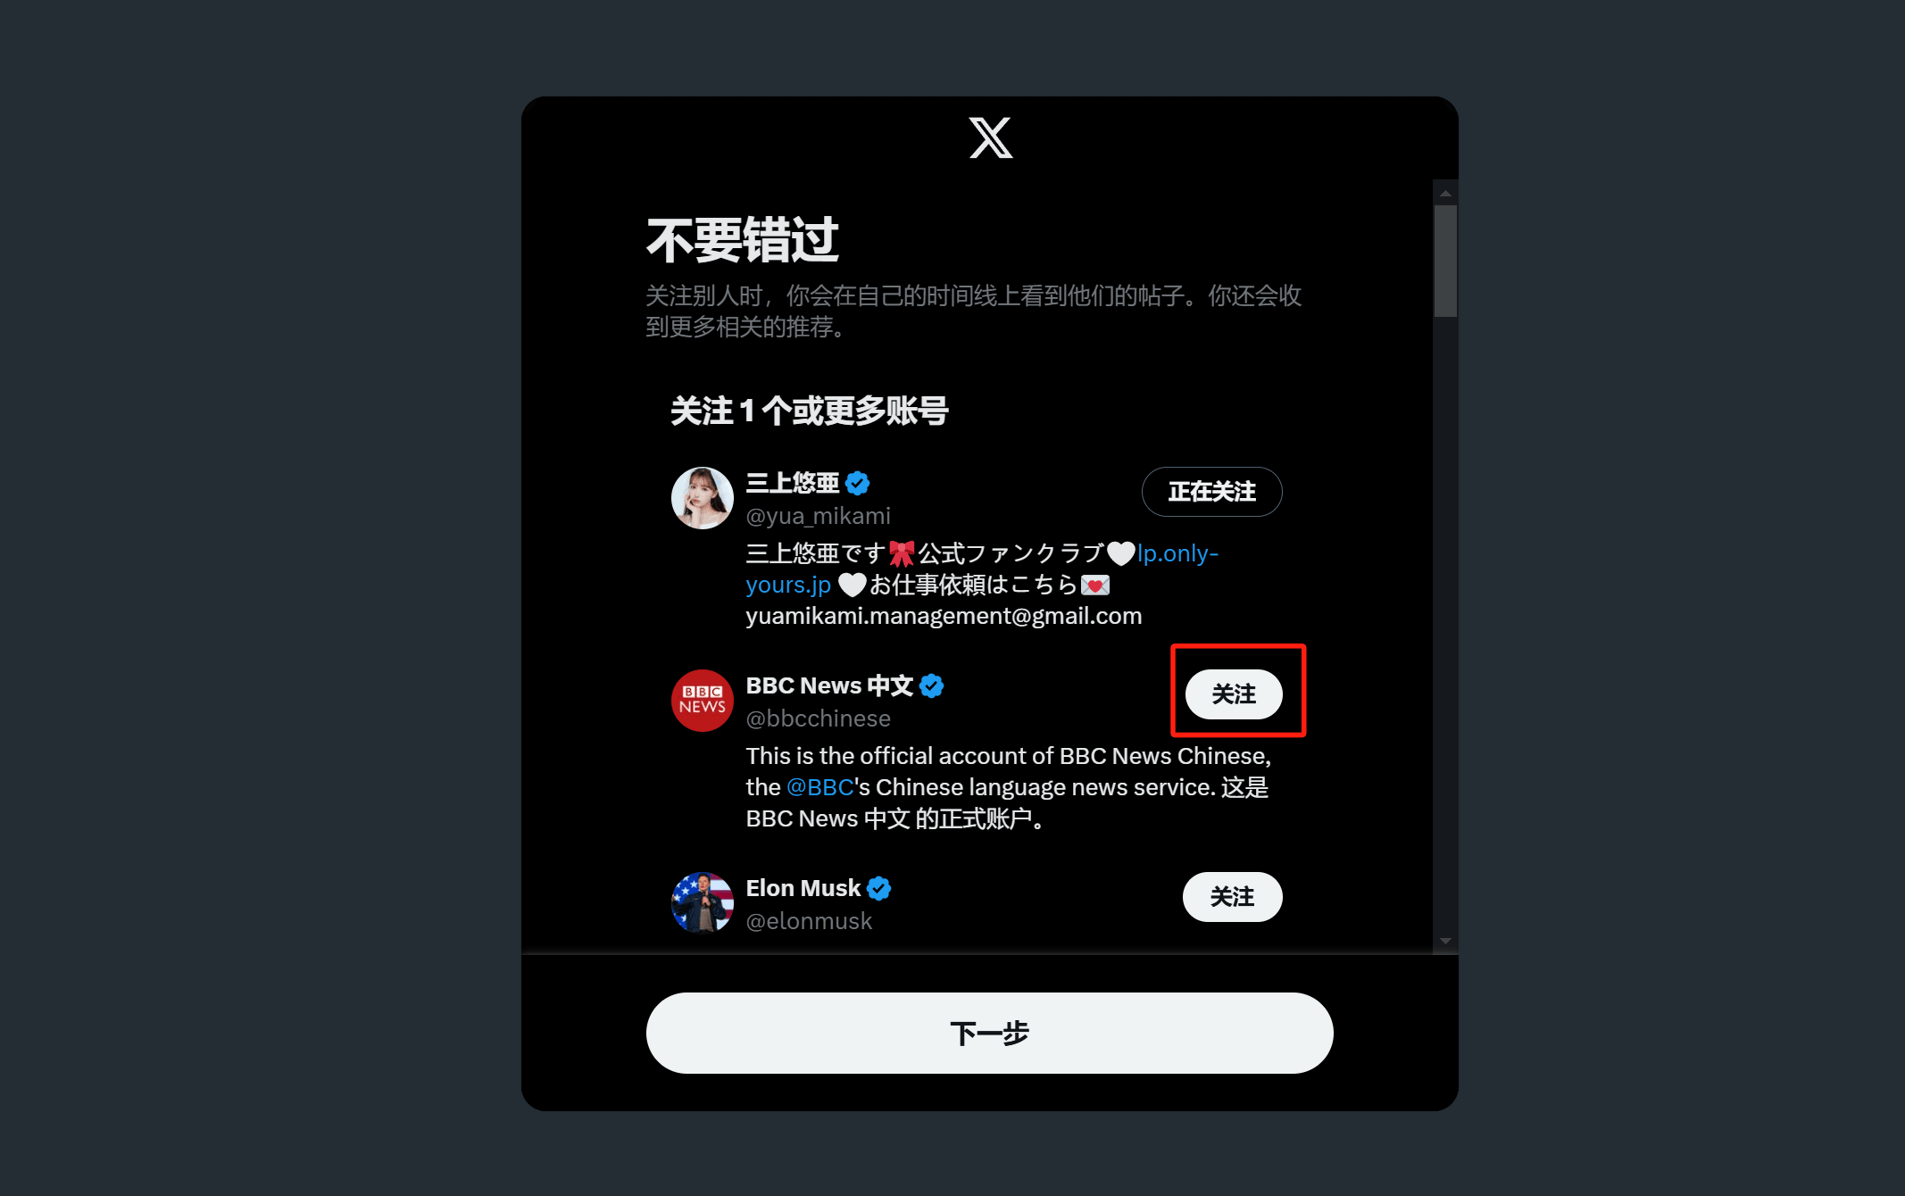
As shown in the image above, in the final step of the initialization setup, the system requires you to follow at least one recommended Twitter account. This step is designed to help Twitter provide more accurate content recommendations based on your interests. Simply click the "Follow" button on the right side of the recommended list to follow at least one account. After completing this action, the "Next" button at the bottom of the page will become highlighted and clickable, allowing you to proceed with the next steps and complete the entire initialization setup process.
(12) Step 12: Complete the registration and initialization process with Apple and successfully log in to your Twitter profile

At this point, we have successfully completed the registration using an Apple account and all the initialization setup steps, and we are now logged into the personal homepage of Twitter. From here, you can freely browse content on Twitter, follow interesting accounts, post tweets, and interact with other users. You can also explore more social experiences by trying out various features on Twitter.
3. How to create an account Register a Twitter account
(1) Step 1: Select and click the "Create Account" button

Select and click the "Create Account" button as shown in the red box above, and you will enter the "Create Account" registration process. "Create Account" is the last of the three account registration methods provided by Twitter. Next, you will see the first process step of this method, as shown below.
(2) Step 2: Create your Twitter account
The first operation interface for the "Create Account" registration method is shown in the image above. Here, you need to fill in the basic information for your Twitter account, including your username, email address, and birthdate. Please enter your username and email in the respective fields and select your birthdate from the dropdown menu. After completing this, click the "Next" button to continue the registration process.
(3) Step 3: Real-person verification of Twitter account
As shown in the image above, this step is identical to the first registration method at the beginning of this chapter, specifically the real-person verification operation for registering a Twitter account using a Google account. This is a verification mechanism set up by Twitter's system to prevent bot registrations. First, click the "Verify" button in the window, and the system will redirect to the real-person verification interface, as shown in the image below. At the top of the interface, you will see a prompt text, and the correct answers are listed on the left side. Following the instructions, complete the corresponding answer matching operations in the right-hand operation area, as indicated by the arrows. After confirming that the first answer matches correctly, click the "Submit" button and proceed with the matching operations for the second and third items. Once all three matching answers are correctly completed, the page will automatically redirect to the next step, which is the fourth step of the process.
(4) Step 4: Fill in the verification code received in the Twitter registration email
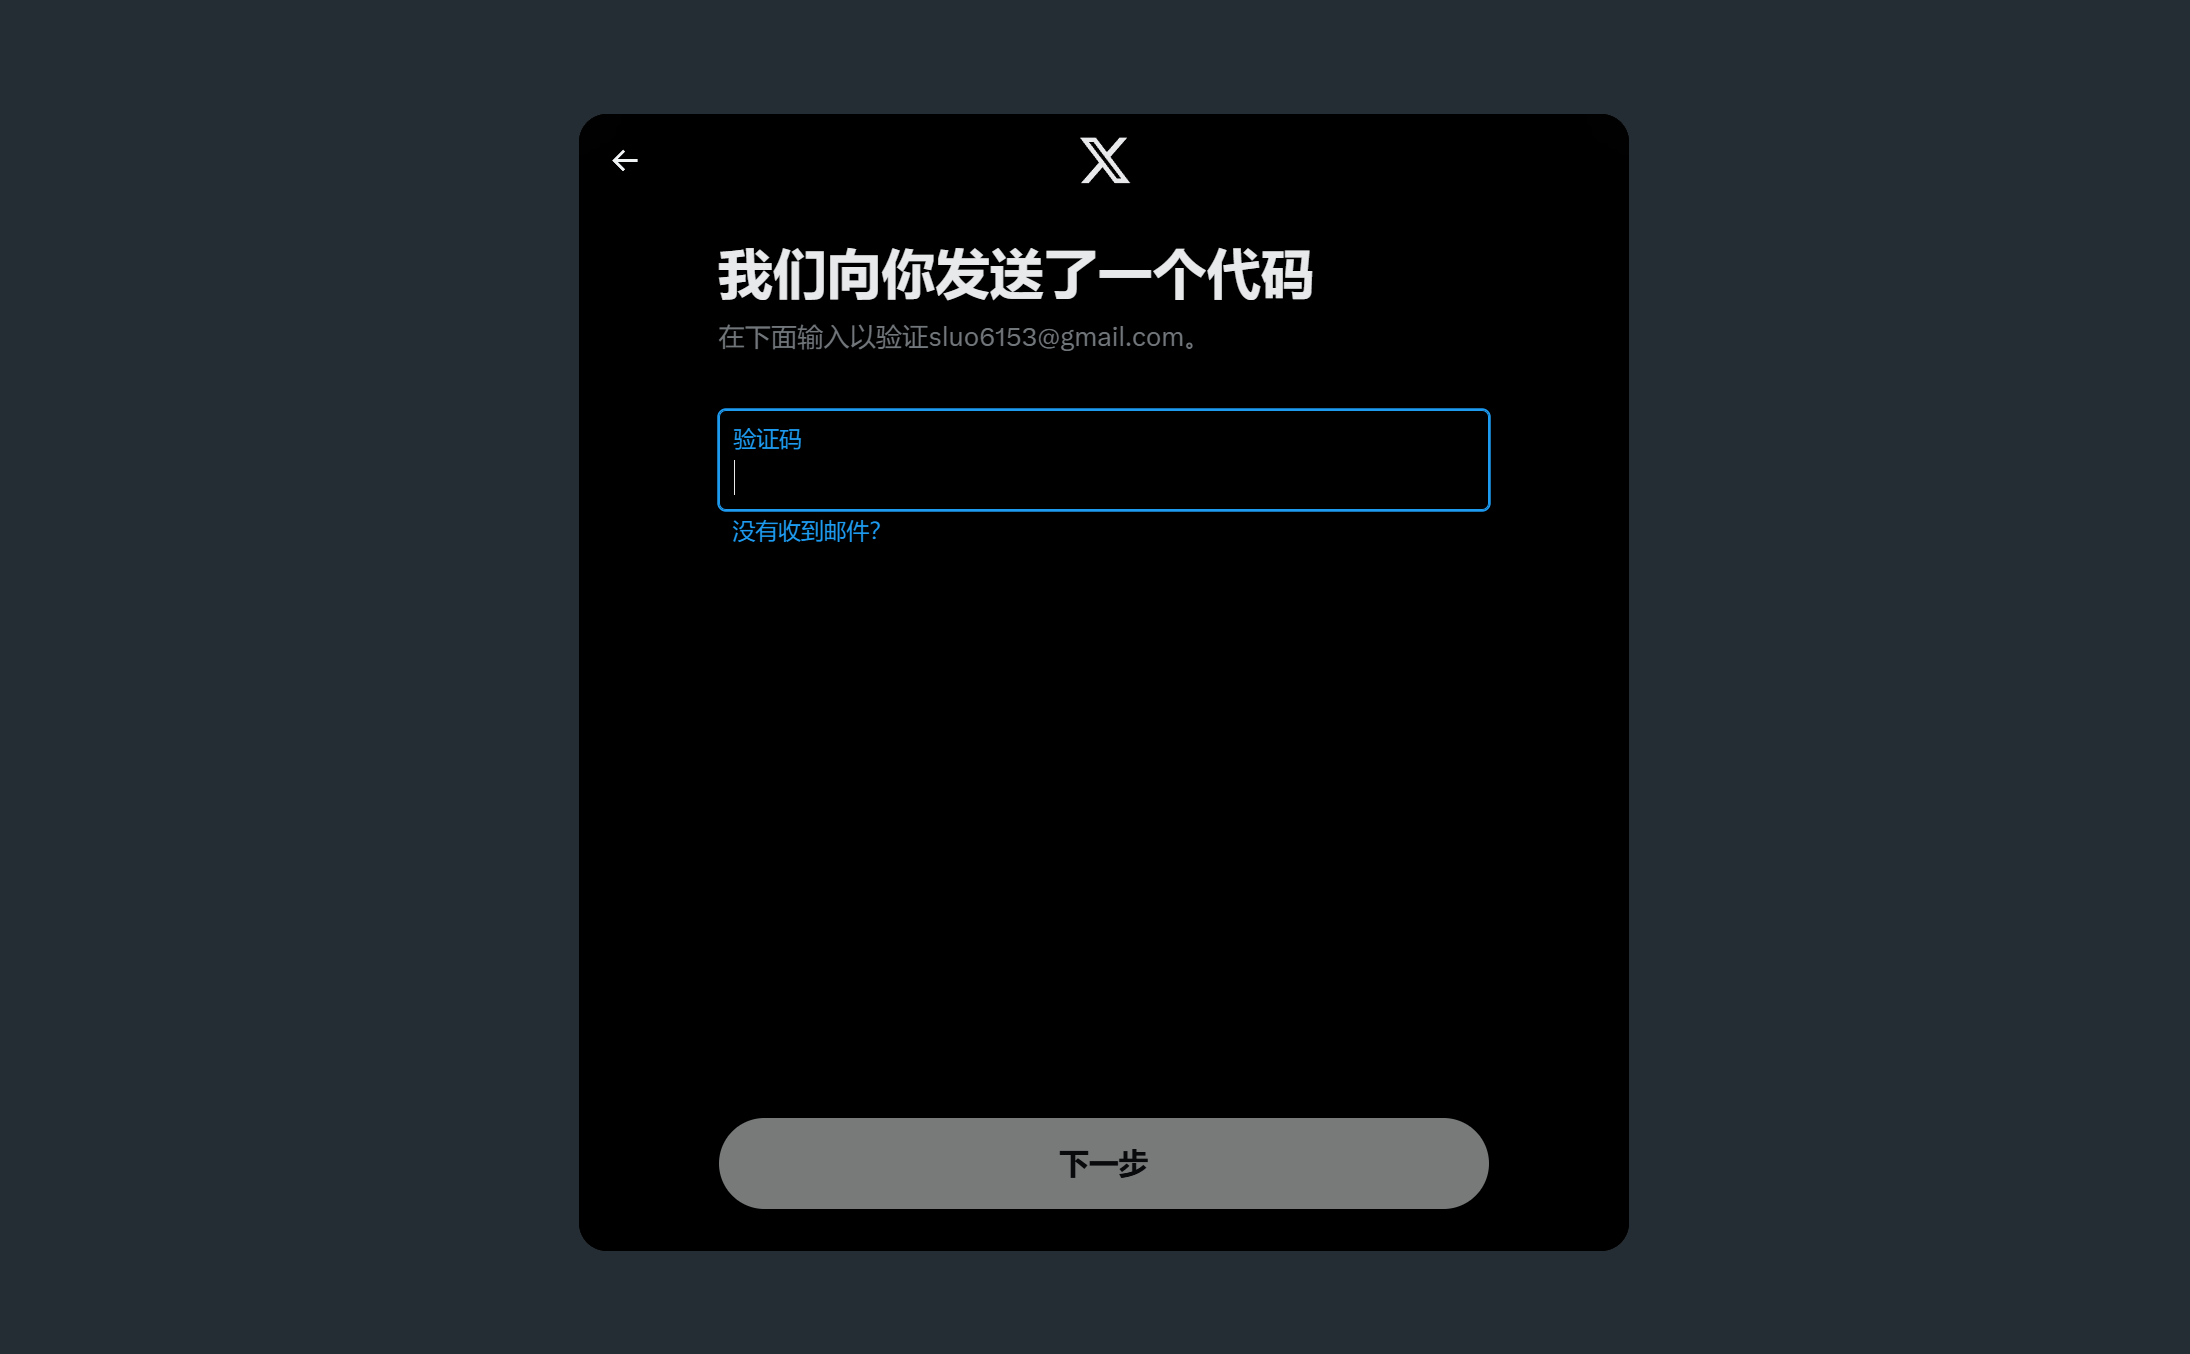
Go to the email address you used to register your Twitter account and check the verification code sent by Twitter. Copy or enter the verification code into the verification code input box as shown above. After entering the verification code, the "Next" button in the window will be activated and clickable. Click the "Next" button to continue.
(5) Step 5: Create a Twitter account login password
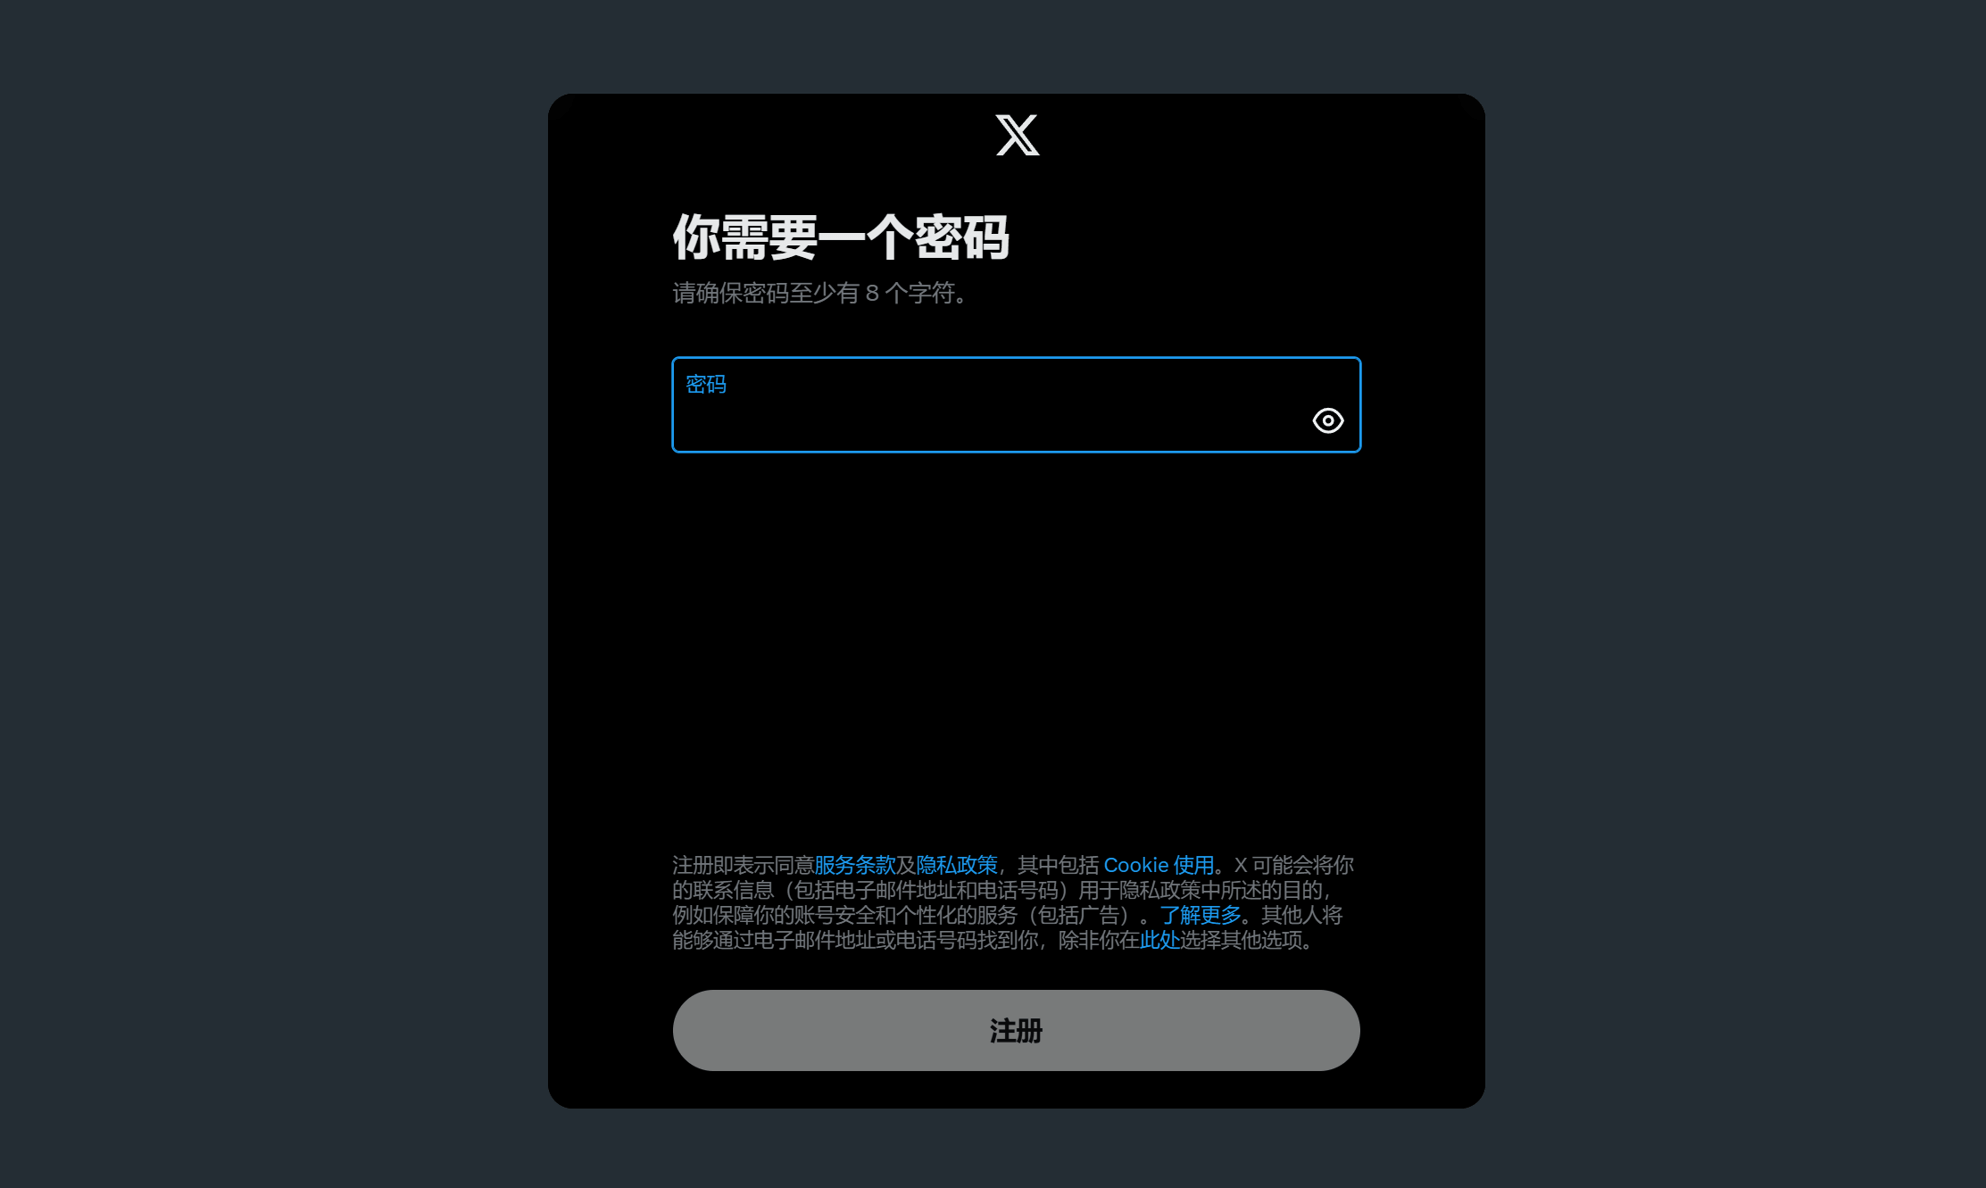
As shown in the image above, we need to create a login password for the registered Twitter account. In the password input field of this window, create a custom password that is at least 8 characters long. After entering the password, be sure to back it up to avoid forgetting it. Below the window, there are brief descriptions of Twitter's Terms of Service, Privacy Policy, and Cookie Use Policy. You can click to view the full content of these policies. Readers who are interested can click the blue anchor text to read the terms, while those who are not interested can simply click the "Sign Up" button to continue with the account initialization process.
(6) Step 6: Set your Twitter account profile picture
When you see the operation window as shown above, it means that the registration process for your Twitter account has been completed. Next, we will move on to the initialization setup phase. As shown in the image, the first setup option is to add a profile picture. You can click the red box area to select and upload your profile picture file. If you don't want to set a profile picture at this time, you can completely skip this step. All initialization settings can be completed later when you visit your Twitter personal homepage. If you choose not to set a profile picture for now, simply click the "Skip for now" button at the bottom of the window to continue with the setup process.
(7) Step 7: Set your Twitter account username
This step is to set the username for your Twitter account. The username is the nickname that will be displayed on the account and visible to others. After entering your desired custom word or characters in the username input field, click the "Next" button. If you don't want to set a username at this moment, you can leave the default symbol in the input field and click the "Skip for now" button to proceed to the next step.
(8) Step 8: Choose the type of content you want to follow on Twitter
Whether you register using a Google account, an Apple account, or choose to create a new account, the steps for the initialization setup are almost the same. During this stage, selecting the content types you want to follow on Twitter is also an essential part of the setup. According to the prompt text at the top of the operation window, you need to select at least 3 types of content you are interested in. The selected content types will be highlighted (as shown in the image above). Once you have made your selections, click the "Next" button to continue with the next part of the initialization setup.
(9) Step 9: Twitter recommends blogger accounts to follow
As shown in the image above, in the final step of the initialization setup, the system requires you to follow at least one recommended Twitter account. The follow button is located on the right side of the recommended list (as highlighted in the red box in the image). Only after completing the follow action will the "Next" button at the bottom of the page change from its default grey, non-clickable state to an activated, clickable state. This setup is designed to ensure that users interact with at least some of the system's recommended content, helping Twitter personalize recommendations more effectively. Once we click the "Next" button again, we will successfully enter the personal homepage of the Twitter account.
(10) Step 10: Successfully create an account and complete the Twitter account registration to enter the account homepage
At this point, you have successfully registered a Twitter account through the "Create Account" method. You can now use all Twitter features, including following bloggers, posting tweets, browsing news, etc.
Conclusion: This article is the fifth in the series on applying for registration for international internet application services and social media platforms. Associated with this article, the series includes tutorials on registering accounts for international application services and social media platforms. The blogger has previously published four articles, namely, "Google Email Registration Tutorial," "Instagram Account Registration Tutorial," "Facebook Registration Tutorial," and "YouTube Registration and Login." Readers interested in opening more international social media platforms for website traffic generation or personal social experiences can choose to read more in the "Learn More" section at the bottom of this page.
Finally, if your purpose for registering and using X is for cross-border e-commerce website marketing, and your website is still in the planning stage, and you need professional answers regarding webpage design or functionality development, or if you are looking to get a project development quotation, feel free to contact the Logic Digital Technology team. Logic Digital Technology specializes in WordPress website building and technical development. If you need assistance with website design, development, and implementation, we will provide you with efficient, professional solutions to help your cross-border e-commerce business succeed.
This article is copyrighted by Logic Digital Technology (SZLOGIC). Personal sharing is welcome to help more users in need of registering a Twitter account. Unauthorized commercial use or reproduction of this article is strictly prohibited.